Showing posts with label jquery mobile. Show all posts

Wednesday, 28 December 2016

The Quest For Mobile Knowledge (Part 1/2)

Back in 2013, I started experimenting with mobile development after obtaining my first smartphone. I borrowed a copy of Android Application Development for Dummies from the library, downloaded a working version of Android Studio, and got to coding.


I met with mixed results, and my progress was slow. Sure, my code worked, but only because I typed everything from the example faithfully. I had no idea why it was working. All I really gained from the experience was the knowledge that XML supplied the user interface markup and Java did the rest. Self-learning wasn't cutting it. I needed guidance; being told when I was doing it wrong, and when I was doing it right.

It was around this time in 2014 when I finally decided to get off my arse and work towards a third Diploma. I had just turned 37, settled in a new job, and the time seemed ripe. Before that, I had a Bachelor's Degree and Diploma in Information Technology, and a Specialist Diploma in E-commerce Technology. Diversify or die, that had been the mantra since I left the desktop support job back in 2008. One area that really stood out for me was mobile technology. Having been in web development for years now, I knew mobile technology was here to stay. And learning this stuff could only improve my web dev cred in terms of responsive design, front-end work and cross-platform compatibility. So I looked back to my two alma maters in Temasek Polytechnic and Singapore Polytechnic, but for pragmatic purposes, I chose to take up night classes in the latter as it was a stone's throw from my place.

Meet my classmates 

The first day was a little bit of a culture shock. I know that globalization and Singapore's liberal labor laws had increased the percentage of foreign labor, but still I was in for a little surprise when I realized that less than a quarter of the class were local professionals. Roughly half were from India. Burmese, Filipinos and Singaporeans made up the rest. Were my fellow citizens that set against self-improvement? Was that why I was hearing so many complaints about their jobs being taken away by "invaders"?

Even among the local professionals, there weren't many like me - a code monkey looking to expand his skill-set. They were mostly at managerial level trying to gain an understanding of mobile technology, probably so that they wouldn't get gypped by vendors. There were even a couple of network technicians. Now, I'm not disparaging network techs at all; in fact networking was one of the toughest subjects for me back in school and I have nothing but respect for those who are good enough at it to ply it as a trade. However, the fact remains that these guys not only had never done any kind of software development (much less web development), they had never written a single line of code in their careers. It leads me to think that they hadn't really thought this through and all they were doing was trying to cash in on the Government grants for professional development. And that whoever was vetting suitable applicants for the course, had either been snoozing that day, or taken a very liberal view as to what constituted "experience in web or software development".

All in all, my foreign classmates seemed more my kind of people. And so the first semester began...

Term 1

It all started out mostly with basic Java. Having my roots in C++, PHP and JavaScript made this a breeze. Having spent a year using almost exclusively C# back in 2012, sure didn't hurt. I got through the basics fairly quickly; in fact the real value of these lessons lay in using an IDE such as Eclipse for the first time. I gave myself a little test, implementing what I had done for this web tutorial, in Java. It was completed within minutes. I supplemented all this by reading Java SE 7 Programming Essentials by Michael Ernest. It's a good reference and I hope to review it sometime on this blog.


Concurrently, we were learning the theory behind mobile technology, what constituted web applications, native applications and hybrid applications. To further cement what I was learning, I blogged about it. This phase was more about drawing wireframes and mocking up mobile applications. I took special note of the tools used, such as Pencil. They would come in handy during my day job.

Term 2 

Now we were having fun in Java. We learned the basics of Object-oriented Programming in Java, and I began applying those concepts to my work in PHP and JavaScript as well. I'm not sure this actually improved the robustness of my work, but it definitely made it more extensible. And then we started making GUIs in Java, using the Swing library. This turned out to be interesting, and after handing in my project, I decided to embark on my own project - a memory game written in Java. To that end, I needed to use some stuff that wasn't covered by the lessons, such as timer functions for animations. Frequent reference to Oracle's documentation did the trick.


I'd be remiss here if I didn't give a little shout-out to my tenant Zhao from Guangdong, China. He'd been renting my guest bedroom for the past couple years. Sure, he had his little eccentricities that drove me nuts, such as this habit of singing cheesy pop songs in the middle of the night over and over, leaving the bathroom lights on the entire day… but he was also experienced in Java and a great help whenever I hit a wall. We had also begun learning JQuery Mobile, and this meant I was picking up jQuery as well. I practised what I could with jQuery, the results of which you can see in this web tutorial during Easter.


Again, to further drill in the process of creating a Single-page hybrid app in jQuery Mobile and porting it over to mobile using Cordova, I created a few apps in my own time - an expense tracker (which I’m still using to this day), a household chores tracker, and a mobile compass. During an annual medical checkup, my doctor gave me a valuable piece of advice: if I wanted to succeed at something, I had to make it part of my daily routine. In fact, I had to make it a part of me as much as possible. (She was actually referring to the task of lowering my cholesterol levels, but that’s another tale for another day.) That got me thinking. I wanted to manage my expenses better, right? And my household chores. And I wanted to learn how to make mobile apps.

The obvious solution? Make mobile apps to track my expenses and manage my household chores! I had learned all this really cool stuff, now I simply needed to apply it.

Next

A look at Semester 2

Wednesday, 15 June 2016

Web Tutorial: The Scrooge Expense Tracker Mobile App (Part 4/4)

Welcome to the final installment of this web tutorial. In this, we'll be putting up the final screen of the Scrooge app.

This screen is not on featured any of the links in the footers of the previous screens. In fact, it's accessible only via the "entries" screen we set up in the previous part of this web tutorial. For this, we'll be copying the HTML template for the "settings" page, and renaming it "dailyentry".

        <div data-role="page" id="settings" data-theme="b">
            <div data-role="header" data-position="fixed">
            SETTINGS
            </div>

            <div data-role="main" class="ui-content">
                <div data-role="fieldcontainer">
                <label for="txtA">Category A: </label>
                <input id="txtA_name" name="txtA" placeholder="Enter title...">
            </div>
            <div data-role="fieldcontainer">
                <label for="txtB">Category B: </label>
                <input id="txtB_name" name="txtB" placeholder="Enter title...">
            </div>
            <div data-role="fieldcontainer">
                <label for="txtC">Category C: </label>
                <input id="txtC_name" name="txtC" placeholder="Enter title...">
            </div>
            <div data-role="fieldcontainer">
                <label for="txtD">Category D: </label>
                <input id="txtD_name" name="txtD" placeholder="Enter title...">
                </div>
            <div data-role="fieldcontainer">
                <label for="txtD">Monthly Budget: </label>
                <input id="txtBudget" name="txtD" placeholder="Enter amount..." onchange="fixinput(this,2);">
                </div>
            <div data-role="fieldcontainer">
                <label for="txtD">Interval (days): </label>
                <input id="txtInterval" name="txtD" placeholder="Enter days..." onchange="fixinput(this,0);">
                </div>
            <a href="#settings" data-role="button" data-icon="edit" onclick="update_settings();">Edit</a>
            </div>

            <div data-role="footer" data-position="fixed">
                <a href="#selectdate" data-icon="info">Select Month</a>
                <a href="#entries" data-icon="grid">Entries</a>
                <a href="#settings" data-icon="gear">Settings</a>
            </div>
        </div>

        <div data-role="page" id="dailyentry" data-theme="b">
            <div data-role="header" data-position="fixed">
               
            </div>

            <div data-role="main" class="ui-content">               

            </div>

            <div data-role="footer" data-position="fixed">
                <a href="#selectdate" data-icon="info">Select Month</a>
                <a href="#entries" data-icon="grid">Entries</a>
                <a href="#settings" data-icon="gear">Settings</a>
            </div>
        </div>


Now fill it in with the following code. You'll notice it's pretty similar to the code we did for the "settings" page, except that for categories A, B, C and D, we'll be entering in numbers instead of text. Hence each of these fields will trigger the fixinput() function when changed. When the edit button is clicked, the update_dailyentry() function is fired off. The pnlDay span element is used to display the current day the user is editing.
        <div data-role="page" id="dailyentry" data-theme="b">
            <div data-role="header" data-position="fixed">
                DAILY ENTRY for <span id="pnlDay"></span>
            </div>

            <div data-role="main" class="ui-content">               
                <div data-role="fieldcontainer">
                    <label for="txtA" id="lblA">Category A: </label>
                    <input id="txtA_amount" name="txtA" placeholder="Enter amount..." onchange="fixinput(this,2);">
                </div>
                <div data-role="fieldcontainer">
                    <label for="txtB" id="lblB">Category B: </label>
                    <input id="txtB_amount" name="txtB" placeholder="Enter amount..." onchange="fixinput(this,2);">
                </div>
                <div data-role="fieldcontainer">
                    <label for="txtC" id="lblC">Category C: </label>
                    <input id="txtC_amount" name="txtC" placeholder="Enter amount..." onchange="fixinput(this,2);">
                </div>
                <div data-role="fieldcontainer">
                    <label for="txtD" id="lblD">Category D: </label>
                    <input id="txtD_amount" name="txtD" placeholder="Enter amount..." onchange="fixinput(this,2);">
                </div>
                <div data-role="fieldcontainer">
                    <label for="txtD" id="lblD">Comments: </label>
                    <textarea id="txtComments" name="txtComments" placeholder="Enter comment..."></textarea>
                </div>
                <a href="#dailyentry" data-role="button" data-icon="edit" onclick="update_dailyentry();">Edit</a>
            </div>
           
            <div data-role="footer" data-position="fixed">
                <a href="#selectdate" data-icon="info">Select Month</a>
                <a href="#entries" data-icon="grid">Entries</a>
                <a href="#settings" data-icon="gear">Settings</a>
            </div>
        </div>


So let's see what the screen looks like. You will access this page from the table links in the "entries" page. Looks all right, except that data needs to be pre-filled in.


This is what we'll be doing next. Set up the code below. Firstly, the pnlDay span element is populated with the date of the day that data is being entered for. This is derived from the glb_currentyear, glb_currentmonth and glb_currentday global variables. The glb_currentday variabe was set in the goto_dailyentry() function prior to redirection to the "dailyentry" screen.
                $(document).on("pagebeforeshow", "#settings", function(event, data)
                {
                    $("#txtA_name").val(glb_settings[0].name);
                    $("#txtB_name").val(glb_settings[1].name);
                    $("#txtC_name").val(glb_settings[2].name);
                    $("#txtD_name").val(glb_settings[3].name);
                    $("#txtBudget").val(glb_settings[4].budget);
                    $("#txtInterval").val(glb_settings[5].interval);
                });

                $(document).on("pagebeforeshow", "#dailyentry", function(event, data) 
                {
                    var showdate=new Date(glb_currentyear,glb_currentmonth-1,glb_currentday,0,0,0,0);
                    $("#pnlDay").html(showdate.toDateString());
                });

                function fixinput(varobj,vardec)
                {
                    if (isNaN(varobj.value)||varobj.value.trim()=="")
                    {
                        varobj.value=(0).toFixed(vardec);
                    }
                    else
                    {
                        varobj.value=parseFloat(varobj.value).toFixed(vardec);
                    }
                }


OK, so take a look now. The day has been filled in nicely.


Next, we take the values of the glb_settings global array and apply them to the labels lblA, lblB, lblC and lblD. So instead of saying "Category A" and so on, the screen will display all the values you entered in the "settings" screen.
                $(document).on("pagebeforeshow", "#dailyentry", function(event, data)
                {
                    var showdate=new Date(glb_currentyear,glb_currentmonth-1,glb_currentday,0,0,0,0);
                    $("#pnlDay").html(showdate.toDateString());

                    $("#lblA").html(glb_settings[0].name);
                    $("#lblB").html(glb_settings[1].name);
                    $("#lblC").html(glb_settings[2].name);
                    $("#lblD").html(glb_settings[3].name);
                });


Awesome, right?


Next, we populate the textboxes using the values found in the archive for this particular date. Since you haven't entered anything, all of the values will be "0.00".
                $(document).on("pagebeforeshow", "#dailyentry", function(event, data)
                {
                    var showdate=new Date(glb_currentyear,glb_currentmonth-1,glb_currentday,0,0,0,0);
                    $("#pnlDay").html(showdate.toDateString());

                    $("#lblA").html(glb_settings[0].name);
                    $("#lblB").html(glb_settings[1].name);
                    $("#lblC").html(glb_settings[2].name);
                    $("#lblD").html(glb_settings[3].name);

                    dayindex=glb_currentday-1;

                    $("#txtA_amount").val(glb_archive[dayindex].A);
                    $("#txtB_amount").val(glb_archive[dayindex].B);
                    $("#txtC_amount").val(glb_archive[dayindex].C);
                    $("#txtD_amount").val(glb_archive[dayindex].D);
                    $("#txtComments").val(glb_archive[dayindex].comments);
                });


This is what you should see now.


Finally, it's time to create the update_dailyentry() function.
        function update_dailyentry()
        {

        }

        function update_settings()
        {
            glb_settings[0].name=$("#txtA_name").val();
            glb_settings[1].name=$("#txtB_name").val();
            glb_settings[2].name=$("#txtC_name").val();
            glb_settings[3].name=$("#txtD_name").val();
            glb_settings[4].budget=parseFloat($("#txtBudget").val()).toFixed(2);
            glb_settings[5].interval=$("#txtInterval").val();

            localStorage.setItem("scrooge_settings", JSON.stringify(glb_settings));

            alert ("Settings saved.");
        }


Not too much to explain here. We take the values of each of the textboxes, cast them into floating point values with two decimal places, and save them into the glb_archive array where we got the values from in the first place. The txtComments textbox too, of course. Then we turn the array into a JSON string using the stringify() method and overwrite the corresponding localStorage value using the setItem() method. And of course, a nice popup tells the user that the data is saved.
        function update_dailyentry()
        {
            dayindex=glb_currentday-1;

            glb_archive[dayindex].A=parseFloat($("#txtA_amount").val()).toFixed(2);
            glb_archive[dayindex].B=parseFloat($("#txtB_amount").val()).toFixed(2);
            glb_archive[dayindex].C=parseFloat($("#txtC_amount").val()).toFixed(2);
            glb_archive[dayindex].D=parseFloat($("#txtD_amount").val()).toFixed(2);
            glb_archive[dayindex].comments=$("#txtComments").val();

            localStorage.setItem("archive_" + glb_currentyear + "_" + glb_currentmonth, JSON.stringify(glb_archive));

            alert ("Daily entry saved.");
        }


Try it!


Check out the changes in your localStorage.


Now, go to your "entries" page. What do you see?


Now keep filling in values for the other days. Then go back to the "entries" page. Do your numbers add up? Now it's time to test the Delete button on your "selectmonth" screen. Click it. Does the archive in the localStorage disappear? Now go back to your "entries" page. Is everything back to "0.00"?

The Scrooge app is complete!

Congratulations, you have a web app, which you can now export into a hybrid mobile app by following these instructions.

Post mortem

This is my virgin attempt at explaining how to create a HTML5-based app for mobile. As such, I'd like to explain a few design decisions I made.

The use of global variables - normally this is frowned on and not really considered "good" programming. Well, it was either use global variables, or install a plug-in to pass variables from one screen to another. The latter seemed totally unnecessary because this app technically consists of one single file. Also, I wanted to keep things as simple as possible for a web tutorial, and including a plug-in seemed counter-intuitive to that.

Lack of structure and coherence - unlike earlier web tutorials where almost every question was addressed right away, there were controls and functions on many screens that had to be explained much later while we dealt with more pressing issues. This is because it's not a single program - it's an app with many moving parts integrated together. And as such, I had to choose what to explain first and what to explain later. It could be because I suck - if that's the case, I can only get better with practice.

Some of the screenshots, especially in the latter parts of this web tutorial, look different. That's because this web tutorial took a while to complete. In between the intervals, the web browser I use for testing and screenshots - Google Chrome - got updated.

This app will be useful. I'd put money on it!
T___T

Monday, 13 June 2016

Web Tutorial: The Scrooge Expense Tracker Mobile App (Part 3/4)

Hello again. Now that we've gone through the localStorage object and figured out how to store and retrieve values from it, it's time to put those values to good use.

Before that, let's go through the data structure of this app. In here, every month's worth of data is represented by a localStorage item. This item will be an array of all the days in that month, and each item in the array will be an object consisting of the expenditure entered for each category ("A", "B", "C" and "D"). Confused? Not to worry, sit tight and allow me to demonstrate. I'm going to create the function addmonthyear().

Before that, however, let's add some global variables to the application. currentdate will hold the value of whichever date it happens to be when the app is being run. glb_archive is the array that holds the objects making up the current month. glb_currentyear, glb_currentmonth and glb_currentday are simply the year, month and day of the entry that is being edited. glb_currentyear and glb_currentmonth are initialized to the value of the current year and month, because these are the values that will be in use on the first screen of this app.
            var currentdate = new Date();
            var glb_settings,glb_archive;
            var glb_currentyear,glb_currentmonth,glb_currentday;

            glb_currentyear = currentdate.getFullYear();
            glb_currentmonth = currentdate.getMonth();


Now we create add_monthyear(). The global variable glb_archive is used here, and it's an array. The variable day starts at 0, and the variable month takes the variable glb_currentmonth and assigns it to the temporary variable monthpointer. Then the variable datepointer is assigned the value of the first day of the month represented by glb_currentmonth.
            function add_monthyear()
            {
                glb_archive = [];
                var day=0;
                var monthpointer=glb_currentmonth;

                var datepointer = new Date(glb_currentyear,monthpointer,1);
            }

            function update_settings()
            {
                glb_settings[0].name=$("#txtA_name").val();
                glb_settings[1].name=$("#txtB_name").val();
                glb_settings[2].name=$("#txtC_name").val();
                glb_settings[3].name=$("#txtD_name").val();
                glb_settings[4].budget=$("#txtBudget").val();
                glb_settings[5].interval=$("#txtInterval").val();

                localStorage.setItem("scrooge_settings", JSON.stringify(glb_settings));

                alert ("Settings saved.");
            }


We now add a While loop. This loop runs as long as the values of month and monthpointer remain the same. Of course, since we've just assigned the value of glb_currentmonth to monthpointer, this will be true right off the bat. So the day element of glb_archive, that is the first element because day is currently at 0, will be assigned an object. The object stores the day, expenditures for categories "A", "B", "C" and "D", and comments. The variable datepointer is advanced to the next day using the setDate() method, day is incremented and monthpointer is assigned the value of the new date represented by datepointer.

monthpointer will remain the same value as glb_currentmonth until datepointer hits the first day of the following month. And at this point, the While loop is exited.
            function add_monthyear()
            {
                glb_archive = [];
                var day=0;
                var monthpointer=glb_currentmonth;

                var datepointer = new Date(glb_currentyear,monthpointer,1);

                while (monthpointer==glb_currentmonth)
                {   
                    glb_archive[day]={"day":day+1,"A":0,"B":0,"C":0,"D":0,"comments":""};

                    datepointer.setDate(datepointer.getDate() + 1);
                    day++;
                    monthpointer=datepointer.getMonth();
                }
            }


So now your glb_archive array has been filled up. We now save it to your localStorage object under the name "archive" and appending the value of the year and month. The value to be saved is the JSON representation of the glb_archive array.

And after this is done, the app automatically brings you to the entries page. I know this looks confusing, but honest to God, the reason for this will be apparent very soon.
            function add_monthyear()
            {
                glb_archive = [];
                var day=0;
                var monthpointer=glb_currentmonth;

                var datepointer = new Date(glb_currentyear,monthpointer,1);

                while (monthpointer==glb_currentmonth)
                {   
                    glb_archive[day]={"day":day+1,"A":0,"B":0,"C":0,"D":0,"comments":""};

                    datepointer.setDate(datepointer.getDate() + 1);
                    day++;
                    monthpointer=datepointer.getMonth();
                }

                localStorage.setItem("archive_" + glb_currentyear + "_" + (glb_currentmonth+1), JSON.stringify(glb_archive));
                $.mobile.changePage("#entries", {transition: "slide"});
            }


When is this function going to be used?

Well, of course it's going to be used. Just not right away. The purpose of writing this function first was to give you a good grasp of the underlying data structure for this app.

And for the next bit...

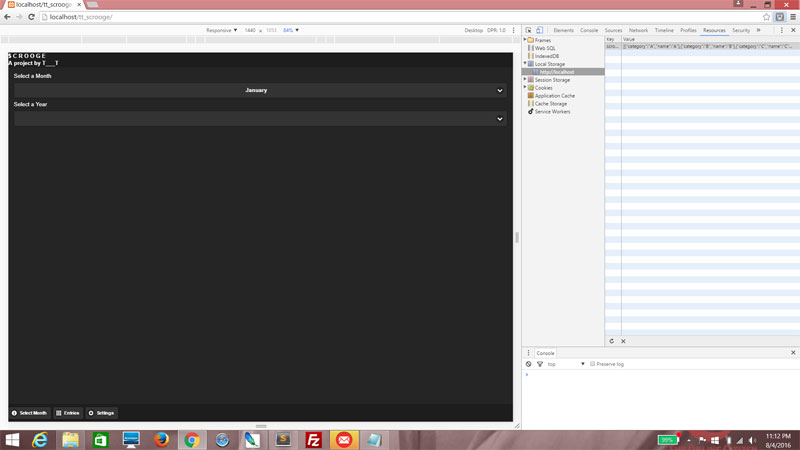
We will be creating the interface for the first page, named "selectdate". It's so named because on the first page, that's exactly what you'll do - select a date. Without further ado, here's the HTML. We've added a label and a drop-down list (id ddlMonth) for the months, then populated it with values from 0 to 11 because JavaScript months are numbered from 0 to 11. Sure, we could do this programmatically, but what the hell, it's only twelve values and one drop-down list, right?
        <div data-role="page" id="selectdate" data-theme="b">
            <div data-role="header" data-position="fixed">
                THE SCROOGE DIRECTIVE<br />A project by T___T
            </div>
            <div data-role="main" class="ui-content">
                <div data-role="fieldcontainer">
                    <label for="ddlMonth">Select a Month</label>               
                    <select name="ddlMonth" id="ddlMonth">
                        <option value="0">January</option>
                        <option value="1">February</option>
                        <option value="2">March</option>
                        <option value="3">April</option>
                        <option value="4">May</option>
                        <option value="5">June</option>
                        <option value="6">July</option>
                        <option value="7">August</option>
                        <option value="8">September</option>
                        <option value="9">October</option>
                        <option value="10">November</option>
                        <option value="11">December</option>
                    </select>
                </div>
            </div>
            <div data-role="footer" data-position="fixed">
                <a href="#selectdate" data-icon="info">Select Month</a>
                <a href="#entries" data-icon="grid">Entries</a>
                <a href="#settings" data-icon="gear">Settings</a>
            </div>
        </div>


For now, let's see what your interface looks like.


Next, we create another drop-down list, ddlYear, for the year. This one we'll leave empty because we'll be filling it in using jQuery.
        <div data-role="page" id="selectdate" data-theme="b">
            <div data-role="header" data-position="fixed">
                THE SCROOGE DIRECTIVE<br />A project by T___T
            </div>
            <div data-role="main" class="ui-content">
                <div data-role="fieldcontainer">
                    <label for="ddlMonth">Select a Month</label>               
                    <select name="ddlMonth" id="ddlMonth">
                        <option value="0">January</option>
                        <option value="1">February</option>
                        <option value="2">March</option>
                        <option value="3">April</option>
                        <option value="4">May</option>
                        <option value="5">June</option>
                        <option value="6">July</option>
                        <option value="7">August</option>
                        <option value="8">September</option>
                        <option value="9">October</option>
                        <option value="10">November</option>
                        <option value="11">December</option>
                    </select>
                </div>
                <div data-role="fieldcontainer">
                    <label for="ddlYear">Select a Year</label>               
                    <select name="ddlYear" id="ddlYear">

                    </select>
                </div>
            </div>
            <div data-role="footer" data-position="fixed">
                <a href="#selectdate" data-icon="info">Select Month</a>
                <a href="#entries" data-icon="grid">Entries</a>
                <a href="#settings" data-icon="gear">Settings</a>
            </div>
        </div>


The ddlYear drop-down list is empty. We'll fix that soon.


After that, we add two buttons. The first button proceeds to the "entries" page using the month selected. The second button deletes the records for the month selected. the set_currentdate() and delete_currentdate() functions will be written, of course. Let's leave that for later.
        <div data-role="page" id="selectdate" data-theme="b">
            <div data-role="header" data-position="fixed">
                THE SCROOGE DIRECTIVE<br />A project by T___T
            </div>
            <div data-role="main" class="ui-content">
                <div data-role="fieldcontainer">
                    <label for="ddlMonth">Select a Month</label>               
                    <select name="ddlMonth" id="ddlMonth">
                        <option value="0">January</option>
                        <option value="1">February</option>
                        <option value="2">March</option>
                        <option value="3">April</option>
                        <option value="4">May</option>
                        <option value="5">June</option>
                        <option value="6">July</option>
                        <option value="7">August</option>
                        <option value="8">September</option>
                        <option value="9">October</option>
                        <option value="10">November</option>
                        <option value="11">December</option>
                    </select>
                </div>
                <div data-role="fieldcontainer">
                    <label for="ddlYear">Select a Year</label>               
                    <select name="ddlYear" id="ddlYear">

                    </select>
                </div>
                <a href="#" data-role="button" data-icon="forward" onclick="set_currentdate();">Go!</a>
                <a href="#" data-role="button" data-icon="delete" onclick="delete_currentdate();">Delete</a>
            </div>
            <div data-role="footer" data-position="fixed">
                <a href="#selectdate" data-icon="info">Select Month</a>
                <a href="#entries" data-icon="grid">Entries</a>
                <a href="#settings" data-icon="gear">Settings</a>
            </div>
        </div>


And here we are...


Add this code. Here, we ensure that the ddlMonth drop-down list's value reflects the value of glb_currentmonth, then we use the selectmenu() method with the argument "refresh" to, well, refresh the display.
            $(document).ready(function()
            {
                if (localStorage.getItem("scrooge_settings") == null)
                {
                    localStorage.setItem("scrooge_settings","[{\"category\":\"A\",\"name\":\"A\"},{\"category\":\"B\",\"name\":\"B\"},{\"category\":\"C\",\"name\":\"C\"},{\"category\":\"D\",\"name\":\"D\"},{\"budget\":\"1000.00\"},{\"interval\":\"5\"}]");
                }

                    glb_settings = JSON.parse(localStorage.getItem("scrooge_settings"));
            });

        $(document).on("pagebeforeshow", "#selectdate", function(event, data) {
            $("#ddlMonth").val(glb_currentmonth).attr("selected", "selected");
            $("#ddlMonth").selectmenu( "refresh" );
        });


Refresh your code. Does the selected value change? Is it the current month?

Editor's Note: It says "May", even though it's currently June. That's because this material was prepared last month. The code is fine. Really.

Next, we clear the ddlYear drop-down list using the empty() method. Then we use a For loop to populate it with years relative to the current year. It's 2016 now, so 2014 and 2015 will be added, then 2016, then 2017. The value of glb_currentyear is selected as default. We then use the selectmenu() method with the argument "refresh" as above.
        $(document).on("pagebeforeshow", "#selectdate", function(event, data) {
            $("#ddlMonth").val(glb_currentmonth).attr("selected", "selected");
            $("#ddlMonth").selectmenu( "refresh" );

            $("#ddlYear").empty();

            for (var i=-2;i<=1;i++)
            {
                yearoption=$("<option value=\""+(currentdate.getFullYear()+i)+"\">"+(currentdate.getFullYear()+i)+"</option>");
                $("#ddlYear").append(yearoption);
            }   

            $("#ddlYear").val(glb_currentyear).attr("selected", "selected");
            $("#ddlYear").selectmenu("refresh");
        });


See the change?


As promised, we'll now create the functions set_currentdate() and delete_currentdate(). These are simple enough. Each function begin by taking the values of the ddlMonth and ddlYear drop-down lists and setting the values of glb_currentmonth and glb_currentyear respectively.
        function fixinput(varobj,vardec)
        {
            if (isNaN(varobj.value)||varobj.value.trim()=="")
            {
                varobj.value=(0).toFixed(vardec);
            }
            else
            {
                varobj.value=parseFloat(varobj.value).toFixed(vardec);
            }
        }

        function set_currentdate()
        {
            glb_currentmonth = parseInt($("#ddlMonth").val());
            glb_currentyear = parseInt($("#ddlYear").val());
        }

        function delete_currentdate()
        {
            glb_currentmonth = parseInt($("#ddlMonth").val());
            glb_currentyear = parseInt($("#ddlYear").val());
        }

        function add_monthyear()
        {
            glb_archive = [];
            var archiveobject;
            var day=0;
            var monthpointer=glb_currentmonth;

            var datepointer = new Date(glb_currentyear,monthpointer,1);

            while (monthpointer==glb_currentmonth)
            {   
                glb_archive[day]={"day":day+1,"A":0,"B":0,"C":0,"D":0,"comments":""};

                datepointer.setDate(datepointer.getDate() + 1);
                day++;
                monthpointer=datepointer.getMonth();
            }

            localStorage.setItem("archive_" + glb_currentyear + "_" + (glb_currentmonth+1), JSON.stringify(glb_archive));
            $.mobile.changePage("#entries", {transition: "slide"});
        }


For the set_currentdate(), we redirect to the entries page immediately after that.
        function set_currentdate()
        {
            glb_currentmonth = parseInt($("#ddlMonth").val());
            glb_currentyear = parseInt($("#ddlYear").val());

            $.mobile.changePage("#entries", {transition: "slide"});
        }

        function delete_currentdate()
        {
            glb_currentmonth = parseInt($("#ddlMonth").val());
            glb_currentyear = parseInt($("#ddlYear").val());
        }


For the delete_currentdate() function, we obtain the archive name from the values of glb_currenthmonth and glb_currentdate, and remove the item from localStorage using the removeItem method. This function is just so you can delete certain archives if you so feel like it.
        function set_currentdate()
        {
            glb_currentmonth = parseInt($("#ddlMonth").val());
            glb_currentyear = parseInt($("#ddlYear").val());

            $.mobile.changePage("#entries", {transition: "slide"});
        }

        function delete_currentdate()
        {
            glb_currentmonth = parseInt($("#ddlMonth").val());
            glb_currentyear = parseInt($("#ddlYear").val());

            var archivename="archive_" + glb_currentyear + "_" + glb_currentmonth;

            localStorage.removeItem(archivename);
            alert("Requested archive deleted.");
        }


Now for the entries page!

We've blabbered long enough about it. In two separate functions, namely add_monthyear() and set_currentdate(), you'll see redirects to this page. So now we're going to work on it. The layout is fairly straightforward - it consists of one table with six columns - one to display the day, for for the categories, and one more for the total. Note that while the columns for "Day" and "Total" are filled in, those for the categories are not. Instead, they're given ids colA, colB, colC and colD respectively. We'll need those ids to fill the column headers in. Remember the previous part of this web tutorial where you tinkered with the settings? Well, that's where they come in!

The table has an id of tblDailyEntries, and I've set the font size to 0.7em because it may get a little cramped otherwise.
        <div data-role="page" id="entries" data-theme="b">
            <div data-role="header" data-position="fixed">
                ENTRIES
            </div>
            <div data-role="main" class="ui-content">               
                <table data-role="table" class="ui-responsive" id="tblDailyEntries" style="font-size:0.7em;">
                    <thead>
                        <tr>
                            <td>Day</td>
                            <td id="colA"></td>
                            <td id="colB"></td>
                            <td id="colC"></td>
                            <td id="colD"></td>
                            <td>Total</td>
                        </tr>
                    </thead>
                    <tbody>

                    </tbody>
                </table>
            </div>
            <div data-role="footer" data-position="fixed">
                <a href="#selectdate" data-icon="info">Select Month</a>
                <a href="#entries" data-icon="grid">Entries</a>
                <a href="#settings" data-icon="gear">Settings</a>
            </div>
        </div>


Before that, check out the entries page you have so far...


So add this to your jQuery script. Upon entering the entries page, we populate the headers colA, colB, colC and colD with the values taken from the glb_settings array.
                $(document).on("pagebeforeshow", "#selectdate", function(event, data)
                {
                    $("#ddlMonth").val(glb_currentmonth).attr("selected", "selected");
                    $("#ddlMonth").selectmenu( "refresh" );

                    $("#ddlYear").empty();

                    for (var i=-2;i<=1;i++)
                    {
                        yearoption=$("<option value=\""+(currentdate.getFullYear()+i)+"\">"+(currentdate.getFullYear()+i)+"</option>");
                        $("#ddlYear").append(yearoption);
                    }   

                    $("#ddlYear").val(glb_currentyear).attr("selected", "selected");
                    $("#ddlYear").selectmenu( "refresh" );
                });

                $(document).on("pagebeforeshow", "#entries", function(event, data) 
                {
                    $("#colA").html(glb_settings[0].name);
                    $("#colB").html(glb_settings[1].name);
                    $("#colC").html(glb_settings[2].name);
                    $("#colD").html(glb_settings[3].name);

                    $("#tblDailyEntries").table( "refresh" );
                });

                $(document).on("pagebeforeshow", "#settings", function(event, data)
                {
                    $("#txtA_name").val(glb_settings[0].name);
                    $("#txtB_name").val(glb_settings[1].name);
                    $("#txtC_name").val(glb_settings[2].name);
                    $("#txtD_name").val(glb_settings[3].name);
                    $("#txtBudget").val(glb_settings[4].budget);
                    $("#txtInterval").val(glb_settings[5].interval);
                });


See? The headers are now updated wth the values you saved in the "settings" screen previously. Don't take my word for it! Go fiddle with the values in the settings page. Save. Come back to the "entries" page. Do the headers get updated?


So next, of course, we'll use the interval and budget values you have assigned to glb_settings.
                $(document).on("pagebeforeshow", "#entries", function(event, data)
                {
                    $("#colA").html(glb_settings[0].name);
                    $("#colB").html(glb_settings[1].name);
                    $("#colC").html(glb_settings[2].name);
                    $("#colD").html(glb_settings[3].name);

                    var budget=parseFloat(glb_settings[4].budget);
                    var interval=parseInt(glb_settings[5].interval);

                    $("#tblDailyEntries").table( "refresh" );
                });


And then we'll get the archive name using the values of glb_currentyear and glb_currentmonth. Variables temprow and temptotal are created for use in populating the table later. The tempsubtotal array is used to store the cumulative subtotals of the A, B, C and D columns.
                $(document).on("pagebeforeshow", "#entries", function(event, data)
                {
                    $("#colA").html(glb_settings[0].name);
                    $("#colB").html(glb_settings[1].name);
                    $("#colC").html(glb_settings[2].name);
                    $("#colD").html(glb_settings[3].name);

                    var archivename="archive_" + glb_currentyear + "_" + glb_currentmonth;
                    var temprow,temptotal;
                    var tempsubtotal=[0,0,0,0,0];
                    var budget=parseFloat(glb_settings[4].budget);
                    var interval=parseInt(glb_settings[5].interval);

                    $("#tblDailyEntries").table( "refresh" );
                });


Next, we check for the existence of the archive in localStorage. If it's null, meaning there's no archive by that name, we run the add_monthyear() function to create one! After that, there will be such an archive, and we'll assign its value to the global variable glb_archive. Then we clear the body of the table in preparation.
                $(document).on("pagebeforeshow", "#entries", function(event, data)
                {
                    $("#colA").html(glb_settings[0].name);
                    $("#colB").html(glb_settings[1].name);
                    $("#colC").html(glb_settings[2].name);
                    $("#colD").html(glb_settings[3].name);

                    var archivename="archive_" + glb_currentyear + "_" + glb_currentmonth;
                    var temprow,temptotal;
                    var tempsubtotal=[0,0,0,0,0];
                    var budget=parseFloat(glb_settings[4].budget);
                    var interval=parseInt(glb_settings[5].interval);

                    if (localStorage.getItem(archivename) == null)
                    {
                        add_monthyear();
                    }

                    glb_archive=JSON.parse(localStorage.getItem(archivename));
                    $("#tblDailyEntries tbody").empty();

                    $("#tblDailyEntries").table( "refresh" );
                });


Take a look at your localStorage. You should see that the archive has been created.


Next, we add a For loop to iterate through the contents of the glbarchive array. temptotal is assigned the total of the values of the A, B, C and D properties of each object in the glbarchive array. Then temprow is a HTML snippet containing the day, the values of the A, B, C and D properties, and the subtotal, which is, of course, temptotal. temptotal needs to be given two denimal places, hence the use of the toFixed() method. The A, B, C and D properties are already formatted in the archive, so there's no need for us to repeat the process. The temprow is then appended to the tbody portion of the tblDailyEntries table via the append() method.
                $(document).on("pagebeforeshow", "#entries", function(event, data)
                {
                    $("#colA").html(glb_settings[0].name);
                    $("#colB").html(glb_settings[1].name);
                    $("#colC").html(glb_settings[2].name);
                    $("#colD").html(glb_settings[3].name);

                    var archivename="archive_" + glb_currentyear + "_" + glb_currentmonth;
                    var temprow,temptotal;
                    var tempsubtotal=[0,0,0,0,0];
                    var budget=parseFloat(glb_settings[4].budget);
                    var interval=parseInt(glb_settings[5].interval);

                    if (localStorage.getItem(archivename) == null)
                    {
                        add_monthyear();
                    }

                    glb_archive=JSON.parse(localStorage.getItem(archivename));
                    $("#tblDailyEntries tbody").empty();

                    for (var i=0;i<glb_archive.length;i++)
                    {
                        temptotal=parseFloat(glb_archive[i].A)+parseFloat(glb_archive[i].B)+parseFloat(glb_archive[i].C)+parseFloat(glb_archive[i].D);
                        temprow=$("<tr><td>"+i+"</td><td>"+glb_archive[i].A+"</td><td>"+glb_archive[i].B+"</td><td>"+glb_archive[i].C+"</td><td>"+glb_archive[i].D+"</td><td>"+temptotal.toFixed(2)+"</td></tr>");
                        $("#tblDailyEntries tbody").append(temprow);
                    }

                    $("#tblDailyEntries").table( "refresh" );
                });


Let's see what we have. The table is populated... but wait, the days seem wrong. That's because they're numbered 0 to 30.


So just amend like so.
                    for (var i=0;i<glb_archive.length;i++)
                    {
                        temptotal=parseFloat(glb_archive[i].A)+parseFloat(glb_archive[i].B)+parseFloat(glb_archive[i].C)+parseFloat(glb_archive[i].D);
                        temprow=$("<tr><td>"+(i+1)+"</td><td>"+glb_archive[i].A+"</td><td>"+glb_archive[i].B+"</td><td>"+glb_archive[i].C+"</td><td>"+glb_archive[i].D+"</td><td>"+temptotal.toFixed(2)+"</td></tr>");
                        $("#tblDailyEntries tbody").append(temprow);
                    }


There you go.


Next, we use the budget and interval properties. For each temptotal, the budget is decremented by that value. And the values of A, B, C and D columns are incremented into the tempsubtotal array.
                    for (var i=0;i<glb_archive.length;i++)
                    {
                        temptotal=parseFloat(glb_archive[i].A)+parseFloat(glb_archive[i].B)+parseFloat(glb_archive[i].C)+parseFloat(glb_archive[i].D);
                        temprow=$("<tr><td>"+(i+1)+"</td><td>"+glb_archive[i].A+"</td><td>"+glb_archive[i].B+"</td><td>"+glb_archive[i].C+"</td><td>"+glb_archive[i].D+"</td><td>"+temptotal.toFixed(2)+"</td></tr>");
                        $("#tblDailyEntries tbody").append(temprow);

                        tempsubtotal[0]+=parseFloat(glb_archive[i].A);
                        tempsubtotal[1]+=parseFloat(glb_archive[i].B);
                        tempsubtotal[2]+=parseFloat(glb_archive[i].C);
                        tempsubtotal[3]+=parseFloat(glb_archive[i].D);
                        tempsubtotal[4]+=temptotal;
                        budget-=temptotal;
                    }


And then we use a Modulus in a conditional to check if it is time for interval to kick in. If you had an interval of 5, for example, every 5 rows a new row will be appended after the current row to display the subtotals so far.
                    for (var i=0;i<glb_archive.length;i++)
                    {
                        temptotal=parseFloat(glb_archive[i].A)+parseFloat(glb_archive[i].B)+parseFloat(glb_archive[i].C)+parseFloat(glb_archive[i].D);
                        temprow=$("<tr><td>"+(i+1)+"</td><td>"+glb_archive[i].A+"</td><td>"+glb_archive[i].B+"</td><td>"+glb_archive[i].C+"</td><td>"+glb_archive[i].D+"</td><td>"+temptotal.toFixed(2)+"</td></tr>");
                        $("#tblDailyEntries tbody").append(temprow);

                        tempsubtotal[0]+=parseFloat(glb_archive[i].A);
                        tempsubtotal[1]+=parseFloat(glb_archive[i].B);
                        tempsubtotal[2]+=parseFloat(glb_archive[i].C);
                        tempsubtotal[3]+=parseFloat(glb_archive[i].D);
                        tempsubtotal[4]+=temptotal;
                        budget-=temptotal;

                        if ((i+1)%interval==0)
                        {
                            temprow=$("<tr><td>SUBT.</td><td>"+tempsubtotal[0].toFixed(2)+"</td><td>"+tempsubtotal[1].toFixed(2)+"</td><td>"+tempsubtotal[2].toFixed(2)+"</td><td>"+tempsubtotal[3].toFixed(2)+"</td><td>"+tempsubtotal[4].toFixed(2)+"</td></tr>");
                            $("#tblDailyEntries tbody").append(temprow);

                            temprow=$("<tr><td>REM.</td><td></td><td></td><td></td><td></td><td>"+budget.toFixed(2)+"</td></tr>");
                            $("#tblDailyEntries tbody").append(temprow);
                        }
                    }


Take a gander, we're almost done with this part!


And right at the very end of the table, we append another row displaying the grand totals along with what's remaining of the budget value.
                $(document).on("pagebeforeshow", "#entries", function(event, data)
                {
                    $("#colA").html(glb_settings[0].name);
                    $("#colB").html(glb_settings[1].name);
                    $("#colC").html(glb_settings[2].name);
                    $("#colD").html(glb_settings[3].name);

                    var archivename="archive_" + glb_currentyear + "_" + glb_currentmonth;
                    var temprow,temptotal;
                    var tempsubtotal=[0,0,0,0,0];
                    var budget=parseFloat(glb_settings[4].budget);
                    var interval=parseInt(glb_settings[5].interval);

                    if (localStorage.getItem(archivename) == null)
                    {
                        add_monthyear();
                    }

                    glb_archive=JSON.parse(localStorage.getItem(archivename));
                    $("#tblDailyEntries tbody").empty();

                    for (var i=0;i<glb_archive.length;i++)
                    {
                        temptotal=parseFloat(glb_archive[i].A)+parseFloat(glb_archive[i].B)+parseFloat(glb_archive[i].C)+parseFloat(glb_archive[i].D);
                        temprow=$("<tr><td>"+(i+1)+"</td><td>"+glb_archive[i].A+"</td><td>"+glb_archive[i].B+"</td><td>"+glb_archive[i].C+"</td><td>"+glb_archive[i].D+"</td><td>"+temptotal.toFixed(2)+"</td></tr>");
                        $("#tblDailyEntries tbody").append(temprow);

                        tempsubtotal[0]+=parseFloat(glb_archive[i].A);
                        tempsubtotal[1]+=parseFloat(glb_archive[i].B);
                        tempsubtotal[2]+=parseFloat(glb_archive[i].C);
                        tempsubtotal[3]+=parseFloat(glb_archive[i].D);
                        tempsubtotal[4]+=temptotal;
                        budget-=temptotal;

                        if ((i+1)%interval==0)
                        {
                            temprow=$("<tr><td>SUBT.</td><td>"+tempsubtotal[0].toFixed(2)+"</td><td>"+tempsubtotal[1].toFixed(2)+"</td><td>"+tempsubtotal[2].toFixed(2)+"</td><td>"+tempsubtotal[3].toFixed(2)+"</td><td>"+tempsubtotal[4].toFixed(2)+"</td></tr>");
                            $("#tblDailyEntries tbody").append(temprow);

                            temprow=$("<tr><td>REM.</td><td></td><td></td><td></td><td></td><td>"+budget.toFixed(2)+"</td></tr>");
                            $("#tblDailyEntries tbody").append(temprow);
                        }
                    }

                    temprow=$("<tr><td>TOT.</td><td>"+tempsubtotal[0].toFixed(2)+"</td><td>"+tempsubtotal[1].toFixed(2)+"</td><td>"+tempsubtotal[2].toFixed(2)+"</td><td>"+tempsubtotal[3].toFixed(2)+"</td><td>"+tempsubtotal[4].toFixed(2)+"</td></tr>");
                    $("#tblDailyEntries tbody").append(temprow);

                    temprow=$("<tr><td>REM.</td><td></td><td></td><td></td><td></td><td>"+budget.toFixed(2)+"</td></tr>");
                    $("#tblDailyEntries tbody").append(temprow);

                    $("#tblDailyEntries").table( "refresh" );
                });


It's all zeros right now, so you won't see what wonder you've created. But that's OK, this will be covered in the next and final part of this web tutorial.


Now modify this line...
                    for (var i=0;i<glb_archive.length;i++)
                    {
                        temptotal=parseFloat(glb_archive[i].A)+parseFloat(glb_archive[i].B)+parseFloat(glb_archive[i].C)+parseFloat(glb_archive[i].D);
                        temprow=$("<tr><td><a href=\"#\" onclick=\"goto_dailyentry("+(i+1)+");\">"+(i+1)+"</a></td><td>"+glb_archive[i].A+"</td><td>"+glb_archive[i].B+"</td><td>"+glb_archive[i].C+"</td><td>"+glb_archive[i].D+"</td><td>"+temptotal.toFixed(2)+"</td></tr>");
                        $("#tblDailyEntries tbody").append(temprow);


This turns the day display into a link. Upon clicking it, the goto_dailyentry() function is fired off, and the day passed in as an argument.


Yep, we'll need to add the goto_dailyentry() function. This one's simple enough. It basically sets the value of glb_currentday to the value of the parameter (which is the day depicted by the row) and then redirects you to the "dailyentry" page.
            function update_settings()
            {
                glb_settings[0].name=$("#txtA_name").val();
                glb_settings[1].name=$("#txtB_name").val();
                glb_settings[2].name=$("#txtC_name").val();
                glb_settings[3].name=$("#txtD_name").val();
                glb_settings[4].budget=$("#txtBudget").val();
                glb_settings[5].interval=$("#txtInterval").val();

                localStorage.setItem("scrooge_settings", JSON.stringify(glb_settings));

                alert ("Settings saved.");
            }

            function goto_dailyentry(varday)
            {
                    glb_currentday=varday;
                    $.mobile.changePage("#dailyentry", {transition: "slide"});
            }


That's all for now!

Phew. That was long. No sweat though, the end is in sight.

Next

Updating the entries of the archive. You don't want to miss this one.