The Year of the Rat is upon us, and I'm still high on the buzz of playing with Scalable Vector Graphics, otherwise known as SVGs. In fact, today I want to introduce another concept in SVG animation - timed animations!
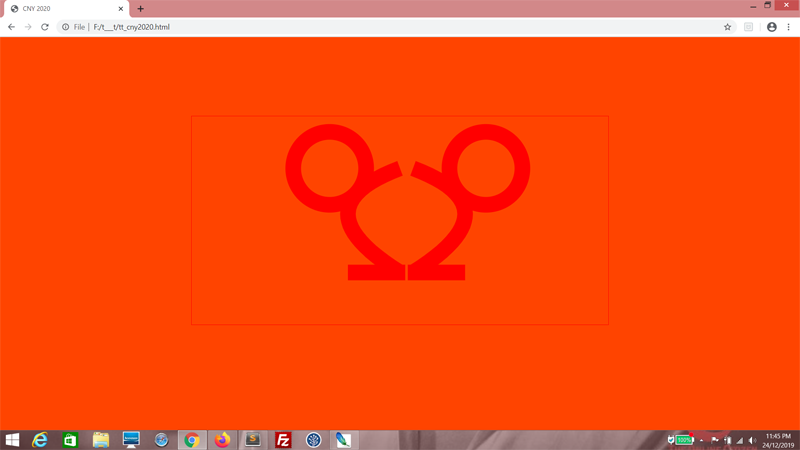
Sure, all animations are timed one way or another, but what if you needed a sequence of one-time animations? Like the one below. (refresh this page if you want to view it again)
The letters "2020" moved and morphed into a stylized rat head. Awesome, right?! I'm going to show you how to get this done.
First, we'll need a HTML page with an orange background. For good measure, set default font size too.
<!DOCTYPE html>
<html>
<head>
<title>CNY 2020</title>
<style>
body
{
background-color: #FF4400;
font-size: 10px;
}
</style>
</head>
<body>
</body>
</html>
<html>
<head>
<title>CNY 2020</title>
<style>
body
{
background-color: #FF4400;
font-size: 10px;
}
</style>
</head>
<body>
</body>
</html>
Then we need to have a div to contain the SVG. Give it an id of svgContainer. Let's make it 800 by 400 pixels, and give it a red border and align it middle of the screen.
<!DOCTYPE html>
<html>
<head>
<title>CNY 2020</title>
<style>
body
{
background-color: #FF4400;
font-size: 10px;
}
#svgContainer
{
width: 800px;
height: 400px;
margin: 10% auto 0 auto;
outline: 1px solid #FF0000;
}
</style>
</head>
<body>
<div id="svgContainer">
</div>
</body>
</html>
<html>
<head>
<title>CNY 2020</title>
<style>
body
{
background-color: #FF4400;
font-size: 10px;
}
#svgContainer
{
width: 800px;
height: 400px;
margin: 10% auto 0 auto;
outline: 1px solid #FF0000;
}
</style>
</head>
<body>
<div id="svgContainer">
</div>
</body>
</html>
Great, here we go!

Next up is the SVG itself. It should go inside the container.
<div id="svgContainer">
<svg>
</svg>
</div>
<svg>
</svg>
</div>
The next tricky bit is the "2020". We need to animate this sucker later, so we can't use text. We need to draw it out. First, add this into the CSS, so the lines we draw will be nice, thick and red.
<style>
body
{
background-color: #FF4400;
font-size: 10px;
}
#svgContainer
{
width: 800px;
height: 400px;
margin: 10% auto 0 auto;
outline: 1px solid #FF0000;
}
svg
{
width: 800px;
height: 400px;
}
line, ellipse, path, text
{
stroke-width: 3em;
stroke: rgba(255, 0, 0, 1);
fill: none;
}
</style>
body
{
background-color: #FF4400;
font-size: 10px;
}
#svgContainer
{
width: 800px;
height: 400px;
margin: 10% auto 0 auto;
outline: 1px solid #FF0000;
}
svg
{
width: 800px;
height: 400px;
}
line, ellipse, path, text
{
stroke-width: 3em;
stroke: rgba(255, 0, 0, 1);
fill: none;
}
</style>
The "0"s are easy enough - just use ellipses! Make them tall, and spread them out to make room for the "2"s.
<div id="svgContainer">
<svg>
<ellipse cx="335" cy="200" rx="40" ry="100">
</ellipse>
<ellipse cx="615" cy="200" rx="40" ry="100">
</ellipse>
</svg>
</div>
<svg>
<ellipse cx="335" cy="200" rx="40" ry="100">
</ellipse>
<ellipse cx="615" cy="200" rx="40" ry="100">
</ellipse>
</svg>
</div>
Like I said - easy.

Each "2" will use a horizontal straight line...
<div id="svgContainer">
<svg>
<line x1="140" y1="300" x2="250" y2="300">
</line>
<ellipse cx="335" cy="200" rx="40" ry="100">
</ellipse>
<line x1="415" y1="300" x2="525" y2="300">
</line>
<ellipse cx="615" cy="200" rx="40" ry="100">
</ellipse>
</svg>
</div>
<svg>
<line x1="140" y1="300" x2="250" y2="300">
</line>
<ellipse cx="335" cy="200" rx="40" ry="100">
</ellipse>
<line x1="415" y1="300" x2="525" y2="300">
</line>
<ellipse cx="615" cy="200" rx="40" ry="100">
</ellipse>
</svg>
</div>
Do you see it taking shape?

And now let's have a vertical line, using a path tag instead of a line tag. Each path goes 200 pixels vertically down from the origin point.
<div id="svgContainer">
<svg>
<path d="M 150 100 l 0 200">
</path>
<line x1="140" y1="300" x2="250" y2="300">
</line>
<ellipse cx="335" cy="200" rx="40" ry="100">
</ellipse>
<path d="M 425 100 l 0 200">
</path>
<line x1="415" y1="300" x2="525" y2="300">
</line>
<ellipse cx="615" cy="200" rx="40" ry="100">
</ellipse>
</svg>
</div>
"LOLO"? Patience, we'll get there!

Let's apply a curve to the paths. The curves will pull the path 200 pixels to the right, and occur 75 pixels down.
<div id="svgContainer">
<svg>
<path d="M 150 100 q 200 75 0 200">
</path>
<line x1="140" y1="300" x2="250" y2="300">
</line>
<ellipse cx="335" cy="200" rx="40" ry="100">
</ellipse>
<path d="M 425 100 q 200 75 0 200">
</path>
<line x1="415" y1="300" x2="525" y2="300">
</line>
<ellipse cx="615" cy="200" rx="40" ry="100">
</ellipse>
</svg>
</div>
Presto! Two "2"s! Here's your "2020".

Time to animate!
Of all the digits, only the second "2" will be mostly stationary. For starters, let's rotate the first "2". Add an animate tag within the path tag which defines the curve of the "2". Give it an id of animateFlipCurve.
<path d="M 150 100 q 200 75 0 200">
<animate
id="animateFlipCurve"
/>
</path>
<animate
id="animateFlipCurve"
/>
</path>
What we're going to animate is the d attribute. While the origin point and end point remains the same, the curve now goes negative 200 pixels horizontally.
<path d="M 150 100 q 200 75 0 200">
<animate
id="animateFlipCurve"
attributeName="d"
from="M 150 100 q 200 75 0 200"
to="M 150 100 q -200 75 0 200"
/>
</path>
<animate
id="animateFlipCurve"
attributeName="d"
from="M 150 100 q 200 75 0 200"
to="M 150 100 q -200 75 0 200"
/>
</path>
The fill attribute, set to "freeze", means that the curve is stuck this way after the current animation ends. Set it to begin after 2 seconds, by setting the begin attribute. Set the duration to half a second, and ensure that it runs only once by setting the repeatCount property.
<path d="M 150 100 q 200 75 0 200">
<animate
id="animateFlipCurve"
attributeName="d"
from="M 150 100 q 200 75 0 200"
to="M 150 100 q -200 75 0 200"
fill="freeze"
begin="2s"
dur="0.5s"
repeatCount="1"
/>
</path>
<animate
id="animateFlipCurve"
attributeName="d"
from="M 150 100 q 200 75 0 200"
to="M 150 100 q -200 75 0 200"
fill="freeze"
begin="2s"
dur="0.5s"
repeatCount="1"
/>
</path>
Let's take a look. Does the first "2" change shape after two seconds?

Now that we've flipped the curve, we want to move it horizontally so that it forms the rat's head with the second "2". For this, we use the animateMotion tag. Give it an id of animateMoveCurve.
<path d="M 150 100 q 200 75 0 200">
<animate
id="animateFlipCurve"
attributeName="d"
from="M 150 100 q 200 75 0 200"
to="M 150 100 q -200 75 0 200"
fill="freeze"
begin="2s"
dur="0.5s"
repeatCount="1"
/>
<animateMotion
id="animateMoveCurve"
/>
</path>
<animate
id="animateFlipCurve"
attributeName="d"
from="M 150 100 q 200 75 0 200"
to="M 150 100 q -200 75 0 200"
fill="freeze"
begin="2s"
dur="0.5s"
repeatCount="1"
/>
<animateMotion
id="animateMoveCurve"
/>
</path>
Now, set the dur and fill attributes.
<path d="M 150 100 q 200 75 0 200">
<animate
id="animateFlipCurve"
attributeName="d"
from="M 150 100 q 200 75 0 200"
to="M 150 100 q -200 75 0 200"
fill="freeze"
begin="2s"
dur="0.5s"
repeatCount="1"
/>
<animateMotion
id="animateMoveCurve"
fill="freeze"
dur="0.5s"
/>
</path>
<animate
id="animateFlipCurve"
attributeName="d"
from="M 150 100 q 200 75 0 200"
to="M 150 100 q -200 75 0 200"
fill="freeze"
begin="2s"
dur="0.5s"
repeatCount="1"
/>
<animateMotion
id="animateMoveCurve"
fill="freeze"
dur="0.5s"
/>
</path>
Ensure that this only starts moving after the curve is flipped, by setting the begin attribute. animateFlipCurve is the animation object to take reference form, and we use its end property here.
<path d="M 150 100 q 200 75 0 200">
<animate
id="animateFlipCurve"
attributeName="d"
from="M 150 100 q 200 75 0 200"
to="M 150 100 q -200 75 0 200"
fill="freeze"
begin="2s"
dur="0.5s"
repeatCount="1"
/>
<animateMotion
id="animateMoveCurve"
fill="freeze"
begin="animateFlipCurve.end"
dur="0.5s"
/>
</path>
<animate
id="animateFlipCurve"
attributeName="d"
from="M 150 100 q 200 75 0 200"
to="M 150 100 q -200 75 0 200"
fill="freeze"
begin="2s"
dur="0.5s"
repeatCount="1"
/>
<animateMotion
id="animateMoveCurve"
fill="freeze"
begin="animateFlipCurve.end"
dur="0.5s"
/>
</path>
Next, we'll want to define the path upon which the curve will travel. (0, 0) is the origin and the next point is (250, 0) that means that the curve will travel 20 pixels right.
<path d="M 150 100 q 200 75 0 200">
<animate
id="animateFlipCurve"
attributeName="d"
from="M 150 100 q 200 75 0 200"
to="M 150 100 q -200 75 0 200"
fill="freeze"
begin="2s"
dur="0.5s"
repeatCount="1"
/>
<animateMotion
id="animateMoveCurve"
fill="freeze"
begin="animateFlipCurve.end"
dur="0.5s"
path="M 0 0 l 250 0"
/>
</path>
<animate
id="animateFlipCurve"
attributeName="d"
from="M 150 100 q 200 75 0 200"
to="M 150 100 q -200 75 0 200"
fill="freeze"
begin="2s"
dur="0.5s"
repeatCount="1"
/>
<animateMotion
id="animateMoveCurve"
fill="freeze"
begin="animateFlipCurve.end"
dur="0.5s"
path="M 0 0 l 250 0"
/>
</path>
Kind of messy, but it's working!

Now, we want the horizontal base of the "2" to move with the curve, right? So we add an animateMotion tag within the line tag. The begin, dur and fill attributes will mirror those of animateMoveCurve. This does not equire an id because no other animation will take reference from this one.
<path d="M 150 100 q 200 75 0 200">
<animate
id="animateFlipCurve"
attributeName="d"
from="M 150 100 q 200 75 0 200"
to="M 150 100 q -200 75 0 200"
fill="freeze"
begin="2s"
dur="0.5s"
repeatCount="1"
/>
<animateMotion
id="animateMoveCurve"
fill="freeze"
begin="animateFlipCurve.end"
dur="0.5s"
path="M 0 0 l 250 0"
/>
</path>
<line x1="140" y1="300" x2="250" y2="300">
<animateMotion
dur="0.5s"
begin="animateFlipCurve.end"
fill="freeze"
/>
</line>
The path here means that the line will travel 160 pixels to the right.
<line x1="140" y1="300" x2="250" y2="300">
<animateMotion
dur="0.5s"
begin="animateFlipCurve.end"
fill="freeze"
path="M 0 0 l 160 0"
/>
</line>
<animateMotion
dur="0.5s"
begin="animateFlipCurve.end"
fill="freeze"
path="M 0 0 l 160 0"
/>
</line>
Do you see it?

Moving the "0"s to form the ears
This will be comparatively easy. In the first ellipse create two animate tags. The first one has an id of animateEllipseSize1 (because another animation will take reference from it soon) and the second will have no id. They will effectively resize the ellipse will modifying the ry and rx attributes of the ellipse to 70 pixels. Both will be set to begin after the animateFlipCurve animation ends. As with the rest, set the fill attribute to "freeze" and also set the dur and repeatCount attributes.
<ellipse cx="335" cy="200" rx="40" ry="100">
<animate
id="animateEllipseSize1"
attributeName="ry"
from="100"
to="70"
fill="freeze"
begin="animateFlipCurve.end"
dur="0.5s"
repeatCount="1"
/>
<animate
attributeName="rx"
from="40"
to="70"
fill="freeze"
begin="animateFlipCurve.end"
dur="0.5s"
repeatCount="1"
/>
</ellipse>
<path d="M 425 100 q 200 75 0 200" />
<line x1="415" y1="300" x2="525" y2="300">
</line>
<ellipse cx="615" cy="200" rx="40" ry="100">
</ellipse>
<animate
id="animateEllipseSize1"
attributeName="ry"
from="100"
to="70"
fill="freeze"
begin="animateFlipCurve.end"
dur="0.5s"
repeatCount="1"
/>
<animate
attributeName="rx"
from="40"
to="70"
fill="freeze"
begin="animateFlipCurve.end"
dur="0.5s"
repeatCount="1"
/>
</ellipse>
<path d="M 425 100 q 200 75 0 200" />
<line x1="415" y1="300" x2="525" y2="300">
</line>
<ellipse cx="615" cy="200" rx="40" ry="100">
</ellipse>
Do the same for the other ellipse. Only, the id should be set to animateEllipseSize2.
<ellipse cx="335" cy="200" rx="40" ry="100">
<animate
id="animateEllipseSize1"
attributeName="ry"
from="100"
to="70"
fill="freeze"
begin="animateFlipCurve.end"
dur="0.5s"
repeatCount="1"
/>
<animate
attributeName="rx"
from="40"
to="70"
fill="freeze"
begin="animateFlipCurve.end"
dur="0.5s"
repeatCount="1"
/>
</ellipse>
<path d="M 425 100 q 200 75 0 200" />
<line x1="415" y1="300" x2="525" y2="300">
</line>
<ellipse cx="615" cy="200" rx="40" ry="100">
<animate
id="animateEllipseSize1"
attributeName="ry"
from="100"
to="70"
fill="freeze"
begin="animateFlipCurve.end"
dur="0.5s"
repeatCount="1"
/>
<animate
attributeName="rx"
from="40"
to="70"
fill="freeze"
begin="animateFlipCurve.end"
dur="0.5s"
repeatCount="1"
/>
</ellipse>
<animate
id="animateEllipseSize1"
attributeName="ry"
from="100"
to="70"
fill="freeze"
begin="animateFlipCurve.end"
dur="0.5s"
repeatCount="1"
/>
<animate
attributeName="rx"
from="40"
to="70"
fill="freeze"
begin="animateFlipCurve.end"
dur="0.5s"
repeatCount="1"
/>
</ellipse>
<path d="M 425 100 q 200 75 0 200" />
<line x1="415" y1="300" x2="525" y2="300">
</line>
<ellipse cx="615" cy="200" rx="40" ry="100">
<animate
id="animateEllipseSize1"
attributeName="ry"
from="100"
to="70"
fill="freeze"
begin="animateFlipCurve.end"
dur="0.5s"
repeatCount="1"
/>
<animate
attributeName="rx"
from="40"
to="70"
fill="freeze"
begin="animateFlipCurve.end"
dur="0.5s"
repeatCount="1"
/>
</ellipse>
Try it. Did the "0"s become circles?

So now that both ellipses have been resized, let's move them to form ears! Add two more animate tags inside the first ellipse. They will both take reference from animateEllipseSize1, beginning only when it ends. Then modify the cy and cx attributes to move the ellipse towards the top left till it aligns neatly to the side of the "rat head". You may need to engage in a bit of trial and error here.
<ellipse cx="335" cy="200" rx="40" ry="100">
<animate
id="animateEllipseSize1"
attributeName="ry"
from="100"
to="70"
fill="freeze"
begin="animateFlipCurve.end"
dur="0.5s"
repeatCount="1"
/>
<animate
attributeName="rx"
from="40"
to="70"
fill="freeze"
begin="animateFlipCurve.end"
dur="0.5s"
repeatCount="1"
/>
<animate
attributeName="cy"
from="200"
to="100"
fill="freeze"
begin="animateEllipseSize1.end"
dur="0.5s"
repeatCount="1"
/>
<animate
attributeName="cx"
from="335"
to="265"
fill="freeze"
begin="animateEllipseSize1.end"
dur="0.5s"
repeatCount="1"
/>
</ellipse>
<path d="M 425 100 q 200 75 0 200" />
<line x1="415" y1="300" x2="525" y2="300">
</line>
<ellipse cx="615" cy="200" rx="40" ry="100">
<animate
id="animateEllipseSize2"
attributeName="ry"
from="100"
to="70"
fill="freeze"
begin="animateFlipCurve.end"
dur="0.5s"
repeatCount="1"
/>
<animate
attributeName="rx"
from="40"
to="70"
fill="freeze"
begin="animateFlipCurve.end"
dur="0.5s"
repeatCount="1"
/>
</ellipse>
<animate
id="animateEllipseSize1"
attributeName="ry"
from="100"
to="70"
fill="freeze"
begin="animateFlipCurve.end"
dur="0.5s"
repeatCount="1"
/>
<animate
attributeName="rx"
from="40"
to="70"
fill="freeze"
begin="animateFlipCurve.end"
dur="0.5s"
repeatCount="1"
/>
<animate
attributeName="cy"
from="200"
to="100"
fill="freeze"
begin="animateEllipseSize1.end"
dur="0.5s"
repeatCount="1"
/>
<animate
attributeName="cx"
from="335"
to="265"
fill="freeze"
begin="animateEllipseSize1.end"
dur="0.5s"
repeatCount="1"
/>
</ellipse>
<path d="M 425 100 q 200 75 0 200" />
<line x1="415" y1="300" x2="525" y2="300">
</line>
<ellipse cx="615" cy="200" rx="40" ry="100">
<animate
id="animateEllipseSize2"
attributeName="ry"
from="100"
to="70"
fill="freeze"
begin="animateFlipCurve.end"
dur="0.5s"
repeatCount="1"
/>
<animate
attributeName="rx"
from="40"
to="70"
fill="freeze"
begin="animateFlipCurve.end"
dur="0.5s"
repeatCount="1"
/>
</ellipse>
Lovely!

Do the same for the other ellipse. The new animation tags should take reference from animateEllipseSize2 instead. Again, adjust the animation as you see fit.
<ellipse cx="335" cy="200" rx="40" ry="100">
<animate
id="animateEllipseSize1"
attributeName="ry"
from="100"
to="70"
fill="freeze"
begin="animateFlipCurve.end"
dur="0.5s"
repeatCount="1"
/>
<animate
attributeName="rx"
from="40"
to="70"
fill="freeze"
begin="animateFlipCurve.end"
dur="0.5s"
repeatCount="1"
/>
<animate
attributeName="cy"
from="200"
to="100"
fill="freeze"
begin="animateEllipseSize1.end"
dur="0.5s"
repeatCount="1"
/>
<animate
attributeName="cx"
from="335"
to="265"
fill="freeze"
begin="animateEllipseSize1.end"
dur="0.5s"
repeatCount="1"
/>
</ellipse>
<path d="M 425 100 q 200 75 0 200" />
<line x1="415" y1="300" x2="525" y2="300">
</line>
<ellipse cx="615" cy="200" rx="40" ry="100">
<animate
id="animateEllipseSize2"
attributeName="ry"
from="100"
to="70"
fill="freeze"
begin="animateFlipCurve.end"
dur="0.5s"
repeatCount="1"
/>
<animate
attributeName="rx"
from="40"
to="70"
fill="freeze"
begin="animateFlipCurve.end"
dur="0.5s"
repeatCount="1"
/>
<animate
attributeName="cy"
from="200"
to="100"
fill="freeze"
begin="animateEllipseSize2.end"
dur="0.5s"
repeatCount="1"
/>
<animate
attributeName="cx"
from="615"
to="565"
fill="freeze"
begin="animateEllipseSize2.end"
dur="0.5s"
repeatCount="1"
/>
</ellipse>
<animate
id="animateEllipseSize1"
attributeName="ry"
from="100"
to="70"
fill="freeze"
begin="animateFlipCurve.end"
dur="0.5s"
repeatCount="1"
/>
<animate
attributeName="rx"
from="40"
to="70"
fill="freeze"
begin="animateFlipCurve.end"
dur="0.5s"
repeatCount="1"
/>
<animate
attributeName="cy"
from="200"
to="100"
fill="freeze"
begin="animateEllipseSize1.end"
dur="0.5s"
repeatCount="1"
/>
<animate
attributeName="cx"
from="335"
to="265"
fill="freeze"
begin="animateEllipseSize1.end"
dur="0.5s"
repeatCount="1"
/>
</ellipse>
<path d="M 425 100 q 200 75 0 200" />
<line x1="415" y1="300" x2="525" y2="300">
</line>
<ellipse cx="615" cy="200" rx="40" ry="100">
<animate
id="animateEllipseSize2"
attributeName="ry"
from="100"
to="70"
fill="freeze"
begin="animateFlipCurve.end"
dur="0.5s"
repeatCount="1"
/>
<animate
attributeName="rx"
from="40"
to="70"
fill="freeze"
begin="animateFlipCurve.end"
dur="0.5s"
repeatCount="1"
/>
<animate
attributeName="cy"
from="200"
to="100"
fill="freeze"
begin="animateEllipseSize2.end"
dur="0.5s"
repeatCount="1"
/>
<animate
attributeName="cx"
from="615"
to="565"
fill="freeze"
begin="animateEllipseSize2.end"
dur="0.5s"
repeatCount="1"
/>
</ellipse>
Looks good!
The whiskers
We're coming to the most complicated part of this tutorial. Here, we want each line to split into three and form "whiskers". What we're going to do is create copies of each line, like so. For the first line, copy even the animations! You should not see anything upon refreshing. That's because all these lines have the exact same properties and are overlapping each other perfectly, even during the animation.
<path d="M 150 100 q 200 75 0 200">
<animate
id="animateFlipCurve"
attributeName="d"
from="M 150 100 q 200 75 0 200"
to="M 150 100 q -200 75 0 200"
fill="freeze"
begin="2s"
dur="0.5s"
repeatCount="1"
/>
<animateMotion
id="animateMoveCurve"
fill="freeze"
begin="animateFlipCurve.end"
dur="0.5s"
path="M 0 0 l 250 0"
/>
</path>
<line x1="140" y1="300" x2="250" y2="300">
<animateMotion
dur="0.5s"
begin="animateFlipCurve.end"
fill="freeze"
path="M 0 0 l 160 0"
/>
</line>
<line x1="140" y1="300" x2="250" y2="300">
<animateMotion
dur="0.5s"
begin="animateFlipCurve.end"
fill="freeze"
path="M 0 0 l 160 0"
/>
</line>
<line x1="140" y1="300" x2="250" y2="300">
<animateMotion
dur="0.5s"
begin="animateFlipCurve.end"
fill="freeze"
path="M 0 0 l 160 0"
/>
</line>
<ellipse cx="335" cy="200" rx="40" ry="100">
<animate
id="animateEllipseSize1"
attributeName="ry"
from="100"
to="70"
fill="freeze"
begin="animateFlipCurve.end"
dur="0.5s"
repeatCount="1"
/>
<animate
attributeName="rx"
from="40"
to="70"
fill="freeze"
begin="animateFlipCurve.end"
dur="0.5s"
repeatCount="1"
/>
<animate
attributeName="cy"
from="200"
to="100"
fill="freeze"
begin="animateEllipseSize1.end"
dur="0.5s"
repeatCount="1"
/>
<animate
attributeName="cx"
from="335"
to="265"
fill="freeze"
begin="animateEllipseSize1.end"
dur="0.5s"
repeatCount="1"
/>
</ellipse>
<path d="M 425 100 q 200 75 0 200" />
<line x1="415" y1="300" x2="525" y2="300">
</line>
<line x1="415" y1="300" x2="525" y2="300">
</line>
<line x1="415" y1="300" x2="525" y2="300">
</line>
<ellipse cx="615" cy="200" rx="40" ry="100">
<animate
id="animateEllipseSize2"
attributeName="ry"
from="100"
to="70"
fill="freeze"
begin="animateFlipCurve.end"
dur="0.5s"
repeatCount="1"
/>
<animate
attributeName="rx"
from="40"
to="70"
fill="freeze"
begin="animateFlipCurve.end"
dur="0.5s"
repeatCount="1"
/>
<animate
attributeName="cy"
from="200"
to="100"
fill="freeze"
begin="animateEllipseSize2.end"
dur="0.5s"
repeatCount="1"
/>
<animate
attributeName="cx"
from="615"
to="565"
fill="freeze"
begin="animateEllipseSize2.end"
dur="0.5s"
repeatCount="1"
/>
</ellipse>
<animate
id="animateFlipCurve"
attributeName="d"
from="M 150 100 q 200 75 0 200"
to="M 150 100 q -200 75 0 200"
fill="freeze"
begin="2s"
dur="0.5s"
repeatCount="1"
/>
<animateMotion
id="animateMoveCurve"
fill="freeze"
begin="animateFlipCurve.end"
dur="0.5s"
path="M 0 0 l 250 0"
/>
</path>
<line x1="140" y1="300" x2="250" y2="300">
<animateMotion
dur="0.5s"
begin="animateFlipCurve.end"
fill="freeze"
path="M 0 0 l 160 0"
/>
</line>
<line x1="140" y1="300" x2="250" y2="300">
<animateMotion
dur="0.5s"
begin="animateFlipCurve.end"
fill="freeze"
path="M 0 0 l 160 0"
/>
</line>
<line x1="140" y1="300" x2="250" y2="300">
<animateMotion
dur="0.5s"
begin="animateFlipCurve.end"
fill="freeze"
path="M 0 0 l 160 0"
/>
</line>
<ellipse cx="335" cy="200" rx="40" ry="100">
<animate
id="animateEllipseSize1"
attributeName="ry"
from="100"
to="70"
fill="freeze"
begin="animateFlipCurve.end"
dur="0.5s"
repeatCount="1"
/>
<animate
attributeName="rx"
from="40"
to="70"
fill="freeze"
begin="animateFlipCurve.end"
dur="0.5s"
repeatCount="1"
/>
<animate
attributeName="cy"
from="200"
to="100"
fill="freeze"
begin="animateEllipseSize1.end"
dur="0.5s"
repeatCount="1"
/>
<animate
attributeName="cx"
from="335"
to="265"
fill="freeze"
begin="animateEllipseSize1.end"
dur="0.5s"
repeatCount="1"
/>
</ellipse>
<path d="M 425 100 q 200 75 0 200" />
<line x1="415" y1="300" x2="525" y2="300">
</line>
<line x1="415" y1="300" x2="525" y2="300">
</line>
<line x1="415" y1="300" x2="525" y2="300">
</line>
<ellipse cx="615" cy="200" rx="40" ry="100">
<animate
id="animateEllipseSize2"
attributeName="ry"
from="100"
to="70"
fill="freeze"
begin="animateFlipCurve.end"
dur="0.5s"
repeatCount="1"
/>
<animate
attributeName="rx"
from="40"
to="70"
fill="freeze"
begin="animateFlipCurve.end"
dur="0.5s"
repeatCount="1"
/>
<animate
attributeName="cy"
from="200"
to="100"
fill="freeze"
begin="animateEllipseSize2.end"
dur="0.5s"
repeatCount="1"
/>
<animate
attributeName="cx"
from="615"
to="565"
fill="freeze"
begin="animateEllipseSize2.end"
dur="0.5s"
repeatCount="1"
/>
</ellipse>
OK, the idea here is for each of these copied line tags to thin, then rotate. Add one animate tag and one animateTransform tag within each line tag, and set them to take reference from animateMoveCurve, beginning the animation only when animateMoveCurve ends. Also set fill, dur and repeatCount attributes.
<line x1="140" y1="300" x2="250" y2="300">
<animateMotion
dur="0.5s"
begin="animateFlipCurve.end"
fill="freeze"
path="M 0 0 l 160 0"
/>
<animate
fill="freeze"
begin="animateMoveCurve.end"
dur="0.5s"
repeatCount="1"
/>
<animateTransform
begin="animateMoveCurve.end"
fill="freeze"
dur="0.5s"
repeatCount="1"
/>
</line>
<animateMotion
dur="0.5s"
begin="animateFlipCurve.end"
fill="freeze"
path="M 0 0 l 160 0"
/>
<animate
fill="freeze"
begin="animateMoveCurve.end"
dur="0.5s"
repeatCount="1"
/>
<animateTransform
begin="animateMoveCurve.end"
fill="freeze"
dur="0.5s"
repeatCount="1"
/>
</line>
<line x1="140" y1="300" x2="250" y2="300">
<animateMotion
dur="0.5s"
begin="animateFlipCurve.end"
fill="freeze"
path="M 0 0 l 160 0"
/>
<animate
fill="freeze"
begin="animateMoveCurve.end"
dur="0.5s"
repeatCount="1"
/>
<animateTransform
begin="animateMoveCurve.end"
fill="freeze"
dur="0.5s"
repeatCount="1"
/>
</line>
For each line tag, the second animation changes the stroke-width attribute from 3em to 1em. That's pretty straightforward.
<line x1="140" y1="300" x2="250" y2="300">
<animateMotion
dur="0.5s"
begin="animateFlipCurve.end"
fill="freeze"
path="M 0 0 l 160 0"
/>
<animate
attributeName="stroke-width"
from="3em"
to="1em"
fill="freeze"
begin="animateMoveCurve.end"
dur="0.5s"
repeatCount="1"
/>
<animateTransform
begin="animateMoveCurve.end"
fill="freeze"
dur="0.5s"
repeatCount="1"
/>
</line>
<line x1="140" y1="300" x2="250" y2="300">
<animateMotion
dur="0.5s"
begin="animateFlipCurve.end"
fill="freeze"
path="M 0 0 l 160 0"
/>
<animate
attributeName="stroke-width"
from="3em"
to="1em"
fill="freeze"
begin="animateMoveCurve.end"
dur="0.5s"
repeatCount="1"
/>
<animateTransform
begin="animateMoveCurve.end"
fill="freeze"
dur="0.5s"
repeatCount="1"
/>
</line>
The third animation rotates the line. We set the attributeName attribute to "transform" and the type attribute to "rotate". The from and to attribues each are a series of three numbers. The first number is the angle in which to rotate by. The second and third numbers are the point of origin of the rotation. We want that point of origin to be the far right of the lines, which is, if you use the x2 and y2 attributes, (250, 300). Note that the first line is rotated by negative 5 degrees, the second line is rotated by negative 15 degrees, and the third by negative 25 degrees.
<line x1="140" y1="300" x2="250" y2="300">
<animateMotion
dur="0.5s"
begin="animateFlipCurve.end"
fill="freeze"
path="M 0 0 l 160 0"
/>
<animate
attributeName="stroke-width"
from="3em"
to="1em"
fill="freeze"
begin="animateMoveCurve.end"
dur="0.5s"
repeatCount="1"
/>
<animateTransform
attributeName="transform"
type="rotate"
from="0 250 300"
to="-5 250 300"
begin="animateMoveCurve.end"
fill="freeze"
dur="0.5s"
repeatCount="1"
/>
</line>
<line x1="140" y1="300" x2="250" y2="300">
<animateMotion
dur="0.5s"
begin="animateFlipCurve.end"
fill="freeze"
path="M 0 0 l 160 0"
/>
<animate
attributeName="stroke-width"
from="3em"
to="1em"
fill="freeze"
begin="animateMoveCurve.end"
dur="0.5s"
repeatCount="1"
/>
<animateTransform
attributeName="transform"
type="rotate"
from="0 250 300"
to="-15 250 300"
begin="animateMoveCurve.end"
fill="freeze"
dur="0.5s"
repeatCount="1"
/>
</line>
<line x1="140" y1="300" x2="250" y2="300">
<animateMotion
dur="0.5s"
begin="animateFlipCurve.end"
fill="freeze"
path="M 0 0 l 160 0"
/>
<animate
attributeName="stroke-width"
from="3em"
to="1em"
fill="freeze"
begin="animateMoveCurve.end"
dur="0.5s"
repeatCount="1"
/>
<animateTransform
attributeName="transform"
type="rotate"
from="0 250 300"
to="-25 250 300"
begin="animateMoveCurve.end"
fill="freeze"
dur="0.5s"
repeatCount="1"
/>
</line>
<animateMotion
dur="0.5s"
begin="animateFlipCurve.end"
fill="freeze"
path="M 0 0 l 160 0"
/>
<animate
attributeName="stroke-width"
from="3em"
to="1em"
fill="freeze"
begin="animateMoveCurve.end"
dur="0.5s"
repeatCount="1"
/>
<animateTransform
attributeName="transform"
type="rotate"
from="0 250 300"
to="-5 250 300"
begin="animateMoveCurve.end"
fill="freeze"
dur="0.5s"
repeatCount="1"
/>
</line>
<line x1="140" y1="300" x2="250" y2="300">
<animateMotion
dur="0.5s"
begin="animateFlipCurve.end"
fill="freeze"
path="M 0 0 l 160 0"
/>
<animate
attributeName="stroke-width"
from="3em"
to="1em"
fill="freeze"
begin="animateMoveCurve.end"
dur="0.5s"
repeatCount="1"
/>
<animateTransform
attributeName="transform"
type="rotate"
from="0 250 300"
to="-15 250 300"
begin="animateMoveCurve.end"
fill="freeze"
dur="0.5s"
repeatCount="1"
/>
</line>
<line x1="140" y1="300" x2="250" y2="300">
<animateMotion
dur="0.5s"
begin="animateFlipCurve.end"
fill="freeze"
path="M 0 0 l 160 0"
/>
<animate
attributeName="stroke-width"
from="3em"
to="1em"
fill="freeze"
begin="animateMoveCurve.end"
dur="0.5s"
repeatCount="1"
/>
<animateTransform
attributeName="transform"
type="rotate"
from="0 250 300"
to="-25 250 300"
begin="animateMoveCurve.end"
fill="freeze"
dur="0.5s"
repeatCount="1"
/>
</line>
Aha!

Now let's repeat for the other three lines, but in reverse! Instead of the point of origin being the right end, make it the left end!
<line x1="415" y1="300" x2="525" y2="300">
<animate
attributeName="stroke-width"
from="3em"
to="1em"
fill="freeze"
begin="animateMoveCurve.end"
dur="0.5s"
repeatCount="1"
/>
<animateTransform
attributeName="transform"
type="rotate"
from="0 415 300"
to="5 415 300"
begin="animateMoveCurve.end"
fill="freeze"
dur="0.5s"
repeatCount="1"
/>
</line>
<line x1="415" y1="300" x2="525" y2="300">
<animate
attributeName="stroke-width"
from="3em"
to="1em"
fill="freeze"
begin="animateMoveCurve.end"
dur="0.5s"
repeatCount="1"
/>
<animateTransform
attributeName="transform"
type="rotate"
from="0 415 300"
to="15 415 300"
begin="animateMoveCurve.end"
fill="freeze"
dur="0.5s"
repeatCount="1"
/>
</line>
<line x1="415" y1="300" x2="525" y2="300">
<animate
attributeName="stroke-width"
from="3em"
to="1em"
fill="freeze"
begin="animateMoveCurve.end"
dur="0.5s"
repeatCount="1"
/>
<animateTransform
attributeName="transform"
type="rotate"
from="0 415 300"
to="25 415 300"
begin="animateMoveCurve.end"
fill="freeze"
dur="0.5s"
repeatCount="1"
/>
</line>
<animate
attributeName="stroke-width"
from="3em"
to="1em"
fill="freeze"
begin="animateMoveCurve.end"
dur="0.5s"
repeatCount="1"
/>
<animateTransform
attributeName="transform"
type="rotate"
from="0 415 300"
to="5 415 300"
begin="animateMoveCurve.end"
fill="freeze"
dur="0.5s"
repeatCount="1"
/>
</line>
<line x1="415" y1="300" x2="525" y2="300">
<animate
attributeName="stroke-width"
from="3em"
to="1em"
fill="freeze"
begin="animateMoveCurve.end"
dur="0.5s"
repeatCount="1"
/>
<animateTransform
attributeName="transform"
type="rotate"
from="0 415 300"
to="15 415 300"
begin="animateMoveCurve.end"
fill="freeze"
dur="0.5s"
repeatCount="1"
/>
</line>
<line x1="415" y1="300" x2="525" y2="300">
<animate
attributeName="stroke-width"
from="3em"
to="1em"
fill="freeze"
begin="animateMoveCurve.end"
dur="0.5s"
repeatCount="1"
/>
<animateTransform
attributeName="transform"
type="rotate"
from="0 415 300"
to="25 415 300"
begin="animateMoveCurve.end"
fill="freeze"
dur="0.5s"
repeatCount="1"
/>
</line>
And there's your rat head.

Finishing up...
Modify svgContainer to remove the red outline. Also, add some styling for text tag.
#svgContainer
{
width: 800px;
height: 400px;
margin: 10% auto 0 auto;
outline: 0px solid #FF0000;
}
svg
{
width: 800px;
height: 400px;
}
line, ellipse, path, text
{
stroke-width: 3em;
stroke: rgba(255, 0, 0, 1);
fill: none;
}
text
{
stroke-width: 1px;
fill: rgba(255, 0, 0, 1);
font: bold 40px arial;
}
{
width: 800px;
height: 400px;
margin: 10% auto 0 auto;
outline: 0px solid #FF0000;
}
svg
{
width: 800px;
height: 400px;
}
line, ellipse, path, text
{
stroke-width: 3em;
stroke: rgba(255, 0, 0, 1);
fill: none;
}
text
{
stroke-width: 1px;
fill: rgba(255, 0, 0, 1);
font: bold 40px arial;
}
When you're done, add some text at the end of the svg object.
<ellipse cx="615" cy="200" rx="40" ry="100">
<animate
id="animateEllipseSize2"
attributeName="ry"
from="100"
to="70"
fill="freeze"
begin="animateFlipCurve.end"
dur="0.5s"
repeatCount="1"
/>
<animate
attributeName="rx"
from="40"
to="70"
fill="freeze"
begin="animateFlipCurve.end"
dur="0.5s"
repeatCount="1"
/>
<animate
attributeName="cy"
from="200"
to="100"
fill="freeze"
begin="animateEllipseSize2.end"
dur="0.5s"
repeatCount="1"
/>
<animate
attributeName="cx"
from="615"
to="565"
fill="freeze"
begin="animateEllipseSize2.end"
dur="0.5s"
repeatCount="1"
/>
</ellipse>
<text x="150" y="400">
HAPPY YEAR OF THE RAT
</text>
<animate
id="animateEllipseSize2"
attributeName="ry"
from="100"
to="70"
fill="freeze"
begin="animateFlipCurve.end"
dur="0.5s"
repeatCount="1"
/>
<animate
attributeName="rx"
from="40"
to="70"
fill="freeze"
begin="animateFlipCurve.end"
dur="0.5s"
repeatCount="1"
/>
<animate
attributeName="cy"
from="200"
to="100"
fill="freeze"
begin="animateEllipseSize2.end"
dur="0.5s"
repeatCount="1"
/>
<animate
attributeName="cx"
from="615"
to="565"
fill="freeze"
begin="animateEllipseSize2.end"
dur="0.5s"
repeatCount="1"
/>
</ellipse>
<text x="150" y="400">
HAPPY YEAR OF THE RAT
</text>
Adjust as necessary!

That's it, we're done...
That was fun. And hopefully, that's just a prelude to the awesomeness that will be The Year of The Rat!
Wishing you an enor-mouse-ly auspicious Lunar New Year!
T___T
T___T
No comments:
Post a Comment