We'll be using PHP, and you will of course, need to sign up for a developer account at Open AI, get an application key and so on. And then you'll need the code from the existing repository here.
After that, we change the filename to a PHP extension, and start adding PHP code.
<?php
?>
<!DOCTYPE html>
<html>
<head>
<title>Easter Puzzle</title>
?>
<!DOCTYPE html>
<html>
<head>
<title>Easter Puzzle</title>
We begin by declaring variables key, org and url. key is the api key you will have been given, org is your account id, and url is the endpoint URL for OpenAI's image generation API.
<?php
$key = "sk-xxx";
$org = "org-FUOhDblZb1pxvaY6YylF54gl";
$url = 'https://api.openai.com/v1/images/generations';
?>
<!DOCTYPE html>
<html>
<head>
<title>Easter Puzzle</title>
$key = "sk-xxx";
$org = "org-FUOhDblZb1pxvaY6YylF54gl";
$url = 'https://api.openai.com/v1/images/generations';
?>
<!DOCTYPE html>
<html>
<head>
<title>Easter Puzzle</title>
We follow up by declaring the headers array. In it, we use key and org to identify ourselves, and ensure that the content-type property is set to JSON.
$key = "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";
$org = "org-FUOhDblZb1pxvaY6YylF54gl";
$url = 'https://api.openai.com/v1/images/generations';
$headers =
[
"Authorization: Bearer " . $key,
"OpenAI-Organization: " . $org,
"Content-Type: application/json"
];
$org = "org-FUOhDblZb1pxvaY6YylF54gl";
$url = 'https://api.openai.com/v1/images/generations';
$headers =
[
"Authorization: Bearer " . $key,
"OpenAI-Organization: " . $org,
"Content-Type: application/json"
];
Then we declare data as an associative array. model specifies the AI model we will be using. prompt can be anything that you want the engine to use for generating the image - in this case I have a string telling it I want a picture of Easter eggs. n is the number of images to generate, and in this case we only want one image. size can have a range of different values, and I'm going to specify a square. For response_format, you can get the API to give you the image as a string of serialized code (but then we'd have to decode on our server, so screw that) or just give us the URL to that image that will be stored on their server.
$headers =
[
"Authorization: Bearer " . $key,
"OpenAI-Organization: " . $org,
"Content-Type: application/json"
];
$data = [];
$data["model"] = "dall-e-2";
$data["prompt"] = "A picture of Easter eggs.";
$data["n"] = 1;
$data["size"] = "1024x1024";
$data["response_format"] = "url";
[
"Authorization: Bearer " . $key,
"OpenAI-Organization: " . $org,
"Content-Type: application/json"
];
$data = [];
$data["model"] = "dall-e-2";
$data["prompt"] = "A picture of Easter eggs.";
$data["n"] = 1;
$data["size"] = "1024x1024";
$data["response_format"] = "url";
We then use cURL to access the endpoint. If there's an error, we print it out.
$data = [];
$data["model"] = "dall-e-2";
$data["prompt"] = "A picture of Easter eggs.";
$data["n"] = 1;
$data["size"] = "1024x1024";
$data["response_format"] = "url";
$curl = curl_init($url);
curl_setopt($curl, CURLOPT_POST, 1);
curl_setopt($curl, CURLOPT_POSTFIELDS, json_encode($data));
curl_setopt($curl, CURLOPT_HTTPHEADER, $headers);
curl_setopt($curl, CURLOPT_RETURNTRANSFER, 1);
$result = curl_exec($curl);
if (curl_errno($curl))
{
echo 'Error:' . curl_error($curl);
}
If not, run json_decode() on result, and grab the url of the image, setting it as the value of imgURL. Finally, use curl_close() to sew things up.
$curl = curl_init($url);
curl_setopt($curl, CURLOPT_POST, 1);
curl_setopt($curl, CURLOPT_POSTFIELDS, json_encode($data));
curl_setopt($curl, CURLOPT_HTTPHEADER, $headers);
curl_setopt($curl, CURLOPT_RETURNTRANSFER, 1);
$result = json_decode($result);
$imgeURL = $result->data[0]->url;
curl_close($curl);
That's the easy part! Now we get to another easy part - setting the image as the puzzle image. In the CSS, modify the CSS class piece. Instead of the previously hardcoded image, use imageURL. And ensure that the background-size property is set to 500 by 500 pixels, because your image is actually 1024 by 1024 pixels.
.piece
{
width: 100%;
height: 100%;
background-image: url(<?php echo $imgeURL; ?>);
background-repeat: no-repeat;
background-size: 500px 500px;
}
{
width: 100%;
height: 100%;
background-image: url(<?php echo $imgeURL; ?>);
background-repeat: no-repeat;
background-size: 500px 500px;
}
Now if you run this, you should see a new image come up.
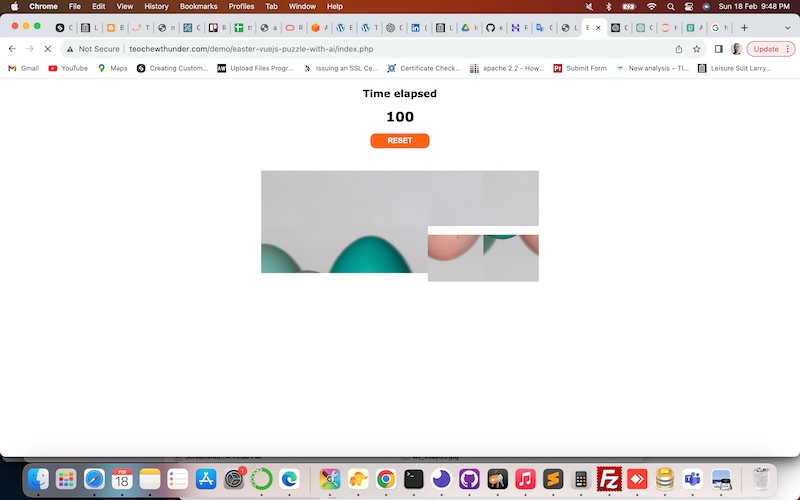
But uh-oh, there's a delay in image loading. The timer has even started running down even before the image is done loading.

That's only to be expected. Your browser code will run faster than the server code sending data to OpenAI and back. And depending on the speed of OpenAI's server where the image is stored, there's going to be some level of lag. What we need to do is mitigate that. That's the hard part. First, we change this message in the reset() function. Originally, it reads "Time elapsed", but now we will switch it to a notice for the user to wait.
reset: function()
{
this.stopTimer();
this.seconds = 100;
this.btnText = "RESET";
this.message = "Please wait while image loads...";
this.startTimer();
{
this.stopTimer();
this.seconds = 100;
this.btnText = "RESET";
this.message = "Please wait while image loads...";
this.startTimer();
Also, now the reset() method will have a parameter, delay. What do we do with this value? Well, we pass it in as an argument when calling the startTimer() method.
reset: function(delay)
{
this.stopTimer();
this.seconds = 100;
this.btnText = "RESET";
this.message = "Please wait while image loads...";
this.startTimer(delay);
{
this.stopTimer();
this.seconds = 100;
this.btnText = "RESET";
this.message = "Please wait while image loads...";
this.startTimer(delay);
This means we also need to change the startTimer() method. Firstly and most obviously, we introduce the parameter delay.
startTimer: function(delay)
{
if (this.timer == undefined)
{
this.timer = setInterval
(
() =>
{
this.seconds = this.seconds - 1;
this.message = "Time elapsed";
if (this.seconds == 0)
{
this.stopTimer();
this.btnText = "REPLAY";
this.message = "Better luck next time!";
}
if (this.checkIncorrectPieces() == 0)
{
this.stopTimer();
this.btnText = "REPLAY";
this.message = "Congratulations!";
}
},
1000
);
}
},
{
if (this.timer == undefined)
{
this.timer = setInterval
(
() =>
{
this.seconds = this.seconds - 1;
this.message = "Time elapsed";
if (this.seconds == 0)
{
this.stopTimer();
this.btnText = "REPLAY";
this.message = "Better luck next time!";
}
if (this.checkIncorrectPieces() == 0)
{
this.stopTimer();
this.btnText = "REPLAY";
this.message = "Congratulations!";
}
},
1000
);
}
},
And then we wrap the entire section involving the setInterval() function, within a callback which will be used in a setTimeout() function, using delay as the duration. And inside it, we also set the message property value to "Time elapsed".
startTimer: function(delay)
{
if (this.timer == undefined)
{
setTimeout
(
() =>
{
this.timer = setInterval
(
() =>
{
this.seconds = this.seconds - 1;
this.message = "Time elapsed";
if (this.seconds == 0)
{
this.stopTimer();
this.btnText = "REPLAY";
this.message = "Better luck next time!";
}
if (this.checkIncorrectPieces() == 0)
{
this.stopTimer();
this.btnText = "REPLAY";
this.message = "Congratulations!";
}
},
1000
);
},
delay
);
}
},
{
if (this.timer == undefined)
{
setTimeout
(
() =>
{
this.timer = setInterval
(
() =>
{
this.seconds = this.seconds - 1;
this.message = "Time elapsed";
if (this.seconds == 0)
{
this.stopTimer();
this.btnText = "REPLAY";
this.message = "Better luck next time!";
}
if (this.checkIncorrectPieces() == 0)
{
this.stopTimer();
this.btnText = "REPLAY";
this.message = "Congratulations!";
}
},
1000
);
},
delay
);
}
},
Then we ensure that when we call reset() upon a page load, it has about a 5 second delay.
created: function()
{
this.reset(5000);
}
{
this.reset(5000);
}
But in the HTML, this value will be 0 when we click the button to run reset(). Because if that button is being clicked, that means the user just wants to reset the game and the image has already been loaded, so there's no need for a delay.
<div id="timeContainer">
<h2>{{message}}</h2>
<h1>{{seconds}}</h1>
<button v-on:click="reset(0)">{{btnText}}</button>
</div>
<h2>{{message}}</h2>
<h1>{{seconds}}</h1>
<button v-on:click="reset(0)">{{btnText}}</button>
</div>
Now we see this happen! And the timer doesn't count down until...

...the entire image is loaded! If you click the RESET button, the pieces rearrange themselves and the timer starts counting down immediately!

One more feature...
What if you wanted to just change the image altogether? Well, the straightforward thing to do would be to refresh the browser, but it's still considered good service to add a button.<div id="timeContainer">
<h2>{{message}}</h2>
<h1>{{seconds}}</h1>
<button v-on:click="reset(0)">{{btnText}}</button>
<button>NEW IMAGE</button>
</div>
<h2>{{message}}</h2>
<h1>{{seconds}}</h1>
<button v-on:click="reset(0)">{{btnText}}</button>
<button>NEW IMAGE</button>
</div>
Use the v-on:click binding attribute and set it to run the refresh() method.
<div id="timeContainer">
<h2>{{message}}</h2>
<h1>{{seconds}}</h1>
<button v-on:click="reset(0)">{{btnText}}</button>
<button v-on:click="refresh">NEW IMAGE</button>
</div>
<h2>{{message}}</h2>
<h1>{{seconds}}</h1>
<button v-on:click="reset(0)">{{btnText}}</button>
<button v-on:click="refresh">NEW IMAGE</button>
</div>
Add the refresh() method to the methods object. In it, you set the message property to a friendly warning.
methods:
{
refresh: function()
{
this.message = "Please wait while new image loads...";
},
reset: function(delay)
{
{
refresh: function()
{
this.message = "Please wait while new image loads...";
},
reset: function(delay)
{
Then you run the stopTimer() method, and finally refresh using the built-in JavaScript reload() method.
methods:
{
refresh: function()
{
this.message = "Please wait while new image loads...";
this.stopTimer();
window.location.reload();
},
reset: function(delay)
{
{
refresh: function()
{
this.message = "Please wait while new image loads...";
this.stopTimer();
window.location.reload();
},
reset: function(delay)
{
There you go. Click the NEW IMAGE button, and "Please wait while the new image loads..." should appear briefly before the page reloads entirely!

Final words, and hope you had a Happy Easter!
Well, this has been fun. AI is full of interesting new possibilities, and with this little exercise today, we've just scratched the surface.Piece be with you,
T___T
T___T
No comments:
Post a Comment