In this four-parter, we will be going through the process of creating one, from the ground up. This will be in PHP, so you'll need an appropriate server.
Why so long? It's just a Contact Us page!
Well yes, young buck, it is a Contact Us page, but it's not just a Contact Us page. When you have a submittable form, this opens you up to multiple forms of malicious attack. It's my responsibility to show you how to protect yourself against such, and go through other aspects of page creation such as responsive layout.As such, this tutorial will be in four parts. First, we will make it work. Then we will validate input. After that, it will be about making it look nice, and layout issues.
We begin with some HTML.
<!DOCTYPE html>
<html>
<head>
<title>Contact Us</title>
<style>
</style>
<script>
</script>
</head>
<body>
</body>
</html>
<html>
<head>
<title>Contact Us</title>
<style>
</style>
<script>
</script>
</head>
<body>
</body>
</html>
Now add a div and style it using the contentContainer CSS class. That's where all your markup will appear in, from now on.
<body>
<div class="contactContainer">
</div>
</body>
<div class="contactContainer">
</div>
</body>
In it, add a div and its style will be messageContainer. Make sure it contains the PHP variable, message.
<body>
<div class="contactContainer">
<div class="messageContainer">
<?php echo $message; ?>
</div>
</div>
</body>
<div class="contactContainer">
<div class="messageContainer">
<?php echo $message; ?>
</div>
</div>
</body>
Add another div, styled using innerContainer. The elements of your page will be in there.
<body>
<div class="contactContainer">
<div class="messageContainer">
<?php echo $message; ?>
</div>
<div class="innerContainer">
</div>
</div>
</body>
<div class="contactContainer">
<div class="messageContainer">
<?php echo $message; ?>
</div>
<div class="innerContainer">
</div>
</div>
</body>
In that div, we add three divs, styled using formContainer, cardContainer and mapContainer. For this part of the tutorial, we need only concern ourselves with the first div.
<div class="innerContainer">
<div class="formContainer">
</div>
<div class="cardContainer">
</div>
<div class="mapContainer">
</div>
</div>
<div class="formContainer">
</div>
<div class="cardContainer">
</div>
<div class="mapContainer">
</div>
</div>
In this div, we add a HTML form. The action attribute is left blank, which means it will submit to the current page, and the method is "POST".
<div class="formContainer">
<form action="" method="POST">
</form>
</div>
<form action="" method="POST">
</form>
</div>
Now, add four divs within. Each of them will be styled using the CSS class formrow.
<div class="formContainer">
<form action="" method="POST">
<div class="formrow">
</div>
<div class="formrow">
</div>
<div class="formrow">
</div>
<div class="formrow">
</div>
</form>
</div>
<form action="" method="POST">
<div class="formrow">
</div>
<div class="formrow">
</div>
<div class="formrow">
</div>
<div class="formrow">
</div>
</form>
</div>
We're going to ask for the user's name, email, and some comments. So add inputs and labels. Labels are important because they allow the input to be accessed by clicking (or tapping, in the case of mobile interfaces) on the label. On a large screen, it's not that useful, but if you were doing this on the small screen of a mobile phone, every little bit of extra usability helps. For comments, instead of a textbox, we use a textarea tag. Note that each element requires a name attribute. The name attribute is important for form submission. Also, we should specify the maxlength attribute to help prevent possible malicious input. 50 characters for a name and email, and 500 for comments, should be enough.
Also make sure the form elements all have id attributes - they'll enable the elements to be focused when clicking on the labels. Plus, they'll be useful in the next part of this tutorial when we want to get into the Document Object Model (DOM).
<div class="formContainer">
<form action="" method="POST">
<div class="formrow">
<label for="txtName">Name</label><br />
<input type="text" id="txtName" name="txtName" maxlength="50" />
</div>
<div class="formrow">
<label for="txtEmail">Email</label><br />
<input type="text" id="txtEmail" name="txtEmail" maxlength="50" />
</div>
<div class="formrow">
<label for="txtComments">Comments</label><br />
<textarea type="text" id="txtComments" name="txtComments" rows="5" maxlength="500" wrap="hard"></textarea>
</div>
<div class="formrow">
</div>
</form>
</div>
So your form is there. It's ugly as shit, but that's not an issue at the moment.

Let's improve on usability by adding placeholder attributes.
<div class="formContainer">
<form action="" method="POST">
<div class="formrow">
<label for="txtName">Name</label><br />
<input type="text" id="txtName" name="txtName" maxlength="50" placeholder="e.g, Jose D'Cruz" />
</div>
<div class="formrow">
<label for="txtEmail">Email</label><br />
<input type="text" id="txtEmail" name="txtEmail" maxlength="50" placeholder="e.g, j_dcruz208@youremail.com" />
</div>
<div class="formrow">
<label for="txtComments">Comments</label><br />
<textarea type="text" id="txtComments" name="txtComments" rows="5" maxlength="500" wrap="hard" placeholder="e.g, You're awesome!"></textarea>
</div>
<div class="formrow">
</div>
</form>
</div>
Yep, now we have example text to guide clueless users.

Add a button in the last div. The type attribute's value is "submit", which means it submits the form that it is in when clicked. Its name is btnSend, and this is going to be very relevant soon.
<div class="formContainer">
<form action="" method="POST">
<div class="formrow">
<label for="txtName">Name</label><br />
<input type="text" id="txtName" name="txtName" maxlength="50" placeholder="e.g, Jose D'Cruz" />
</div>
<div class="formrow">
<label for="txtEmail">Email</label><br />
<input type="text" id="txtEmail" name="txtEmail" maxlength="50" placeholder="e.g, j_dcruz208@youremail.com" />
</div>
<div class="formrow">
<label for="txtComments">Comments</label><br />
<textarea type="text" id="txtComments" name="txtComments" rows="5" maxlength="500" wrap="hard" placeholder="e.g, You're awesome!"></textarea>
</div>
<div class="formrow">
<input type="submit" id="btnSend" name="btnSend" value="Send">
</div>
</form>
</div>
Your form should look like this now.

The HTML portion is done for now. Now we need some PHP code.
<?php
?>
<!DOCTYPE html>
<html>
?>
<!DOCTYPE html>
<html>
These lines declare the variables message, form_name, form_email and form_comments, and sets them to an empty string. Also declare mailsent and set it to false.
<?php
$message = "";
$mailsent = false;
$form_email = "";
$form_name = "";
$form_comments = "";
?>
$message = "";
$mailsent = false;
$form_email = "";
$form_name = "";
$form_comments = "";
?>
Next, we check for the presence of the POST variable btnSend by using the isset() function. If data has been posted to the page, the _POST associative array will hold the variables. And since we're checking specifically for a key named btnSend, this means that the page will not be acting as though stuff has been posted on every reload, only when there is a key named btnSend in the _POST associative array.
<?php
$message = "";
$mailsent = false;
$form_email = "";
$form_name = "";
$form_comments = "";
if (isset($_POST["btnSend"]))
{
}
?>
$message = "";
$mailsent = false;
$form_email = "";
$form_name = "";
$form_comments = "";
if (isset($_POST["btnSend"]))
{
}
?>
Here, we set form_name, form_email and form_comments to the appropriate values in the _POST associative array. These are all in the _POST associative array as key-value pairs when the form is submitted. We also run them through the trim() function to remove extra leading and trailing spaces.
<?php
$message = "";
$mailsent = false;
$form_email = "";
$form_name = "";
$form_comments = "";
if (isset($_POST["btnSend"]))
{
$form_name = trim($_POST["txtName"]);
$form_email = trim($_POST["txtEmail"]);
$form_comments = trim($_POST["txtComments"]);
}
?>
$message = "";
$mailsent = false;
$form_email = "";
$form_name = "";
$form_comments = "";
if (isset($_POST["btnSend"]))
{
$form_name = trim($_POST["txtName"]);
$form_email = trim($_POST["txtEmail"]);
$form_comments = trim($_POST["txtComments"]);
}
?>
Next, we call an emailer function. Using the name and email, we set the title and subject of the email, along with the headers. We'll use the n12br() function to convert the breaks in form_comments.
if (isset($_POST["btnSend"]))
{
$form_name = trim($_POST["txtName"]);
$form_email = trim($_POST["txtEmail"]);
$form_comments = trim($_POST["txtComments"]);
$headers = "MIME-Version: 1.0\r\n";
$headers .= "Content-type:text/html;charset=UTF-8\r\n";
$headers .= "From: " . $form_email . "\r\n";
$headers .= "X-Mailer: PHP/" . phpversion();
$subject = "Contact request from " . $form_name;
$body = nl2br($form_comments);
}
Now, we'll use the mail() function and return the result to the variable mailsent. If successful, it'll return true and false otherwise.
if (isset($_POST["btnSend"]))
{
$form_name = trim($_POST["txtName"]);
$form_email = trim($_POST["txtEmail"]);
$form_comments = trim($_POST["txtComments"]);
$headers = "MIME-Version: 1.0\r\n";
$headers .= "Content-type:text/html;charset=UTF-8\r\n";
$headers .= "From: " . $form_email . "\r\n";
$headers .= "X-Mailer: PHP/" . phpversion();
$subject = "Contact request from " . $form_name;
$body = nl2br($form_comments);
$mailsent = mail("teochewthunder@gmail.com", $subject, $body, $headers);
if ($mailsent)
{
}
else
{
}
}
{
$form_name = trim($_POST["txtName"]);
$form_email = trim($_POST["txtEmail"]);
$form_comments = trim($_POST["txtComments"]);
$headers = "MIME-Version: 1.0\r\n";
$headers .= "Content-type:text/html;charset=UTF-8\r\n";
$headers .= "From: " . $form_email . "\r\n";
$headers .= "X-Mailer: PHP/" . phpversion();
$subject = "Contact request from " . $form_name;
$body = nl2br($form_comments);
$mailsent = mail("teochewthunder@gmail.com", $subject, $body, $headers);
if ($mailsent)
{
}
else
{
}
}
If successful, we want the message to be this.
if ($mailsent)
{
$message = "Email sent. Thank you!";
}
else
{
}
{
$message = "Email sent. Thank you!";
}
else
{
}
If not, we use this instead.
if ($mailsent)
{
$message = "Email sent. Thank you!";
}
else
{
$message = "An error occured while trying to send your mail. Please try again.";
}
{
$message = "Email sent. Thank you!";
}
else
{
$message = "An error occured while trying to send your mail. Please try again.";
}
Note that the mail() function only serves to check if your values are valid. It could return true without actually sending any email. It all depends on how your PHP and SMTP servers are set up. My environmental setup is appropriate... but you might want to try some kind of external library for PHP Mailing otherwise.
Either way, let's test this input.

Success!


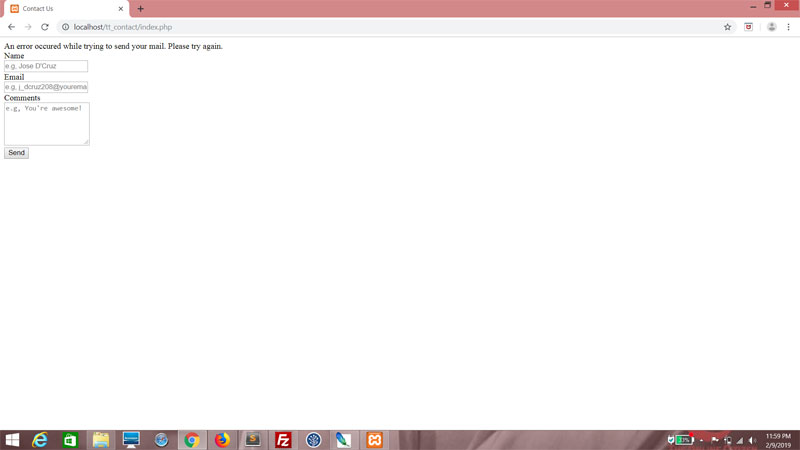
What if we modified this, an obviously invalid email?
$mailsent = mail("xxx", $subject, $body, $headers);
This is what you should get. If you don't get this, again, it could be your PHP and SMTP setup.
OK, stuff works. What next?
What's next is security. All we did was verify the presence of a btnSend variable. I could just as easily post variables to this page from another domain, and fool the script into thinking that it's valid by adding a btnSend key. So we'll add an Anti-CSRF Token here, as a hidden field next to the button. (It doesn't have to be next to the button; put it anywhere you want as long as it's within the form tag.) The hidden field will be named csrftoken. Its value will be the md5 value of the session id, obtained using the session_id() function.Here's a previous web tutorial on the Anti-CSRF Token if you're interested.
<div class="formrow">
<input type="submit" id="btnSend" name="btnSend" value="Send">
<input type="hidden" id="csrftoken" name="csrftoken" value="<?php echo md5(session_id()); ?>">
</div>
<input type="submit" id="btnSend" name="btnSend" value="Send">
<input type="hidden" id="csrftoken" name="csrftoken" value="<?php echo md5(session_id()); ?>">
</div>
Now, the session_id() function is useless if we don't start a session. So do this right at the start of the page.
<?php
session_start();
$message = "";
session_start();
$message = "";
Then within the first If block, declare a variable, csrftoken. And if a similarly named key-value pair exists in the posted data, set csrftoken to this value.
<?php
session_start();
$message = "";
$mailsent = false;
$form_email = "";
$form_name = "";
$form_comments = "";
if (isset($_POST["btnSend"]))
{
$csrftoken = (isset($_POST["csrftoken"]) ? $_POST["csrftoken"] : "");
session_start();
$message = "";
$mailsent = false;
$form_email = "";
$form_name = "";
$form_comments = "";
if (isset($_POST["btnSend"]))
{
$csrftoken = (isset($_POST["csrftoken"]) ? $_POST["csrftoken"] : "");
Next, check for a match between csrftoken and the actual session id. It should be a match. Process the form only if there is a match. If it's not a match, someone is trying some Cross-Site Forgery on you, and you should change the variable message.
if (isset($_POST["btnSend"]))
{
$csrftoken = (isset($_POST["csrftoken"]) ? $_POST["csrftoken"] : "");
if ($csrftoken == md5(session_id()))
{
$form_name = trim($_POST["txtName"]);
$form_email = trim($_POST["txtEmail"]);
$form_comments = trim($_POST["txtComments"]);
$headers = "MIME-Version: 1.0\r\n";
$headers .= "Content-type:text/html;charset=UTF-8\r\n";
$headers .= "From: " . $form_email . "\r\n";
$headers .= "X-Mailer: PHP/" . phpversion();
$subject = "Contact request from " . $form_name;
$body = nl2br($form_comments);
$mailsent = mail("teochewthunder@gmail.com", $subject, $body, $headers);
if ($mailsent)
{
$message = "Email sent. Thank you!";
}
else
{
$message = "An error occured while trying to send your mail. Please try again.";
}
}
else
{
$message = "CSRF attack foiled!";
}
{
$csrftoken = (isset($_POST["csrftoken"]) ? $_POST["csrftoken"] : "");
if ($csrftoken == md5(session_id()))
{
$form_name = trim($_POST["txtName"]);
$form_email = trim($_POST["txtEmail"]);
$form_comments = trim($_POST["txtComments"]);
$headers = "MIME-Version: 1.0\r\n";
$headers .= "Content-type:text/html;charset=UTF-8\r\n";
$headers .= "From: " . $form_email . "\r\n";
$headers .= "X-Mailer: PHP/" . phpversion();
$subject = "Contact request from " . $form_name;
$body = nl2br($form_comments);
$mailsent = mail("teochewthunder@gmail.com", $subject, $body, $headers);
if ($mailsent)
{
$message = "Email sent. Thank you!";
}
else
{
$message = "An error occured while trying to send your mail. Please try again.";
}
}
else
{
$message = "CSRF attack foiled!";
}
Try it! Change the value in the HTML to something else and click the Submit button.
<input type="hidden" id="csrftoken" name="csrftoken" value="<?php echo ""; ?>">
This is what you should get. Of course, the message will never show in the event of a real Cross-Site Forgery Request, but it's a good visual indicator of your security setup. Remember to revert the value of the hidden field after you're done testing.

No comments:
Post a Comment