So in solidarity, I searched out some protest art on the Clubhouse app, and as it turns out, most of it is a variation on the theme of Ukraine's blue-and-yellow flag.

This gave me the idea to create a simple graphic generator to create Ukraine invasion protest art!
Here's some HTML, and in it we will give the divs a red outline so we can see what we're doing. We also set some font styles. And before I forget, we also want to declare the function generateGraphic(), which has a parameter, section.
<!DOCTYPE html>
<html>
<head>
<title>#IStandWithUkraine</title>
<style>
div {outline: 1px solid red;}
body
{
font-family: arial;
font-size: 10px;
line-height: 3em;
}
</style>
<script>
function generateGraphic(section)
{
}
</script>
</head>
<body>
</body>
</html>
<html>
<head>
<title>#IStandWithUkraine</title>
<style>
div {outline: 1px solid red;}
body
{
font-family: arial;
font-size: 10px;
line-height: 3em;
}
</style>
<script>
function generateGraphic(section)
{
}
</script>
</head>
<body>
</body>
</html>
Now we set up two divs - one for the image and one for the dashboard. Their CSS styles will be named accordingly.
<body>
<div class="image">
</div>
<div class="dashboard">
</div>
</body>
<div class="image">
</div>
<div class="dashboard">
</div>
</body>
Here's the styling. As you can see, the divs take up roughly half of the screen width, and they are floated to opposite sides.
body
{
font-family: arial;
font-size: 10px;
line-height: 3em;
}
.image
{
width: 45%;
height: 600px;
float: left;
}
.dashboard
{
width: 45%;
float: right;
}
{
font-family: arial;
font-size: 10px;
line-height: 3em;
}
.image
{
width: 45%;
height: 600px;
float: left;
}
.dashboard
{
width: 45%;
float: right;
}
Simple so far. Only the div styled using image is a box, and that's because we specified the height.

Inside that div, we add two more divs, styling them with top and bottom. And in each of these divs, there is yet another div. They will have the id message1 and message2 respectively.
<div class="image">
<div class="top">
<div id="message1"></div>
</div>
<div class="bottom">
<div id="message2"></div>
</div>
</div>
<div class="top">
<div id="message1"></div>
</div>
<div class="bottom">
<div id="message2"></div>
</div>
</div>
Now, top and bottom will both take up full width, with 300 pixels height. Text will be aligned center. As with the Ukrainian flag, the top half has a blue background and the bottom half has a yellow background. This is reversed with the color property, and a lowered opacity.
.image
{
width: 45%;
height: 600px;
float: left;
}
.top
{
width: 100%;
height: 300px;
text-align: center;
color: rgba(255, 255, 0, 0.8);
background-color: rgba(0, 0, 200, 1);
}
.bottom
{
width: 100%;
height: 300px;
text-align: center;
color: rgba(0, 0, 200, 0.8);
background-color: rgba(255, 255, 0, 1);
}
.dashboard
{
width: 45%;
float: right;
}
{
width: 45%;
height: 600px;
float: left;
}
.top
{
width: 100%;
height: 300px;
text-align: center;
color: rgba(255, 255, 0, 0.8);
background-color: rgba(0, 0, 200, 1);
}
.bottom
{
width: 100%;
height: 300px;
text-align: center;
color: rgba(0, 0, 200, 0.8);
background-color: rgba(255, 255, 0, 1);
}
.dashboard
{
width: 45%;
float: right;
}
Oh there it is, right there.

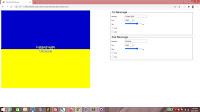
Now let's concentrate on the dashboard. We want a fieldset here. Let's create a legend for it, with the text "1st Message".
<div class="dashboard">
<fieldset>
<legend>1st Message</legend>
</fieldset>
</div>
<fieldset>
<legend>1st Message</legend>
</fieldset>
</div>
Here's some styling for the fieldset and legend tags. It's not necessary, but things will look nicer.
.dashboard
{
width: 45%;
float: right;
}
fieldset
{
width: 90%;
}
legend
{
font-size: 2em;
font-weight: bold;
}
{
width: 45%;
float: right;
}
fieldset
{
width: 90%;
}
legend
{
font-size: 2em;
font-weight: bold;
}
This is how the fieldset looks like.

Let's add a label and textbox. The id will be text1, we add a value and a placeholder attribute, then specify that if the value changes, the generateGraphic() function will be run with "1" passed in.
<fieldset>
<legend>1st Message</legend>
<label for="text1">Message: </label>
<input id="text1" value="I stand with" onchange="generateGraphic(1)" placeholder="Top Message" />
</fieldset>
<legend>1st Message</legend>
<label for="text1">Message: </label>
<input id="text1" value="I stand with" onchange="generateGraphic(1)" placeholder="Top Message" />
</fieldset>
Here, we just set a standard width for labels. Again, not necessary, but it will be neater.
fieldset
{
width: 90%;
}
legend
{
font-size: 2em;
font-weight: bold;
}
label
{
display: inline-block;
width: 10em;
}
{
width: 90%;
}
legend
{
font-size: 2em;
font-weight: bold;
}
label
{
display: inline-block;
width: 10em;
}
Going good!

Next, we add a break and put in a drop-down list, with an id of font1. Again, we make sure that if the value changes, the generateGraphic() function will be run with "1" passed in.
<fieldset>
<legend>1st Message</legend>
<label for="text1">Message: </label>
<input id="text1" value="I stand with" onchange="generateGraphic(1)" placeholder="Top Message" />
<br />
<label for="font1">Font: </label>
<select id="font1" onchange="generateGraphic(1)">
</select>
</fieldset>
<legend>1st Message</legend>
<label for="text1">Message: </label>
<input id="text1" value="I stand with" onchange="generateGraphic(1)" placeholder="Top Message" />
<br />
<label for="font1">Font: </label>
<select id="font1" onchange="generateGraphic(1)">
</select>
</fieldset>
Add some options here. You can add more options if you feel that the list is really limited, but these are just a few.
<fieldset>
<legend>1st Message</legend>
<label for="text1">Message: </label>
<input id="text1" value="I stand with" onchange="generateGraphic(1)" placeholder="Top Message" />
<br />
<label for="font1">Font: </label>
<select id="font1" onchange="generateGraphic(1)">
<option value="arial">arial</option>
<option value="georgia">georgia</option>
<option value="impact">impact</option>
<option value="verdana">verdana</option>
</select>
</fieldset>
Here's the drop-down list!

We'll create a range input next. The id is size1. You can fill in whatever values you want for the value, min and max property, but these are what I recommend. However, the step property should be 1.
<fieldset>
<legend>1st Message</legend>
<label for="text1">Message: </label>
<input id="text1" value="I stand with" onchange="generateGraphic(1)" placeholder="Top Message" />
<br />
<label for="font1">Font: </label>
<select id="font1" onchange="generateGraphic(1)">
<option value="arial">arial</option>
<option value="georgia">georgia</option>
<option value="impact">impact</option>
<option value="verdana">verdana</option>
</select>
<br />
<label for="size1">Size: </label>
<input type="range" id="size1" value="28" min="8" max="35" step="1" onchange="generateGraphic(1)" /> px
</fieldset>
So far so good...

Here, we add two checkboxes, bold1 and italic1. We follow the same model for the rest of the elements we've created so far.
<fieldset>
<legend>1st Message</legend>
<label for="text1">Message: </label>
<input id="text1" value="I stand with" onchange="generateGraphic(1)" placeholder="Top Message" />
<br />
<label for="font1">Font: </label>
<select id="font1" onchange="generateGraphic(1)">
<option value="arial">arial</option>
<option value="georgia">georgia</option>
<option value="impact">impact</option>
<option value="verdana">verdana</option>
</select>
<br />
<label for="size1">Size: </label>
<input type="range" id="size1" value="28" min="8" max="35" step="1" onchange="generateGraphic(1)" /> px
<br />
<label for="bold1"><input type="checkbox" id="bold1" onchange="generateGraphic(1)" /> Bold</label>
<br />
<label for="italic1"><input type="checkbox" id="italic1" onchange="generateGraphic(1)" /> italic</label>
</fieldset>
Beautiful!

Copy the entire fieldset and paste it.
<div class="dashboard">
<fieldset>
<legend>1st Message</legend>
<label for="text1">Message: </label>
<input id="text1" value="I stand with" onchange="generateGraphic(1)" placeholder="Top Message" />
<br />
<label for="font1">Font: </label>
<select id="font1" onchange="generateGraphic(1)">
<option value="arial">arial</option>
<option value="georgia">georgia</option>
<option value="impact">impact</option>
<option value="verdana">verdana</option>
</select>
<br />
<label for="size1">Size: </label>
<input type="range" id="size1" value="28" min="8" max="35" step="1" onchange="generateGraphic(1)" /> px
<br />
<label for="bold1"><input type="checkbox" id="bold1" onchange="generateGraphic(1)" /> Bold</label>
<br />
<label for="italic1"><input type="checkbox" id="italic1" onchange="generateGraphic(1)" /> italic</label>
</fieldset>
</div>
<fieldset>
<legend>1st Message</legend>
<label for="text1">Message: </label>
<input id="text1" value="I stand with" onchange="generateGraphic(1)" placeholder="Top Message" />
<br />
<label for="font1">Font: </label>
<select id="font1" onchange="generateGraphic(1)">
<option value="arial">arial</option>
<option value="georgia">georgia</option>
<option value="impact">impact</option>
<option value="verdana">verdana</option>
</select>
<br />
<label for="size1">Size: </label>
<input type="range" id="size1" value="28" min="8" max="35" step="1" onchange="generateGraphic(1)" /> px
<br />
<label for="bold1"><input type="checkbox" id="bold1" onchange="generateGraphic(1)" /> Bold</label>
<br />
<label for="italic1"><input type="checkbox" id="italic1" onchange="generateGraphic(1)" /> italic</label>
</fieldset>
</div>
Make these changes. We want this fieldset to be for the second message, so change the ids and the argument passed into the function call for generateGraphic().
<div class="dashboard">
<fieldset>
<legend>1st Message</legend>
<label for="text1">Message: </label>
<input id="text1" value="I stand with" onchange="generateGraphic(1)" placeholder="Top Message" />
<br />
<label for="font1">Font: </label>
<select id="font1" onchange="generateGraphic(1)">
<option value="arial">arial</option>
<option value="georgia">georgia</option>
<option value="impact">impact</option>
<option value="verdana">verdana</option>
</select>
<br />
<label for="size1">Size: </label>
<input type="range" id="size1" value="28" min="8" max="35" step="1" onchange="generateGraphic(1)" /> px
<br />
<label for="bold1"><input type="checkbox" id="bold1" onchange="generateGraphic(1)" /> Bold</label>
<br />
<label for="italic1"><input type="checkbox" id="italic1" onchange="generateGraphic(1)" /> italic</label>
</fieldset>
<fieldset>
<legend>2nd Message</legend>
<label for="text2">Message: </label>
<input id="text2" value="Ukraine" onchange="generateGraphic(2)" placeholder="Bottom Message" />
<br />
<label for="font2">Font: </label>
<select id="font2" onchange="generateGraphic(2)">
<option value="arial">arial</option>
<option value="georgia">georgia</option>
<option value="impact">impact</option>
<option value="verdana">verdana</option>
</select>
<br />
<label for="size2">Size: </label>
<input type="range" id="size2" value="28" min="8" max="35" step="1" onchange="generateGraphic(2)" /> px
<br />
<label for="bold2"><input type="checkbox" id="bold2" onchange="generateGraphic(2)" /> Bold</label>
<br />
<label for="italic2"><input type="checkbox" id="italic2" onchange="generateGraphic(2)" /> italic</label>
</fieldset>
</div>
<fieldset>
<legend>1st Message</legend>
<label for="text1">Message: </label>
<input id="text1" value="I stand with" onchange="generateGraphic(1)" placeholder="Top Message" />
<br />
<label for="font1">Font: </label>
<select id="font1" onchange="generateGraphic(1)">
<option value="arial">arial</option>
<option value="georgia">georgia</option>
<option value="impact">impact</option>
<option value="verdana">verdana</option>
</select>
<br />
<label for="size1">Size: </label>
<input type="range" id="size1" value="28" min="8" max="35" step="1" onchange="generateGraphic(1)" /> px
<br />
<label for="bold1"><input type="checkbox" id="bold1" onchange="generateGraphic(1)" /> Bold</label>
<br />
<label for="italic1"><input type="checkbox" id="italic1" onchange="generateGraphic(1)" /> italic</label>
</fieldset>
<fieldset>
<legend>2nd Message</legend>
<label for="text2">Message: </label>
<input id="text2" value="Ukraine" onchange="generateGraphic(2)" placeholder="Bottom Message" />
<br />
<label for="font2">Font: </label>
<select id="font2" onchange="generateGraphic(2)">
<option value="arial">arial</option>
<option value="georgia">georgia</option>
<option value="impact">impact</option>
<option value="verdana">verdana</option>
</select>
<br />
<label for="size2">Size: </label>
<input type="range" id="size2" value="28" min="8" max="35" step="1" onchange="generateGraphic(2)" /> px
<br />
<label for="bold2"><input type="checkbox" id="bold2" onchange="generateGraphic(2)" /> Bold</label>
<br />
<label for="italic2"><input type="checkbox" id="italic2" onchange="generateGraphic(2)" /> italic</label>
</fieldset>
</div>
And there's your second fieldset!

Now let's work on the generateGraphic() function. We first declare message by using section along with "message" to get the div. Same for text, font, size, bold and italic.
function generateGraphic(section)
{
var message = document.getElementById("message" + section);
var text = document.getElementById("text" + section);
var font = document.getElementById("font" + section);
var size = document.getElementById("size" + section);
var bold = document.getElementById("bold" + section);
var italic = document.getElementById("italic" + section);
}
Next, we populate message with the value of text. We set the font and font size using the values of font and size respectively. Then we set bolding and italicizing using the checked properties of bold and italic respectively.
function generateGraphic(section)
{
var message = document.getElementById("message" + section);
var text = document.getElementById("text" + section);
var font = document.getElementById("font" + section);
var size = document.getElementById("size" + section);
var bold = document.getElementById("bold" + section);
var italic = document.getElementById("italic" + section);
message.innerHTML = text.value;
message.style.fontFamily = font.value;
message.style.fontSize = size.value + "px";
message.style.fontWeight = (bold.checked ? "bold" : "normal");
message.style.fontStyle = (italic.checked ? "italic" : "normal");
}
And after that, let's make sure generateGraphic() is run twice upon page load, the first time with "1" passed in, and the second time with "2" passed in.
<body onload="generateGraphic(1); generateGraphic(2);">
Now reload. You see that the messages now appear in the blue and yellow halves of the graphic.

Play with the controls by changing the text, adjusting sizes and checking or unchecking the boxes!

But we want the top half text to be next to the line. So add this to the CSS. The padding-top property should take care of this.
.bottom
{
width: 100%;
height: 300px;
text-align: center;
color: rgba(0, 0, 200, 0.8);
background-color: rgba(255, 255, 0, 1);
}
#message1
{
padding-top: 270px;
}
.dashboard
{
width: 45%;
float: right;
}
{
width: 100%;
height: 300px;
text-align: center;
color: rgba(0, 0, 200, 0.8);
background-color: rgba(255, 255, 0, 1);
}
#message1
{
padding-top: 270px;
}
.dashboard
{
width: 45%;
float: right;
}
Yes!

And just remove the red outline.
div {outline: 0px solid red;}
Here we go.
And all of this means jackshit unless we can print the result. So add this media class to the CSS. When printing, dashboard will be invisible and image will take up full width.
label
{
display: inline-block;
width: 10em;
}
@media print
{
.dashboard
{
display: none;
}
.image
{
width: 100%;
}
}
{
display: inline-block;
width: 10em;
}
@media print
{
.dashboard
{
display: none;
}
.image
{
width: 100%;
}
}
Try to print it!

Standing with Ukraine
Politics is a dirty business, but it's the people who suffer most. So hey, if you've got enough to spare, send some money over to help save lives!#StandWithUkraine,
T___T
T___T
No comments:
Post a Comment