We earlier created a page called Registration, so open that. It's blank. We need to add a form to it. To do that, look at the three tabs at the bottom of your screen. You'll see Regions, Items and Buttons. When you click on Regions, you'll see a lot of options. The one we are interested in is Form. Click and drag it into the screen above and this is what you should see.

On the right panel, click on Source. You should select "Local Database". For Table Name, select "MAILING_LIST". Once you do that, fields will magically appear in your form, notably, all the columns in the MAILING_LIST table. They will be automatically named by concatenating "P" and the page number, followed by an underscore and the field name. You can change this, but it works fine for what I have in mind.

Let's add one more field. There is already a password field in the form, but we want to confirm it properly. Therefore, we will add another password field. Click on the Items tab at the bottom of the screen. There'll be a whole bunch of options, mostly form elements. Select the one labelled "password" and drag it onto your form. Name it "P2_CONFIRMPASSWORD".

We need to make sure that this item is required. On the right panel, you'll see Value Required under the Validation section. Make sure it's turned on.

We need to create a more specific back-end validation for this field. Right click on the field at the left panel. You should see an array of options come up. Select Create Validation.

Now over here your new validation should appear under the field P2_CONFIRMPASSWORD. On the right panel, give it a name. In the Validation section, the Type is "Expression" and you should select "SQL" as the Language. Make sure Always Execute is on. Also, set the Error Message.

In the box, type in the expression below. The server will evaluate this expression and only continue if it is true. Otherwise the error message will be displayed.
:P2_CONFIRMPASSWORD = :P2_PASSWORD
Now we'll work on the rest of the fields!
Start with P2_EMAIL. Do what we did before - create a validation.

As with the last time, give it a name, the Type is "Expression" and you should select "SQL" as the Language. Make sure Always Execute is on. Set the Error Message.

This is the expression. Since EMAIL is the Primary Key for the table MAILING_LIST, we want to ensure that the user does not try to enter an already existing email address.
upper(:P2_EMAIL) not in (SELECT upper(EMAIL) FROM MAILING_LIST)
Next we move on to P2_FIRST_NAME. It's a string and that value is required. Other than that, we probably don't need to do anything else. The field after that, P2_LAST_NAME is optional and we don't need to do anything there.

The next field is P2_DOB. It's a date. Under the Settings section on the right panel, you can see some options. Since we don't need the time of birth, disable Show Time. For Minimum Date, leave it as "None". However, we want to ensure that anyone using this form is at least 15 years of age, so for Maximum Date, set the value as "Static". The Maximum Static setting will come up, so just type in the value "-15y". For the rest of the settings, feel free to play around.

P2_GENDER is a string, so by default the system will give you a text field. We'll change this to a radio button by going to the right panel. Some of the very first options you will see are the Name, and the Type. Change that to "Radio Select".

You'll now see List of Values come up on the right panel. Click on it to add "M" and "F" to the values in the popup box. The interface should be fairly intuitive here.

P2_DAYS is a number. We want the user to select this from a drop-down list, so change the Type to "Select List".

As before, add the values in List of Values. Unlike P2_GENDER, you will want to create nice textual options instead of just giving the user a number and letting them figure out it represents the number of days between emails.

Now, for P2_PASSWORD. The Type on the right panel should already have been set to "Password", but no harm checking.

And after that, it's time to create the button. On the bottom, select the Buttons tag. Any one of the options should do, but the last one gives you the option to add a nice icon with the text. Drag it into your Form.

Name the button and define the label. If you want, select an icon. The action for the button should be "Submit Form".

Go to the third tab on the left panel. You should see the back-end validations we defined earlier. Right-click in the Processes section and select Create Process.

This is where we enter the SQL to save the record.

This is the SQL code. Note that for the PASSWORD field, we first encrypt it using a hash. It's not perfect but it's professionally it's the least one can do.
UPDATE MAILING_LIST SET FIRST_NAME = :P3_FIRST_NAME, LAST_NAME = :P3_LAST_NAME, DOB = :P3_DOB, GENDER = :P3_GENDER, DAYS = :P3_DAYS WHERE upper(EMAIL) = upper(:EMAIL)
Now right-click on Post-processing and Create a Branch.

This redirects to Page 10, which is the Thank You page. The settings are on the right panel.

Before we begin testing, make sure the Security section's Authentication setting for the Registration page is "Page is Public".

Let's test this! Click on the Run button, and a new browser tab should pop up. You should see this.

Click the REGISTER button, and all these notifications should pop up for all the fields that you have marked as Required.

If you try again with "xxx" in the email address, they'll have a different validation message.

If you try to enter a date which is too recent, a different error message comes up as well.

You can try adding valid values for these fields and the error messages will disappear. Now try entering a different password for PASSWORD and CONFIRM PASSWORD...

Now back to the app. We want to work on Page 10, which is the Thank You page. Click on the bottom tabs and select Regions. We want the Static Content item. Drag it into the page.

Name the section. Add the HTML in the Source section.

This is the HTML. Yes, we want the user to begin receiving email the very next day. That will be covered some other day.
<h1>Your registration is complete</h1>
Thank you for registering. You should receive your first self-affirmation the next day!
Thank you for registering. You should receive your first self-affirmation the next day!
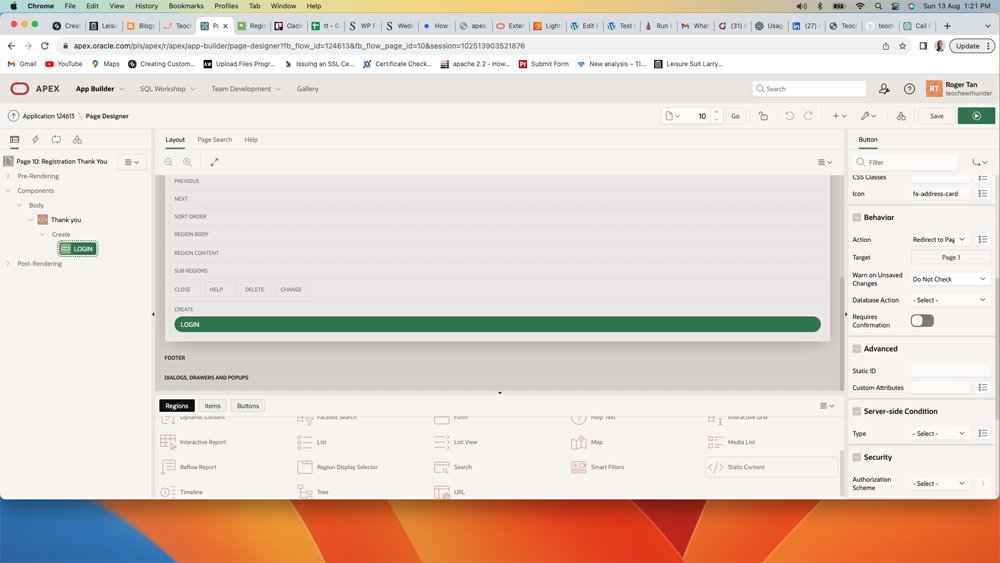
Add a button. It's the LOGIN button.

This button will redirect to Page 1, which is the Login page. After the user has successfully registered, they should be able to do so.
Save the page. Now let's try registering again, this time with valid values.

This is what you should see.

When you view the table, you should see the data has gone in! Note that PASSWORD has been hashed, and LAST_SENT is set to the default of "01-01-1970".

If you try registration with the same email address, this error message should come up.

No comments:
Post a Comment