This is when you have to guess a word with n number of letters. Each round, you guess a letter and if it matches any letters in the word, those letters are revealed. If there are no matches, one art of the hanged man is drawn. When the drawing is complete, you lose.
What you'll need
A working understanding of NodeJS and how to create your ReactJS app using NPM would be great. If not, just follow the instructions on the ReactJS website.We will be rendering the hanged man using SVGs. So if you don't have the slightest clue what an SVG is, some supplementary reading is recommended.
Lastly, we will be using this very awesome and totally free API endpoint to get words.
Create your ReactJS app and let's begin!
As usual, I like to make certain initial changes such as the app's title. You can also change the favicon for the app (it's the favicon.ico file in the public directory), but that's also entirely optional.public/index.html
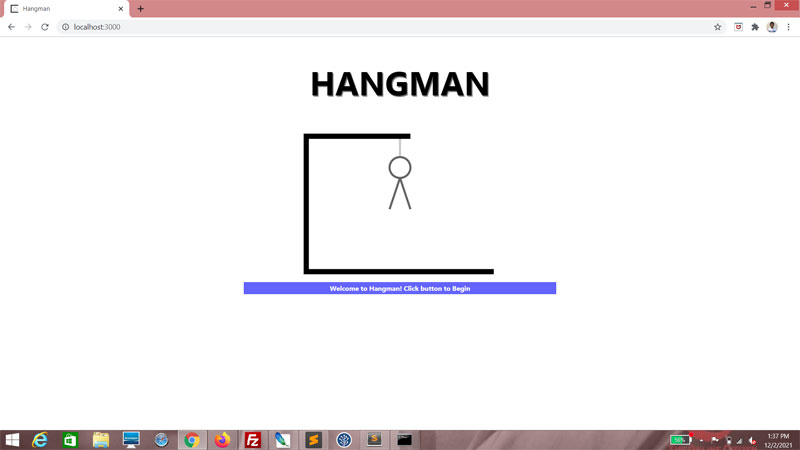
<title>Hangman</title>
In the src folder, we can leave everything as-is except for App.js. Clear the whole file and let's start from a clean slate. Also, let's go to App.css and clear that too. Then add this into the file. This defines the visual space on-screen for your app. The h1 specification adds a nice shadow to all h1 tags, though you won't see it just yet.
src/App.css
.App {
width: 600px;
margin: 0 auto 0 auto;
}
.App h1 {
text-align: center;
text-shadow: 2px 2px rgba(0, 0, 0, 0.5);
font-size: 4em;
}
width: 600px;
margin: 0 auto 0 auto;
}
.App h1 {
text-align: center;
text-shadow: 2px 2px rgba(0, 0, 0, 0.5);
font-size: 4em;
}
For App.js, we begin by importing the usual stuff. We will be using useState and useEffect from react. And of course, we will import the CSS file that we just modified.
src/App.js
import React, { useState, useEffect } from 'react';
import './App.css';
import './App.css';
Next, let's define an async operation here. It's called fetchWordList, and it basically uses await and fetch to get the results of calling the API endpoint for getting random words.
src/App.js
import React, { useState, useEffect } from 'react';
import './App.css';
const fetchWordList = async () => {
const res = await fetch('https://random-word-api.herokuapp.com/word?number=50');
};
import './App.css';
const fetchWordList = async () => {
const res = await fetch('https://random-word-api.herokuapp.com/word?number=50');
};
If there's no response, an Error is thrown. But otherwise, return the json property of res.
src/App.js
import React, { useState, useEffect } from 'react';
import './App.css';
const fetchWordList = async () => {
const res = await fetch('https://random-word-api.herokuapp.com/word?number=50');
if (!res.ok) throw new Error(res.statusText)
return res.json();
};
import './App.css';
const fetchWordList = async () => {
const res = await fetch('https://random-word-api.herokuapp.com/word?number=50');
if (!res.ok) throw new Error(res.statusText)
return res.json();
};
And of course, we define App. And export App as the default. index.js will import App, so we need this part.
src/App.js
import React, { useState, useEffect } from 'react';
import './App.css';
const fetchWordList = async () => {
const res = await fetch('https://random-word-api.herokuapp.com/word?number=50');
if (!res.ok) throw new Error(res.statusText)
return res.json();
};
function App() {
}
export default App;
import './App.css';
const fetchWordList = async () => {
const res = await fetch('https://random-word-api.herokuapp.com/word?number=50');
if (!res.ok) throw new Error(res.statusText)
return res.json();
};
function App() {
}
export default App;
In here, we will use the useState() hook to set the wordList. Default value is an array with one element, which is an empty string.
src/App.js
function App() {
const [wordList, setWordList] = useState(['']);
}
const [wordList, setWordList] = useState(['']);
}
For this next part, we will need to import async from react-async. That's because we will be calling the async operation fetchWordList.
src/App.js
import React, { useState, useEffect } from 'react';
import { useAsync } from 'react-async';
import './App.css';
import { useAsync } from 'react-async';
import './App.css';
We use destructuring to obtain data, error and isPending from useAsync().
src/App.js
const fetchWordList = async () => {
const res = await fetch('https://random-word-api.herokuapp.com/word?number=50');
if (!res.ok) throw new Error(res.statusText)
return res.json();
};
function App() {
const { data, error, isPending } = useAsync({
});
const [wordList, setWordList] = useState(['']);
}
const res = await fetch('https://random-word-api.herokuapp.com/word?number=50');
if (!res.ok) throw new Error(res.statusText)
return res.json();
};
function App() {
const { data, error, isPending } = useAsync({
});
const [wordList, setWordList] = useState(['']);
}
From here, we set the value of promiseFn to fetchWordList, which is the operation we defined earlier.
src/App.js
function App() {
const { data, error, isPending } = useAsync({
promiseFn: fetchWordList
});
const [wordList, setWordList] = useState(['']);
}
const { data, error, isPending } = useAsync({
promiseFn: fetchWordList
});
const [wordList, setWordList] = useState(['']);
}
And then for the onResolve property, we create a variable named tempList. The value is set to wordList. Grab all the random words in data and push them into tempList if they are between 5 to 13 characters in length, because that's all the space we have on-screen. Then use setWordList (which we defined earlier using useState()) to the value of tempList. wordList will now be a list of random words taken from the API endpoint, as soon as the data is returned, each 5 to 13 characters in length! The first element in wordList, of course, will still be an empty string.
src/App.js
function App() {
const { data, error, isPending } = useAsync({
promiseFn: fetchWordList,
onResolve: (data) => {
let tempList = wordList;
data.forEach((item)=> {
if (item.length >= 5 && item.length <= 13) {
tempList.push(item);
}
});
setWordList(tempList);
}
});
const [wordList, setWordList] = useState(['']);
}
const { data, error, isPending } = useAsync({
promiseFn: fetchWordList,
onResolve: (data) => {
let tempList = wordList;
data.forEach((item)=> {
if (item.length >= 5 && item.length <= 13) {
tempList.push(item);
}
});
setWordList(tempList);
}
});
const [wordList, setWordList] = useState(['']);
}
App() needs to return something in JSX.
src/App.js
function App() {
const { data, error, isPending } = useAsync({
promiseFn: fetchWordList,
onResolve: (data) => {
let tempList = wordList;
data.forEach((item)=> {
if (item.length >= 5 && item.length <= 13) {
tempList.push(item);
}
});
setWordList(tempList);
}
});
const [wordList, setWordList] = useState(['']);
return (
<div className="App">
</div>
);
}
Insert in some HTML.
src/App.js
return (
<div className="App">
<h1>HANGMAN</h1>
</div>
);
<div className="App">
<h1>HANGMAN</h1>
</div>
);
And here you can see your nicely styled h1!

Add this line. Basically it means that if isPending (remember the async operation?) is true, the word "Loading" will show.
src/App.js
return (
<div className="App">
<h1>HANGMAN</h1>
<div>
{ isPending && 'Loading...' }
</div>
</div>
);
<div className="App">
<h1>HANGMAN</h1>
<div>
{ isPending && 'Loading...' }
</div>
</div>
);
Refresh. "Loading" should show for a few seconds while we load the response of the API endpoint.

Back to the hooks! We use useState() to set two more variables - message and messageContext. message is a line of informative text and messageContext determines if the message is positive or negative. If it's neutral, it's an empty string.
src/App.js
const [wordList, setWordList] = useState(['']);
const [message, setMessage] = useState('Welcome to Hangman! Click button to Begin');
const [messageContext, setMessageContext] = useState('');
const [message, setMessage] = useState('Welcome to Hangman! Click button to Begin');
const [messageContext, setMessageContext] = useState('');
Here, we add this bit. The div is supposed to be styled using the Message CSS class, along with whatever messageContext is. In this case, right now, messageContext is an empty string.
src/App.js
<div className="App">
<h1>HANGMAN</h1>
<div>
{ isPending && 'Loading...' }
</div>
<div className={ 'Message ' + messageContext }>
{ message }
</div>
</div>
<h1>HANGMAN</h1>
<div>
{ isPending && 'Loading...' }
</div>
<div className={ 'Message ' + messageContext }>
{ message }
</div>
</div>
Then let's add this to the CSS. This is really cosmetic - I want to give my message a bright blue background and white text... but really, do as you see fit.
src/App.css
.App {
width: 600px;
margin: 0 auto 0 auto;
}
.App h1 {
text-align: center;
text-shadow: 2px 2px rgba(0, 0, 0, 0.5);
font-size: 4em;
}
.Message {
padding: 3px 0 3px 0;
margin-bottom: 5px;
background-color: rgba(100, 100, 255, 1);
color: rgba(255, 255, 255, 1);
font-weight: bold;
font-size: 0.8em;
text-align: center;
visibility: visible;
}
Nice.

Now for the Hanged Man!
It's basically a big SVG, where certain pieces are visible or invisible depending on the variable, stage. To facilitate that, let's declare stage using useState(), with a default value of -1.src/App.js
const [wordList, setWordList] = useState(['']);
const [stage, setStage] = useState(-1);
const [message, setMessage] = useState('Welcome to Hangman! Click button to Begin');
const [messageContext, setMessageContext] = useState('');
const [stage, setStage] = useState(-1);
const [message, setMessage] = useState('Welcome to Hangman! Click button to Begin');
const [messageContext, setMessageContext] = useState('');
Within the return statement, we want to show the component HangedMan, and pass in the value of stage.
src/App.js
<div className="App">
<h1>HANGMAN</h1>
<HangedMan stage={ stage } />
<div>
{ isPending && 'Loading...' }
</div>
<div className={ 'Message ' + messageContext }>
{ message }
</div>
</div>
<h1>HANGMAN</h1>
<HangedMan stage={ stage } />
<div>
{ isPending && 'Loading...' }
</div>
<div className={ 'Message ' + messageContext }>
{ message }
</div>
</div>
And we have to import HangedMan from the directory we will create in the next step.
src/App.js
import React, { useState, useEffect } from 'react';
import { useAsync } from 'react-async';
import './App.css';
import HangedMan from './components/HangedMan';
import { useAsync } from 'react-async';
import './App.css';
import HangedMan from './components/HangedMan';
Now, what we need to do is create the components folder. And in there, we create another folder HangedMan. In the HangedMan directory, we create three new files - HangedMan.js, HangedMan.css and index.js.
In index.js, we export this from the HangedMan.js file so that any export from the HangedMan directory won't need to know what filename to call. Because the default directory is always index.js.
src/components/HangedMan/index.js
export { default } from './HangedMan';
We then prepare the CSS file for the SVG we're about to create. Here, we ensure that the div to be styled using HangedMan will take up full width and 300 pixels height. The SVG will fill the entire div and have a white background. That will do for starters; we can come back to this later.
src/components/HangedMan/HangedMan.css
.HangedMan {
width: 100%;
height: 300px;
}
.HangedMan svg{
width: 100%;
height: 100%;
background-color: rgba(255, 255, 255, 1);
}
width: 100%;
height: 300px;
}
.HangedMan svg{
width: 100%;
height: 100%;
background-color: rgba(255, 255, 255, 1);
}
Now for the HangedMan component itself. This is important because every other component we create from this point on will pretty much follow the same template. We start with import statements - obviously, React is one thing we need to import, followed by the CSS. Then we have the main function HangedMan() which accepts a parameter, props. It will return JSX. And finally, we export HangedMan as the default.
src/components/HangedMan/HangedMan.js
import React from 'react';
import './HangedMan.css';
function HangedMan(props) {
return (
);
}
export default HangedMan;
import './HangedMan.css';
function HangedMan(props) {
return (
);
}
export default HangedMan;
In here, we begin by adding a div styled using the HangedMan CSS class, which we've already defined, and an svg tag within it.
src/components/HangedMan/HangedMan.js
function HangedMan(props) {
return (
<div className="HangedMan">
<svg>
</svg>
</div>
);
}
return (
<div className="HangedMan">
<svg>
</svg>
</div>
);
}
Then we add a polyline tag styled using gallows. Note that this is JSX, so we use className rather than class as an attribute name.
src/components/HangedMan/HangedMan.js
function HangedMan(props) {
return (
<div className="HangedMan">
<svg>
<polyline className="gallows" points="320,20 120,20 120,280 480,280"></polyline>
</svg>
</div>
);
}
return (
<div className="HangedMan">
<svg>
<polyline className="gallows" points="320,20 120,20 120,280 480,280"></polyline>
</svg>
</div>
);
}
Back to the CSS, add gallows. This will style the polyline tag we just added.
src/components/HangedMan/HangedMan.css
.HangedMan {
width: 100%;
height: 300px;
}
.HangedMan svg{
width: 100%;
height: 100%;
background-color: rgba(255, 255, 255, 1);
}
.HangedMan svg .gallows{
stroke: rgba(0, 0, 0, 1);
stroke-width: 10;
fill: none;
}
width: 100%;
height: 300px;
}
.HangedMan svg{
width: 100%;
height: 100%;
background-color: rgba(255, 255, 255, 1);
}
.HangedMan svg .gallows{
stroke: rgba(0, 0, 0, 1);
stroke-width: 10;
fill: none;
}
You can see what we just drew - a nice frame from which to hang from.

Let's add one more CSS class. hidden will cause the styled element to be 100% transparent, effectively invisible.
src/components/HangedMan/HangedMan.css
.HangedMan {
width: 100%;
height: 300px;
}
.HangedMan svg{
width: 100%;
height: 100%;
background-color: rgba(255, 255, 255, 1);
}
.HangedMan svg .gallows{
stroke: rgba(0, 0, 0, 1);
stroke-width: 10;
fill: none;
}
.HangedMan svg .hidden{
stroke: rgba(255, 255, 255, 0);
fill: rgba(255, 0, 0, 0);
}
width: 100%;
height: 300px;
}
.HangedMan svg{
width: 100%;
height: 100%;
background-color: rgba(255, 255, 255, 1);
}
.HangedMan svg .gallows{
stroke: rgba(0, 0, 0, 1);
stroke-width: 10;
fill: none;
}
.HangedMan svg .hidden{
stroke: rgba(255, 255, 255, 0);
fill: rgba(255, 0, 0, 0);
}
Add a line tag here, and style it using rope.
src/components/HangedMan/HangedMan.js
function HangedMan(props) {
return (
<div className="HangedMan">
<svg>
<line
className="rope"
x1="300"
y1="20"
x2="300"
y2="60"
></line>
<polyline className="gallows" points="320,20 120,20 120,280 480,280"></polyline>
</svg>
</div>
);
}
return (
<div className="HangedMan">
<svg>
<line
className="rope"
x1="300"
y1="20"
x2="300"
y2="60"
></line>
<polyline className="gallows" points="320,20 120,20 120,280 480,280"></polyline>
</svg>
</div>
);
}
Add the rope CSS class.
src/components/HangedMan/HangedMan.css
.HangedMan {
width: 100%;
height: 300px;
}
.HangedMan svg{
width: 100%;
height: 100%;
background-color: rgba(255, 255, 255, 1);
}
.HangedMan svg .gallows{
stroke: rgba(0, 0, 0, 1);
stroke-width: 10;
fill: none;
}
.HangedMan svg .rope{
stroke: rgba(200, 200, 200, 1);
stroke-width: 4;
}
.HangedMan svg .hidden{
stroke: rgba(255, 255, 255, 0);
fill: rgba(255, 0, 0, 0);
}
width: 100%;
height: 300px;
}
.HangedMan svg{
width: 100%;
height: 100%;
background-color: rgba(255, 255, 255, 1);
}
.HangedMan svg .gallows{
stroke: rgba(0, 0, 0, 1);
stroke-width: 10;
fill: none;
}
.HangedMan svg .rope{
stroke: rgba(200, 200, 200, 1);
stroke-width: 4;
}
.HangedMan svg .hidden{
stroke: rgba(255, 255, 255, 0);
fill: rgba(255, 0, 0, 0);
}
You should be abe to see a faint grey outline at the top of the gallows! That's the rope.

Now add this. It's a circle tag and represents the hanged man's head.
src/components/HangedMan/HangedMan.js
function HangedMan(props) {
return (
<div className="HangedMan">
<svg>
<line
className="rope"
x1="300"
y1="20"
x2="300"
y2="60"
></line>
<circle
cx="300"
cy="80"
r="20"
data-testid="hangedMan_head"
></circle>
<polyline className="gallows" points="320,20 120,20 120,280 480,280"></polyline>
</svg>
</div>
);
}
return (
<div className="HangedMan">
<svg>
<line
className="rope"
x1="300"
y1="20"
x2="300"
y2="60"
></line>
<circle
cx="300"
cy="80"
r="20"
data-testid="hangedMan_head"
></circle>
<polyline className="gallows" points="320,20 120,20 120,280 480,280"></polyline>
</svg>
</div>
);
}
However, we want to add a condition in the class - if stage is 1 or more, style using man. Otherwise, hide it by using the CSS class hidden.
src/components/HangedMan/HangedMan.js
function HangedMan(props) {
return (
<div className="HangedMan">
<svg>
<line
className="rope"
x1="300"
y1="20"
x2="300"
y2="60"
></line>
<circle
className={props.stage >= 1 ? 'man' : 'man hidden'}
cx="300"
cy="80"
r="20"
></circle>
<polyline className="gallows" points="320,20 120,20 120,280 480,280"></polyline>
</svg>
</div>
);
}
You'll want to add the man CSS class as well.
src/components/HangedMan/HangedMan.css
.HangedMan svg .rope{
stroke: rgba(200, 200, 200, 1);
stroke-width: 4;
}
.HangedMan svg .man{
stroke: rgba(100, 100, 100, 1);
stroke-width: 4;
fill: none;
}
.HangedMan svg .hidden{
stroke: rgba(255, 255, 255, 0);
fill: rgba(255, 0, 0, 0);
}
stroke: rgba(200, 200, 200, 1);
stroke-width: 4;
}
.HangedMan svg .man{
stroke: rgba(100, 100, 100, 1);
stroke-width: 4;
fill: none;
}
.HangedMan svg .hidden{
stroke: rgba(255, 255, 255, 0);
fill: rgba(255, 0, 0, 0);
}
If you rerun your application, you'll see nothing changes. Because stage is not greater or equal to 1. state has been set to 0, remember? So it's 0 that was passed down to the HangedMan component. Unless you do this...
src/App.js
<div className="App">
<h1>HANGMAN</h1>
<HangedMan stage="1" />
<div>
{ isPending && 'Loading...' }
</div>
<div className={ 'Message ' + messageContext }>
{ message }
</div>
</div>
<h1>HANGMAN</h1>
<HangedMan stage="1" />
<div>
{ isPending && 'Loading...' }
</div>
<div className={ 'Message ' + messageContext }>
{ message }
</div>
</div>
... and there's the head!

Now for the rest of the hanged man. Note that each of these test for a different value of stage. That means as the value of stage grows larger, more and more of the hanged man is displayed.
src/components/HangedMan/HangedMan.js
<circle
className={props.stage >= 1 ? 'man' : 'man hidden'}
cx="300"
cy="80"
r="20"
>
</circle>
<line
className={props.stage >= 2 ? 'man' : 'man hidden'}
x1="300"
y1="100"
x2="280"
y2="160"
></line>
<line
className={props.stage >= 3 ? 'man' : 'man hidden'}
x1="300"
y1="100"
x2="320"
y2="160"
></line>
<line
className={props.stage >= 4 ? 'man' : 'man hidden'}
x1="300"
y1="100"
x2="300"
y2="180"
></line>
<line
className={props.stage >= 5 ? 'man' : 'man hidden'}
x1="300"
y1="180"
x2="280"
y2="250"
></line>
<line
className={props.stage >= 6 ? 'man' : 'man hidden'}
x1="300"
y1="180"
x2="320"
y2="250"
></line>
<polyline className="gallows" points="320,20 120,20 120,280 480,280"></polyline>
Go ahead, try it with different values!
src/App.js
<div className="App">
<h1>HANGMAN</h1>
<HangedMan stage="2" />
<div>
{ isPending && 'Loading...' }
</div>
<div className={ 'Message ' + messageContext }>
{ message }
</div>
</div>
<h1>HANGMAN</h1>
<HangedMan stage="2" />
<div>
{ isPending && 'Loading...' }
</div>
<div className={ 'Message ' + messageContext }>
{ message }
</div>
</div>
Here we go...

For stage = 3
For stage = 4

For stage = 5

For stage = 6

But for stage = 6, that means the game is also over. So let's add some text. We will use the gameover CSS class to style this.
src/components/HangedMan/HangedMan.js
<line
className={props.stage >= 6 ? 'man' : 'man hidden'}
x1="300"
y1="180"
x2="320"
y2="250"
></line>
<text
x="350"
y="100"
className={props.stage >= 6 ? 'gameover' : 'gameover hidden'}
data-testid="txtGameOver"
>
<tspan x="350" y="100">GAME</tspan>
<tspan x="350" y="145">OVER</tspan>
</text>
<polyline className="gallows" points="320,20 120,20 120,280 480,280"></polyline>
The gameover CSS class.
src/components/HangedMan/HangedMan.css
.HangedMan svg .man{
stroke: rgba(100, 100, 100, 1);
stroke-width: 4;
fill: none;
}
.HangedMan svg .gameover{
stroke: rgba(255, 0, 0, 1);
stroke-width: 3;
font-size: 3em;
fill: rgba(255, 0, 0, 1);
}
.HangedMan svg .hidden{
stroke: rgba(255, 255, 255, 0);
fill: rgba(255, 0, 0, 0);
}
stroke: rgba(100, 100, 100, 1);
stroke-width: 4;
fill: none;
}
.HangedMan svg .gameover{
stroke: rgba(255, 0, 0, 1);
stroke-width: 3;
font-size: 3em;
fill: rgba(255, 0, 0, 1);
}
.HangedMan svg .hidden{
stroke: rgba(255, 255, 255, 0);
fill: rgba(255, 0, 0, 0);
}
And now you see the red GAME OVER text.

Let's add an extra touch!
Because just a hanged man isn't macabre enough. How about we make it swing? To do this, add a g tag around the rope and the elements that make up the man.src/components/HangedMan/HangedMan.js
<g>
<line
className="rope"
x1="300"
y1="20"
x2="300"
y2="60"
></line>
<circle
className={props.stage >= 1 ? 'man' : 'man hidden'}
cx="300"
cy="80"
r="20"
></circle>
<line
className={props.stage >= 2 ? 'man' : 'man hidden'}
x1="300"
y1="100"
x2="280"
y2="160"
></line>
<line
className={props.stage >= 3 ? 'man' : 'man hidden'}
x1="300"
y1="100"
x2="320"
y2="160"
></line>
<line
className={props.stage >= 4 ? 'man' : 'man hidden'}
x1="300"
y1="100"
x2="300"
y2="180"
></line>
<line
className={props.stage >= 5 ? 'man' : 'man hidden'}
x1="300"
y1="180"
x2="280"
y2="250"
></line>
<line
className={props.stage >= 6 ? 'man' : 'man hidden'}
x1="300"
y1="180"
x2="320"
y2="250"
></line>
</g>
<line
className="rope"
x1="300"
y1="20"
x2="300"
y2="60"
></line>
<circle
className={props.stage >= 1 ? 'man' : 'man hidden'}
cx="300"
cy="80"
r="20"
></circle>
<line
className={props.stage >= 2 ? 'man' : 'man hidden'}
x1="300"
y1="100"
x2="280"
y2="160"
></line>
<line
className={props.stage >= 3 ? 'man' : 'man hidden'}
x1="300"
y1="100"
x2="320"
y2="160"
></line>
<line
className={props.stage >= 4 ? 'man' : 'man hidden'}
x1="300"
y1="100"
x2="300"
y2="180"
></line>
<line
className={props.stage >= 5 ? 'man' : 'man hidden'}
x1="300"
y1="180"
x2="280"
y2="250"
></line>
<line
className={props.stage >= 6 ? 'man' : 'man hidden'}
x1="300"
y1="180"
x2="320"
y2="250"
></line>
</g>
And then add a conditional class of swing.
src/components/HangedMan/HangedMan.js
<g className={ props.stage >= 6 ? 'swing' : '' }>
<line
className="rope"
x1="300"
y1="20"
x2="300"
y2="60"
></line>
<circle
className={props.stage >= 1 ? 'man' : 'man hidden'}
cx="300"
cy="80"
r="20"
></circle>
<line
className={props.stage >= 2 ? 'man' : 'man hidden'}
x1="300"
y1="100"
x2="280"
y2="160"
></line>
<line
className={props.stage >= 3 ? 'man' : 'man hidden'}
x1="300"
y1="100"
x2="320"
y2="160"
></line>
<line
className={props.stage >= 4 ? 'man' : 'man hidden'}
x1="300"
y1="100"
x2="300"
y2="180"
></line>
<line
className={props.stage >= 5 ? 'man' : 'man hidden'}
x1="300"
y1="180"
x2="280"
y2="250"
></line>
<line
className={props.stage >= 6 ? 'man' : 'man hidden'}
x1="300"
y1="180"
x2="320"
y2="250"
></line>
</g>
<line
className="rope"
x1="300"
y1="20"
x2="300"
y2="60"
></line>
<circle
className={props.stage >= 1 ? 'man' : 'man hidden'}
cx="300"
cy="80"
r="20"
></circle>
<line
className={props.stage >= 2 ? 'man' : 'man hidden'}
x1="300"
y1="100"
x2="280"
y2="160"
></line>
<line
className={props.stage >= 3 ? 'man' : 'man hidden'}
x1="300"
y1="100"
x2="320"
y2="160"
></line>
<line
className={props.stage >= 4 ? 'man' : 'man hidden'}
x1="300"
y1="100"
x2="300"
y2="180"
></line>
<line
className={props.stage >= 5 ? 'man' : 'man hidden'}
x1="300"
y1="180"
x2="280"
y2="250"
></line>
<line
className={props.stage >= 6 ? 'man' : 'man hidden'}
x1="300"
y1="180"
x2="320"
y2="250"
></line>
</g>
First, style the g tag to put the point of rotation at the middle top. The middle is 300px because that's where the x1 attribute of the rope begins.
src/components/HangedMan/HangedMan.css
.HangedMan svg .hidden{
stroke: rgba(255, 255, 255, 0);
fill: rgba(255, 0, 0, 0);
}
g{
-webKit-transform-origin: 300px 0px;
transform-origin: 300px 0px;
}
stroke: rgba(255, 255, 255, 0);
fill: rgba(255, 0, 0, 0);
}
g{
-webKit-transform-origin: 300px 0px;
transform-origin: 300px 0px;
}
And then create the CSS class swing. It's an animation that is 1 second in duration and runs on infinitely. For the keyframes, we set it to rotate between -10 and 10 degrees.
src/components/HangedMan/HangedMan.css
g{
-webKit-transform-origin: 300px 0px;
transform-origin: 300px 0px;
}
.swing{
animation: swing 1s infinite;
}
@keyframes swing {
50% {-webkit-transform: rotate(-10deg);transform: rotate(-10deg);}
100% {-webkit-transform: rotate(10deg);transform: rotate(10deg);}
}
-webKit-transform-origin: 300px 0px;
transform-origin: 300px 0px;
}
.swing{
animation: swing 1s infinite;
}
@keyframes swing {
50% {-webkit-transform: rotate(-10deg);transform: rotate(-10deg);}
100% {-webkit-transform: rotate(10deg);transform: rotate(10deg);}
}
Look at this guy swing!

Set the value back in preparaton for the next part of this web tutorial.
src/App.js
return (
<div className="App">
<h1>HANGMAN</h1>
<HangedMan stage={ stage } />
<div>
{ isPending && 'Loading...' }
</div>
<div className={ 'Message ' + messageContext }>
{ message }
</div>
</div>
);
<div className="App">
<h1>HANGMAN</h1>
<HangedMan stage={ stage } />
<div>
{ isPending && 'Loading...' }
</div>
<div className={ 'Message ' + messageContext }>
{ message }
</div>
</div>
);
No comments:
Post a Comment