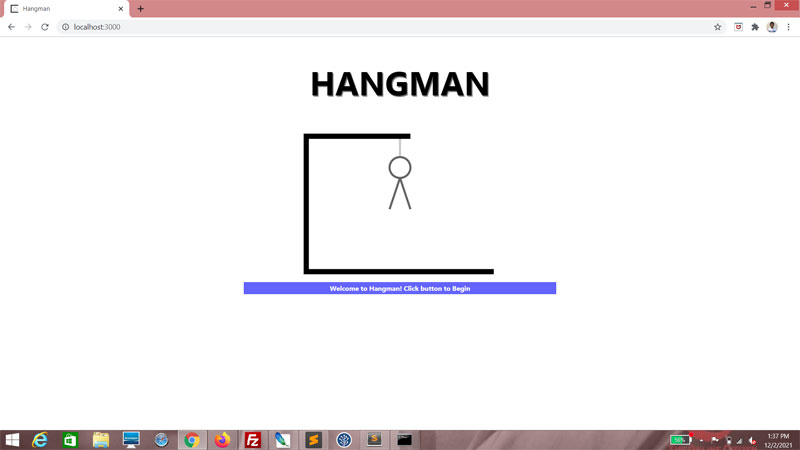
We first set mysteryWord and guessedLetters and their mutators, setGuessedLetters() and setMysteryWord(), using useState(). The default value for mysteryWord is the first value of the wordList array, which is always an empty string. The default value for guessedLetters is an empty array.
src/App.js
const [wordList, setWordList] = useState(['']);
const [mysteryWord, setMysteryWord] = useState(wordList[0]);
const [guessedLetters, setGuessedLetters] = useState([]);
const [mysteryWord, setMysteryWord] = useState(wordList[0]);
const [guessedLetters, setGuessedLetters] = useState([]);
We will also declare a combined function, setMessageAndContext(), to call setMessage() and setMessageContext().
src/App.js
const [wordList, setWordList] = useState(['']);
const [mysteryWord, setMysteryWord] = useState(wordList[0]);
const [guessedLetters, setGuessedLetters] = useState([]);
const [stage, setStage] = useState(-1);
const [message, setMessage] = useState('Welcome to Hangman! Click button to Begin');
const [messageContext, setMessageContext] = useState('');
const setMessageAndContext = (strMessage, strContext)=> {
setMessage(strMessage);
setMessageContext(strContext);
}
const [mysteryWord, setMysteryWord] = useState(wordList[0]);
const [guessedLetters, setGuessedLetters] = useState([]);
const [stage, setStage] = useState(-1);
const [message, setMessage] = useState('Welcome to Hangman! Click button to Begin');
const [messageContext, setMessageContext] = useState('');
const setMessageAndContext = (strMessage, strContext)=> {
setMessage(strMessage);
setMessageContext(strContext);
}
And then we will use useEffect(), to set both the message and context upon the app rendering. Remember importing useEffect from react in the previous part? Well, now it will come in useful.
src/App.js
const setMessageAndContext = (strMessage, strContext)=> {
setMessage(strMessage);
setMessageContext(strContext);
}
useEffect(() => {
});
setMessage(strMessage);
setMessageContext(strContext);
}
useEffect(() => {
});
Then we use setMessageAndContext() to set the message to "Guess the mystery word".
src/App.js
useEffect(() => {
setMessageAndContext('Guess the mystery word', '');
});
setMessageAndContext('Guess the mystery word', '');
});
After that, we use setMysteryWord() to set mysteryWord to a random word in wordList. To do that, we use the function GetRandomIndex(), which we will soon write.
src/App.js
useEffect(() => {
setMessageAndContext('Guess the mystery word', '');
setMysteryWord(wordList[GetRandomIndex(wordList.length)]);
});
setMessageAndContext('Guess the mystery word', '');
setMysteryWord(wordList[GetRandomIndex(wordList.length)]);
});
GetRandomIndex() is actually a function that isn't meant to be tied specifically to any one component. This means I wrote it to potentially be re-used by any component. For stuff like this, I recommend creating a separate folder within src. In this case, we will create the directory utils.
Here, we create GetRandomIndex.js. It should accept as a parameter an integer, wordListLength. And then use the random() method to select any number from 0 to wordListLength, plus 1. Because we don't want it to select element 0 of wordList, which is an empty string. However, we also don't want it to go above the boundaries of the array, so at the end, there's an If block to decrement randomIndex if it's out of bounds. Finally, we return randomIndex, and export GetRandomIndex as default.
src/utils/GetRandomIndex.js
const GetRandomIndex = (wordListLength) => {
let randomIndex = Math.floor(Math.random() * wordListLength) + 1;
if (randomIndex === wordListLength) randomIndex--;
return randomIndex;
}
export default GetRandomIndex;
let randomIndex = Math.floor(Math.random() * wordListLength) + 1;
if (randomIndex === wordListLength) randomIndex--;
return randomIndex;
}
export default GetRandomIndex;
We then, of course, import GetRandomIndex from its directory. At the same time, import Computer in preparation for the next step, because we will be creating that component.
src/App.js
import React, { useState, useEffect } from 'react';
import { useAsync } from 'react-async';
import './App.css';
import HangedMan from './components/HangedMan';
import Computer from './components/Computer';
import GetRandomIndex from './utils/GetRandomIndex';
import { useAsync } from 'react-async';
import './App.css';
import HangedMan from './components/HangedMan';
import Computer from './components/Computer';
import GetRandomIndex from './utils/GetRandomIndex';
Remember, we have set mysteryWord and guessedLetters. Now we will pass them down as props to Computer.
src/App.js
return (
<div className="App">
<h1>HANGMAN</h1>
<HangedMan stage={ stage } />
<div>
{ isPending && 'Loading...' }
</div>
<div className={ 'Message ' + messageContext }>
{ message }
</div>
<Computer
mysteryWord={ mysteryWord }
guessedLetters={ guessedLetters }
/>
</div>
);
<div className="App">
<h1>HANGMAN</h1>
<HangedMan stage={ stage } />
<div>
{ isPending && 'Loading...' }
</div>
<div className={ 'Message ' + messageContext }>
{ message }
</div>
<Computer
mysteryWord={ mysteryWord }
guessedLetters={ guessedLetters }
/>
</div>
);
And now we create the Computer component. This is the part that displays the mystery word, hiding the letters until they are guessed correctly. For this, create the Computer directory within the components directory, then create index.js. As with HangedMan, do the export.
src/components/Computer/index.js
export { default } from './Computer';
Create Computer.js. Do what we did for the HangedMan component. We will set up the CSS soon enough.
src/components/Computer/Computer.js
import React from 'react';
import './Computer.css';
function Computer(props) {
return (
);
}
export default Computer;
import './Computer.css';
function Computer(props) {
return (
);
}
export default Computer;
In the return statement, we have a div styled using Computer encapsulating another div styled using Letters.
src/components/Computer/Computer.js
import React from 'react';
import './Computer.css';
function Computer(props) {
return (
<div className="Computer">
<div className="Letters">
</div>
</div>
);
}
export default Computer;
import './Computer.css';
function Computer(props) {
return (
<div className="Computer">
<div className="Letters">
</div>
</div>
);
}
export default Computer;
Create the CSS file. Set width to 100% for Computer, and a height of, say, 70 pixels. For Letters, we want to display its contents center, so we'll use some very simple flex.
src/components/Computer/Computer.css
.Computer {
width: 100%;
height: 70px;
}
.Computer .Letters {
display: flex;
background-color: rgba(0, 0, 0, 1);
box-shadow: 10px 10px 10px rgba(0, 0, 0, 0.5);
flex-flow: row wrap;
justify-content: center;
}
width: 100%;
height: 70px;
}
.Computer .Letters {
display: flex;
background-color: rgba(0, 0, 0, 1);
box-shadow: 10px 10px 10px rgba(0, 0, 0, 0.5);
flex-flow: row wrap;
justify-content: center;
}
Back to computer.js, we get mysteryWord and guessedLetters from props. Then we obtain mysteryLetters by converting mysteryWord to an array of its letters.
src/components/Computer/Computer.js
function Computer(props) {
let mysteryWord = props.mysteryWord;
let guessedLetters = props.guessedLetters;
let mysteryLetters = mysteryWord.split('');
return (
<div className="Computer">
<div className="Letters">
</div>
</div>
);
}
let mysteryWord = props.mysteryWord;
let guessedLetters = props.guessedLetters;
let mysteryLetters = mysteryWord.split('');
return (
<div className="Computer">
<div className="Letters">
</div>
</div>
);
}
Obtain the mystery component by running mysteryLetters through a map() operation. Define the key; it's good practice. And set the class to Letter if that particular letter in mysteryLetters is found within guessedLetters, and hide it using hidden if not.
src/components/Computer/Computer.js
function Computer(props) {
let mysteryWord = props.mysteryWord;
let guessedLetters = props.guessedLetters;
let mysteryLetters = mysteryWord.split('');
let mystery = mysteryLetters.map((item, index) => (
<div
key={ 'letter_' + index }
className={guessedLetters.indexOf(item) !== -1 ? 'Letter' : 'Letter hidden'}
>
</div>
));
return (
<div className="Computer">
<div className="Letters">
</div>
</div>
);
}
let mysteryWord = props.mysteryWord;
let guessedLetters = props.guessedLetters;
let mysteryLetters = mysteryWord.split('');
let mystery = mysteryLetters.map((item, index) => (
<div
key={ 'letter_' + index }
className={guessedLetters.indexOf(item) !== -1 ? 'Letter' : 'Letter hidden'}
>
</div>
));
return (
<div className="Computer">
<div className="Letters">
</div>
</div>
);
}
Cap it off by putting the letter in the div.
src/components/Computer/Computer.js
function Computer(props) {
let mysteryWord = props.mysteryWord;
let guessedLetters = props.guessedLetters;
let mysteryLetters = mysteryWord.split('');
let mystery = mysteryLetters.map((item, index) => (
<div
key={ 'letter_' + index }
className={guessedLetters.indexOf(item) !== -1 ? 'Letter' : 'Letter hidden'}
>
{ item }
</div>
));
return (
<div className="Computer">
<div className="Letters">
</div>
</div>
);
}
let mysteryWord = props.mysteryWord;
let guessedLetters = props.guessedLetters;
let mysteryLetters = mysteryWord.split('');
let mystery = mysteryLetters.map((item, index) => (
<div
key={ 'letter_' + index }
className={guessedLetters.indexOf(item) !== -1 ? 'Letter' : 'Letter hidden'}
>
{ item }
</div>
));
return (
<div className="Computer">
<div className="Letters">
</div>
</div>
);
}
Then put mystery into the JSX.
src/components/Computer/Computer.js
function Computer(props) {
let mysteryWord = props.mysteryWord;
let guessedLetters = props.guessedLetters;
let mysteryLetters = mysteryWord.split('');
let mystery = mysteryLetters.map((item, index) => (
<div
key={ 'letter_' + index }
className={guessedLetters.indexOf(item) !== -1 ? 'Letter' : 'Letter hidden'}
>
{ item }
</div>
));
return (
<div className="Computer">
<div className="Letters">
{ mystery }
</div>
</div>
);
}
let mysteryWord = props.mysteryWord;
let guessedLetters = props.guessedLetters;
let mysteryLetters = mysteryWord.split('');
let mystery = mysteryLetters.map((item, index) => (
<div
key={ 'letter_' + index }
className={guessedLetters.indexOf(item) !== -1 ? 'Letter' : 'Letter hidden'}
>
{ item }
</div>
));
return (
<div className="Computer">
<div className="Letters">
{ mystery }
</div>
</div>
);
}
Naturally, what we need to do next is style Letter. Each div using Letter is a child of the div styled using Letters. The border color and background colors are set; use some artistic license here. For hidden, background color is set to black.
src/components/Computer/Computer.css
.Computer .Letters {
display: flex;
background-color: rgba(0, 0, 0, 1);
box-shadow: 10px 10px 10px rgba(0, 0, 0, 0.5);
flex-flow: row wrap;
justify-content: center;
}
.Computer .Letters .Letter {
margin: 4px 0 4px 4px;
width: 40px;
height: 40px;
border-radius: 5px;
border: 1px solid rgba(200, 200, 200, 1);
background-color: rgba(255, 255, 200, 1);
color: rgba(100, 0, 0, 1);
float: left;
text-align: center;
font-size: 2em;
font-weight: bold;
text-transform: uppercase;
}
.Computer .Letters .hidden {
background-color: rgba(0, 0, 0, 1);
}
display: flex;
background-color: rgba(0, 0, 0, 1);
box-shadow: 10px 10px 10px rgba(0, 0, 0, 0.5);
flex-flow: row wrap;
justify-content: center;
}
.Computer .Letters .Letter {
margin: 4px 0 4px 4px;
width: 40px;
height: 40px;
border-radius: 5px;
border: 1px solid rgba(200, 200, 200, 1);
background-color: rgba(255, 255, 200, 1);
color: rgba(100, 0, 0, 1);
float: left;
text-align: center;
font-size: 2em;
font-weight: bold;
text-transform: uppercase;
}
.Computer .Letters .hidden {
background-color: rgba(0, 0, 0, 1);
}
Here, you can see that the message has been set. The word, in this case, is "ungratefully". Refresh and you will see that the word changes!
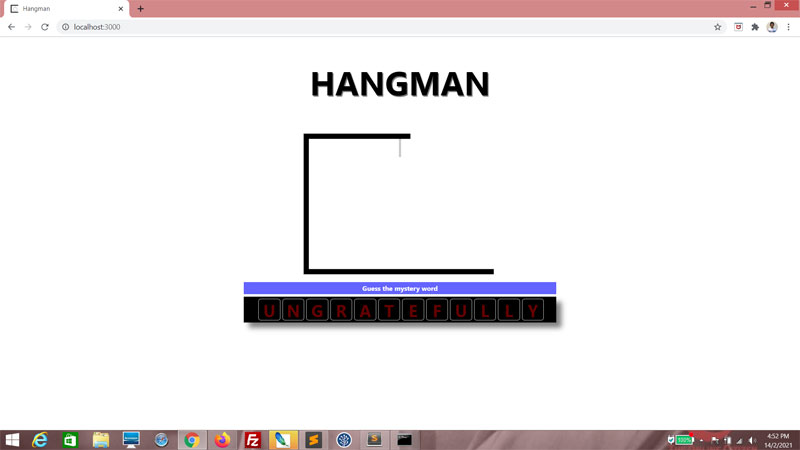
Of course, you can't "guess" the mystery word because the mystery word has already been displayed for you, albeit with the "hidden" background. This is by design, because later on you are going to have to test the function for guessing the mystery word and as the developer, you want to see what the word is.
Also, at this point, the word should not even be showing. What we need to do when calling useEffect(), is ensure that nothing happens when message is an empty string, as will be the case when the app is first loaded.
src/App.js
useEffect(() => {
if (message !== '') return;
setMessageAndContext('Guess the mystery word', '');
setMysteryWord(wordList[GetRandomIndex(wordList.length)]);
});
if (message !== '') return;
setMessageAndContext('Guess the mystery word', '');
setMysteryWord(wordList[GetRandomIndex(wordList.length)]);
});
If you reload the app now, you will see that the letters are no longer showing!
Now for the next component...
We need another component to handle user input. This one will be called Player. In App, we'll include the component, and pass down stage, mysteryWord and guessedLetters, and their respective mutators. We will also pass down setMessageAndContext, error and isPending. This may not actually be the best way to accomplish what we want, but for the purposes of this exercise, it's the most expedient.src/App.js
return (
<div className="App">
<h1>HANGMAN</h1>
<HangedMan stage={ stage } />
<div>
{ isPending && 'Loading...' }
</div>
<div className={ 'Message ' + messageContext }>
{ message }
</div>
<Computer
mysteryWord={ mysteryWord }
guessedLetters={ guessedLetters }
/>
<Player
stage={ stage }
setStage={ setStage }
mysteryWord={ mysteryWord }
guessedLetters={ guessedLetters }
setGuessedLetters={ setGuessedLetters }
setMessageAndContext={ setMessageAndContext }
error={ error }
isPending={ isPending }
/>
</div>
);
<div className="App">
<h1>HANGMAN</h1>
<HangedMan stage={ stage } />
<div>
{ isPending && 'Loading...' }
</div>
<div className={ 'Message ' + messageContext }>
{ message }
</div>
<Computer
mysteryWord={ mysteryWord }
guessedLetters={ guessedLetters }
/>
<Player
stage={ stage }
setStage={ setStage }
mysteryWord={ mysteryWord }
guessedLetters={ guessedLetters }
setGuessedLetters={ setGuessedLetters }
setMessageAndContext={ setMessageAndContext }
error={ error }
isPending={ isPending }
/>
</div>
);
We'll then want to create that component by creating Player folder inside the components folder of the src directory.
Inside it, create index.js. And then do what we did for the Computer and HangedMan components.
src/components/Player/index.js
export { default } from './Player';
Do the same with Player.js. But unlike the Computer and HangedMan components, we will omit the return statement for now.
src/components/Player/Player.js
import React from 'react';
import './Player.css';
function Player(props) {
}
export default Player;
import './Player.css';
function Player(props) {
}
export default Player;
There will be plenty to do for the CSS. For now, just style Player. We'll use the flexbox display in order to center everything. This will come in useful because there will be multiple nested divs within. Aesthetically, I've also added a bit of shadows and stuff, but it's not strictly neccessary.
src/components/Player/Player.css
.Player {
display: flex;
background-color: rgba(0, 0, 0, 1);
box-shadow: 10px 10px 10px rgba(0, 0, 0, 0.5);
padding: 10px 0;
flex-flow: row wrap;
justify-content: center;
align-items: center;
}
display: flex;
background-color: rgba(0, 0, 0, 1);
box-shadow: 10px 10px 10px rgba(0, 0, 0, 0.5);
padding: 10px 0;
flex-flow: row wrap;
justify-content: center;
align-items: center;
}
Now back to Player.js. Grab all the data passed down via props, and set them to local variables. Also, declare mysteryLetters. It is an array derived from mysteryWord.
src/components/Player/Player.js
import React from 'react';
import './Player.css';
function Player(props) {
let stage = props.stage;
let setStage = props.setStage;
let guessedLetters = props.guessedLetters;
let setGuessedLetters = props.setGuessedLetters;
let mysteryWord = props.mysteryWord;
let setMessageAndContext = props.setMessageAndContext;
let error = props.error;
let isPending = props.isPending;
let mysteryLetters = mysteryWord.split('');
}
export default Player;
import './Player.css';
function Player(props) {
let stage = props.stage;
let setStage = props.setStage;
let guessedLetters = props.guessedLetters;
let setGuessedLetters = props.setGuessedLetters;
let mysteryWord = props.mysteryWord;
let setMessageAndContext = props.setMessageAndContext;
let error = props.error;
let isPending = props.isPending;
let mysteryLetters = mysteryWord.split('');
}
export default Player;
Back to Player.js. Remember we omitted the return statement? That's because we want the component to return conditionally; specifically, to return different things based the value of stage. So set an If-else block, catering for the values of -1 and 6, and everything else. For a value of -1 for stage, the game has not started. For a value of 6, the game is over. And for every other value, the game is in progress.
src/components/Player/Player.js
import React from 'react';
import './Player.css';
function Player(props) {
let stage = props.stage;
let setStage = props.setStage;
let guessedLetters = props.guessedLetters;
let setGuessedLetters = props.setGuessedLetters;
let mysteryWord = props.mysteryWord;
let setMessageAndContext = props.setMessageAndContext;
let error = props.error;
let isPending = props.isPending;
let mysteryLetters = mysteryWord.split('');
if (stage === -1) {
return (
);
} else if (stage === 6) {
return (
);
} else {
return (
);
}
}
export default Player;
import './Player.css';
function Player(props) {
let stage = props.stage;
let setStage = props.setStage;
let guessedLetters = props.guessedLetters;
let setGuessedLetters = props.setGuessedLetters;
let mysteryWord = props.mysteryWord;
let setMessageAndContext = props.setMessageAndContext;
let error = props.error;
let isPending = props.isPending;
let mysteryLetters = mysteryWord.split('');
if (stage === -1) {
return (
);
} else if (stage === 6) {
return (
);
} else {
return (
);
}
}
export default Player;
So if the game has not started, return a button with the text "Begin". If the game is over, render that button also, but with the text "Replay". If the game is in progress, return a div styled using Player.
src/components/Player/Player.js
import React from 'react';
import './Player.css';
function Player(props) {
let stage = props.stage;
let setStage = props.setStage;
let guessedLetters = props.guessedLetters;
let setGuessedLetters = props.setGuessedLetters;
let mysteryWord = props.mysteryWord;
let setMessageAndContext = props.setMessageAndContext;
let error = props.error;
let isPending = props.isPending;
let mysteryLetters = mysteryWord.split('');
if (stage === -1) {
return (
<button className="BtnBegin">
Begin
</button>
);
} else if (stage === 6) {
return (
<button className="BtnBegin">
Replay
</button>
);
} else {
return (
<div className="Player">
</div>
);
}
}
export default Player;
import './Player.css';
function Player(props) {
let stage = props.stage;
let setStage = props.setStage;
let guessedLetters = props.guessedLetters;
let setGuessedLetters = props.setGuessedLetters;
let mysteryWord = props.mysteryWord;
let setMessageAndContext = props.setMessageAndContext;
let error = props.error;
let isPending = props.isPending;
let mysteryLetters = mysteryWord.split('');
if (stage === -1) {
return (
<button className="BtnBegin">
Begin
</button>
);
} else if (stage === 6) {
return (
<button className="BtnBegin">
Replay
</button>
);
} else {
return (
<div className="Player">
</div>
);
}
}
export default Player;
Here's some styling for the button. I've made it various shades of grey, even upon hovering. This is up to personal taste.
src/components/Player/Player.css
.Player {
display: flex;
background-color: rgba(0, 0, 0, 1);
box-shadow: 10px 10px 10px rgba(0, 0, 0, 0.5);
padding: 10px 0;
flex-flow: row wrap;
justify-content: center;
align-items: center;
}
.BtnBegin {
display: block;
margin: 0 auto 0 auto;
padding: 0.5em;
width: 8em;
border-radius: 5px;
border: 0px solid red;
background-color: rgba(100, 100, 100, 1);
color: rgba(0, 0, 0, 1);
font-weight: bold;
font-size: 2em;
cursor: pointer;
}
.BtnBegin:hover{
background-color: rgba(200, 200, 200, 1);
color: rgba(100, 100, 100, 1);
}
display: flex;
background-color: rgba(0, 0, 0, 1);
box-shadow: 10px 10px 10px rgba(0, 0, 0, 0.5);
padding: 10px 0;
flex-flow: row wrap;
justify-content: center;
align-items: center;
}
.BtnBegin {
display: block;
margin: 0 auto 0 auto;
padding: 0.5em;
width: 8em;
border-radius: 5px;
border: 0px solid red;
background-color: rgba(100, 100, 100, 1);
color: rgba(0, 0, 0, 1);
font-weight: bold;
font-size: 2em;
cursor: pointer;
}
.BtnBegin:hover{
background-color: rgba(200, 200, 200, 1);
color: rgba(100, 100, 100, 1);
}
You should see this. Because when the app loads, stage is set to -1.

Now, clicking the button will not accomplish anything simply because we haven't defined an event for it. So let's do it now.
src/components/Player/Player.js
if (stage === -1) {
return (
<button className="BtnBegin" onClick={ ()=>{BtnBegin_click();}}>
Begin
</button>
);
} else if (stage === 6) {
return (
<button className="BtnBegin" onClick={ ()=>{BtnBegin_click();}}>
Replay
</button>
);
} else {
return (
<div className="Player">
</div>
);
}
return (
<button className="BtnBegin" onClick={ ()=>{BtnBegin_click();}}>
Begin
</button>
);
} else if (stage === 6) {
return (
<button className="BtnBegin" onClick={ ()=>{BtnBegin_click();}}>
Replay
</button>
);
} else {
return (
<div className="Player">
</div>
);
}
And then we define BtnBegin_click(). First, we handle cases for the value of error and isPending, causing the function to exit prematurely if either is true. This will ensure that nothing awkward happens if the user clicks on the buttons before the required data has loaded.
src/components/Player/Player.js
function Player(props) {
let stage = props.stage;
let setStage = props.setStage;
let guessedLetters = props.guessedLetters;
let setGuessedLetters = props.setGuessedLetters;
let mysteryWord = props.mysteryWord;
let setMessageAndContext = props.setMessageAndContext;
let error = props.error;
let isPending = props.isPending;
let mysteryLetters = mysteryWord.split('');
const BtnBegin_click = ()=> {
if (error) {
alert("Error has occured. Please reload.");
return;
};
if (isPending) {
alert("Fetching words in progress. Please wait.");
return;
};
};
if (stage === -1) {
return (
<button className="BtnBegin" onClick={ ()=>{BtnBegin_click();}}>
Begin
</button>
);
let stage = props.stage;
let setStage = props.setStage;
let guessedLetters = props.guessedLetters;
let setGuessedLetters = props.setGuessedLetters;
let mysteryWord = props.mysteryWord;
let setMessageAndContext = props.setMessageAndContext;
let error = props.error;
let isPending = props.isPending;
let mysteryLetters = mysteryWord.split('');
const BtnBegin_click = ()=> {
if (error) {
alert("Error has occured. Please reload.");
return;
};
if (isPending) {
alert("Fetching words in progress. Please wait.");
return;
};
};
if (stage === -1) {
return (
<button className="BtnBegin" onClick={ ()=>{BtnBegin_click();}}>
Begin
</button>
);
After that, if neither error nor isPending is true, we set stage to 0 using setStage(). This basically means that the game has begun, or restarted. Then we use setGuessedLetters to, well, set guessedLetters, to an empty array. And then we call setMessageAndContext() to clear both message content and the context.
src/components/Player/Player.js
const BtnBegin_click = ()=> {
if (error) {
alert("Error has occured. Please reload.");
return;
};
if (isPending) {
alert("Fetching words in progress. Please wait.");
return;
};
setStage(0);
setGuessedLetters([]);
setMessageAndContext("", "");
};
if (error) {
alert("Error has occured. Please reload.");
return;
};
if (isPending) {
alert("Fetching words in progress. Please wait.");
return;
};
setStage(0);
setGuessedLetters([]);
setMessageAndContext("", "");
};
We follow up by calling setUsedLetters() to set usedLetters to an empty array. If you've been paying attention, you're probably wondering where this came from. That's because we haven't defined this yet.
src/components/Player/Player.js
const BtnBegin_click = ()=> {
if (error) {
alert("Error has occured. Please reload.");
return;
};
if (isPending) {
alert("Fetching words in progress. Please wait.");
return;
};
setStage(0);
setGuessedLetters([]);
setUsedLetters([]);
setMessageAndContext("", "");
};
if (error) {
alert("Error has occured. Please reload.");
return;
};
if (isPending) {
alert("Fetching words in progress. Please wait.");
return;
};
setStage(0);
setGuessedLetters([]);
setUsedLetters([]);
setMessageAndContext("", "");
};
usedLetters is an array that is defined and used only in the Player component, and isn't passed anywhere. We will define it here using useState(). We will also define guessedWord and its mutator, setGuessedWord(), using the same method.
src/components/Player/Player.js
function Player(props) {
const [guessedWord, setguessedWord] = useState('');
const [usedLetters, setUsedLetters] = useState([]);
let stage = props.stage;
let setStage = props.setStage;
let guessedLetters = props.guessedLetters;
let setGuessedLetters = props.setGuessedLetters;
let mysteryWord = props.mysteryWord;
let setMessageAndContext = props.setMessageAndContext;
let error = props.error;
let isPending = props.isPending;
let mysteryLetters = mysteryWord.split('');
const BtnBegin_click = ()=> {
if (error) {
alert("Error has occured. Please reload.");
return;
};
if (isPending) {
alert("Fetching words in progress. Please wait.");
return;
};
setStage(0);
setGuessedLetters([]);
setUsedLetters([]);
setMessageAndContext("", "");
};
const [guessedWord, setguessedWord] = useState('');
const [usedLetters, setUsedLetters] = useState([]);
let stage = props.stage;
let setStage = props.setStage;
let guessedLetters = props.guessedLetters;
let setGuessedLetters = props.setGuessedLetters;
let mysteryWord = props.mysteryWord;
let setMessageAndContext = props.setMessageAndContext;
let error = props.error;
let isPending = props.isPending;
let mysteryLetters = mysteryWord.split('');
const BtnBegin_click = ()=> {
if (error) {
alert("Error has occured. Please reload.");
return;
};
if (isPending) {
alert("Fetching words in progress. Please wait.");
return;
};
setStage(0);
setGuessedLetters([]);
setUsedLetters([]);
setMessageAndContext("", "");
};
Now we will define some JSX under the constant dashboard. Within a fragment, we'll have a div styled using GuessWord. Include dashboard in the last return statement. This should show when the game is in progress.
src/components/Player/Player.js
const BtnBegin_click = ()=> {
if (error) {
alert("Error has occured. Please reload.");
return;
};
if (isPending) {
alert("Fetching words in progress. Please wait.");
return;
};
setStage(0);
setGuessedLetters([]);
setUsedLetters([]);
setMessageAndContext("", "");
};
const dashboard = (
<>
<div className="GuessWord">
</div>
</>
);
if (stage === -1) {
return (
<button className="BtnBegin" onClick={ ()=>{BtnBegin_click();}}>
Begin
</button>
);
} else if (stage === 6) {
return (
<button className="BtnBegin" onClick={ ()=>{BtnBegin_click();}}>
Replay
</button>
);
} else {
return (
<div className="Player">
{ dashboard }
</div>
);
}
if (error) {
alert("Error has occured. Please reload.");
return;
};
if (isPending) {
alert("Fetching words in progress. Please wait.");
return;
};
setStage(0);
setGuessedLetters([]);
setUsedLetters([]);
setMessageAndContext("", "");
};
const dashboard = (
<>
<div className="GuessWord">
</div>
</>
);
if (stage === -1) {
return (
<button className="BtnBegin" onClick={ ()=>{BtnBegin_click();}}>
Begin
</button>
);
} else if (stage === 6) {
return (
<button className="BtnBegin" onClick={ ()=>{BtnBegin_click();}}>
Replay
</button>
);
} else {
return (
<div className="Player">
{ dashboard }
</div>
);
}
This interface is for the user to guess the entire word at one go. We're going to add a h3 tag.
src/components/Player/Player.js
const dashboard = (
<>
<div className="GuessWord">
<h3>Guess The Word</h3>
</div>
</>
)
<>
<div className="GuessWord">
<h3>Guess The Word</h3>
</div>
</>
)
Then add an input tag. Since the length of every word is between 5 to 13 characters, we will set the maxlength attribute to 13. The value will be guessedWord.
src/components/Player/Player.js
const dashboard = (
<>
<div className="GuessWord">
<h3>Guess The Word</h3>
<input
type="text"
maxLength="13"
value={ guessedWord }
/>
</div>
</>
)
<>
<div className="GuessWord">
<h3>Guess The Word</h3>
<input
type="text"
maxLength="13"
value={ guessedWord }
/>
</div>
</>
)
Then we have a button which is disabled if guessedWord is an empty string.
src/components/Player/Player.js
const dashboard = (
<>
<div className="GuessWord">
<h3>Guess The Word</h3>
<input
type="text"
maxLength="13"
value={ guessedWord }
/>
<br /><br />
<button disabled={guessedWord.length === 0}>
Confirm
</button>
</div>
</>
)
<>
<div className="GuessWord">
<h3>Guess The Word</h3>
<input
type="text"
maxLength="13"
value={ guessedWord }
/>
<br /><br />
<button disabled={guessedWord.length === 0}>
Confirm
</button>
</div>
</>
)
All this needs to be styled. It should probably go without saying that you should feel free to style it however you want. Since the background color of Player is black, I've elected for white for text color. In any case, styling really isn't the point of this web tutorial here, and you should do what makes sense to you.
src/components/Player/Player.css
.Player {
display: flex;
background-color: rgba(0, 0, 0, 1);
box-shadow: 10px 10px 10px rgba(0, 0, 0, 0.5);
padding: 10px 0;
flex-flow: row wrap;
justify-content: center;
align-items: center;
}
.GuessWord {
background-color: rgba(0, 0, 0, 1);
width: 45%;
height: 150px;
}
.GuessWord {
float: right;
}
.GuessWord input{
padding: 0.5em;
width: 13em;
border-radius: 5px;
border: 0px solid red;
}
.GuessWord button{
padding: 0.5em;
width: 8em;
border-radius: 5px;
border: 0px solid red;
background-color: rgba(100, 100, 100, 1);
color: rgba(0, 0, 0, 1);
font-weight: bold;
cursor: pointer;
}
.GuessWord button:hover{
background-color: rgba(200, 200, 200, 1);
color: rgba(100, 100, 100, 1);
}
.GuessWord {
text-align: center;
width: 45%;
min-width: 200px;
}
.GuessWord h3 {
color: rgba(255, 255, 255, 1);
}
.BtnBegin {
display: block;
margin: 0 auto 0 auto;
padding: 0.5em;
width: 8em;
border-radius: 5px;
border: 0px solid red;
background-color: rgba(100, 100, 100, 1);
color: rgba(0, 0, 0, 1);
font-weight: bold;
font-size: 2em;
cursor: pointer;
}
.BtnBegin:hover{
background-color: rgba(200, 200, 200, 1);
color: rgba(100, 100, 100, 1);
}
display: flex;
background-color: rgba(0, 0, 0, 1);
box-shadow: 10px 10px 10px rgba(0, 0, 0, 0.5);
padding: 10px 0;
flex-flow: row wrap;
justify-content: center;
align-items: center;
}
.GuessWord {
background-color: rgba(0, 0, 0, 1);
width: 45%;
height: 150px;
}
.GuessWord {
float: right;
}
.GuessWord input{
padding: 0.5em;
width: 13em;
border-radius: 5px;
border: 0px solid red;
}
.GuessWord button{
padding: 0.5em;
width: 8em;
border-radius: 5px;
border: 0px solid red;
background-color: rgba(100, 100, 100, 1);
color: rgba(0, 0, 0, 1);
font-weight: bold;
cursor: pointer;
}
.GuessWord button:hover{
background-color: rgba(200, 200, 200, 1);
color: rgba(100, 100, 100, 1);
}
.GuessWord {
text-align: center;
width: 45%;
min-width: 200px;
}
.GuessWord h3 {
color: rgba(255, 255, 255, 1);
}
.BtnBegin {
display: block;
margin: 0 auto 0 auto;
padding: 0.5em;
width: 8em;
border-radius: 5px;
border: 0px solid red;
background-color: rgba(100, 100, 100, 1);
color: rgba(0, 0, 0, 1);
font-weight: bold;
font-size: 2em;
cursor: pointer;
}
.BtnBegin:hover{
background-color: rgba(200, 200, 200, 1);
color: rgba(100, 100, 100, 1);
}
So when you click the BEGIN button, this is what you should see! Note that the mystery word (currently "EMOTE") is still visible because we want to run some tests.

Let's handle input to the text box. Using e to derive the value of that textbox, we then use setGuessedWord() to set guessedWord to that value.
src/components/Player/Player.js
<input
type="text"
maxLength="13"
value={ guessedWord }
onChange={ (e)=>{ setGuessedWord(e.target.value); }}
/>
type="text"
maxLength="13"
value={ guessedWord }
onChange={ (e)=>{ setGuessedWord(e.target.value); }}
/>
Next, let's handle the button click. The button is disabled if there's no input. That's been handled. But if there's input and the button is clicked, we want it to do something.
src/components/Player/Player.js
<button onClick={ ()=>{BtnConfirm_click();}} disabled={guessedWord.length === 0}>
Confirm
</button>
Confirm
</button>
Create BtnConfirm_click() as an event handler.
src/components/Player/Player.js
let stage = props.stage;
let setStage = props.setStage;
let guessedLetters = props.guessedLetters;
let setGuessedLetters = props.setGuessedLetters;
let mysteryWord = props.mysteryWord;
let setMessageAndContext = props.setMessageAndContext;
let error = props.error;
let isPending = props.isPending;
let mysteryLetters = mysteryWord.split('');
const BtnConfirm_click = ()=> {
};
const BtnBegin_click = ()=> {
if (error) {
alert("Error has occured. Please reload.");
return;
};
let setStage = props.setStage;
let guessedLetters = props.guessedLetters;
let setGuessedLetters = props.setGuessedLetters;
let mysteryWord = props.mysteryWord;
let setMessageAndContext = props.setMessageAndContext;
let error = props.error;
let isPending = props.isPending;
let mysteryLetters = mysteryWord.split('');
const BtnConfirm_click = ()=> {
};
const BtnBegin_click = ()=> {
if (error) {
alert("Error has occured. Please reload.");
return;
};
First, examine the value of stage. If the game is over or has not yet begun, we exit the function.
src/components/Player/Player.js
const BtnConfirm_click = ()=> {
if (stage === 6 || stage === -1) return;
};
if (stage === 6 || stage === -1) return;
};
Then we check guessedWord against mysteryWord. If the word was guessed correctly, we set guessedLetters to the value of mysteryLetters, automatically set stage to the value of -1, and set both message and messageContext.
src/components/Player/Player.js
const BtnConfirm_click = ()=> {
if (stage === 6 || stage === -1) return;
if (guessedWord === mysteryWord) {
setGuessedLetters(mysteryLetters);
setStage(-1);
setMessageAndContext("You Win!", "success");
} else {
}
};
if (stage === 6 || stage === -1) return;
if (guessedWord === mysteryWord) {
setGuessedLetters(mysteryLetters);
setStage(-1);
setMessageAndContext("You Win!", "success");
} else {
}
};
If not, we increment stage, and set both message and messageContext. Note the values for both these values; we will need to handle them as well later.
src/components/Player/Player.js
const BtnConfirm_click = ()=> {
if (stage === 6 || stage === -1) return;
if (guessedWord === mysteryWord) {
setGuessedLetters(mysteryLetters);
setStage(-1);
setMessageAndContext("You Win!", "success");
} else {
setStage(stage + 1);
setMessageAndContext("You guessed '" + guessedWord + "'. Wrong!", "failure");
}
};
if (stage === 6 || stage === -1) return;
if (guessedWord === mysteryWord) {
setGuessedLetters(mysteryLetters);
setStage(-1);
setMessageAndContext("You Win!", "success");
} else {
setStage(stage + 1);
setMessageAndContext("You guessed '" + guessedWord + "'. Wrong!", "failure");
}
};
If stage is 5, that means the game is over. We display the mystery word after setting both message and messageContext.
src/components/Player/Player.js
const BtnConfirm_click = ()=> {
if (stage === 6 || stage === -1) return;
if (guessedWord === mysteryWord) {
setGuessedLetters(mysteryLetters);
setStage(-1);
setMessageAndContext("You Win!", "success");
} else {
setStage(stage + 1);
setMessageAndContext("You guessed '" + guessedWord + "'. Wrong!", "failure");
if (stage === 5) {
setMessageAndContext("You have run out of tries!", "failure");
setGuessedLetters(mysteryLetters);
}
}
};
if (stage === 6 || stage === -1) return;
if (guessedWord === mysteryWord) {
setGuessedLetters(mysteryLetters);
setStage(-1);
setMessageAndContext("You Win!", "success");
} else {
setStage(stage + 1);
setMessageAndContext("You guessed '" + guessedWord + "'. Wrong!", "failure");
if (stage === 5) {
setMessageAndContext("You have run out of tries!", "failure");
setGuessedLetters(mysteryLetters);
}
}
};
Now we handle the CSS classes success and failure in App.css. I am setting them to background colors of green and red respectively.
src/App.css
.Message {
padding: 3px 0 3px 0;
margin-bottom: 5px;
background-color: rgba(100, 100, 255, 1);
color: rgba(255, 255, 255, 1);
font-weight: bold;
font-size: 0.8em;
text-align: center;
visibility: visible;
}
.failure {
background-color: rgba(255, 100, 100, 1);
}
.success {
background-color: rgba(100, 255, 100, 1);
}
padding: 3px 0 3px 0;
margin-bottom: 5px;
background-color: rgba(100, 100, 255, 1);
color: rgba(255, 255, 255, 1);
font-weight: bold;
font-size: 0.8em;
text-align: center;
visibility: visible;
}
.failure {
background-color: rgba(255, 100, 100, 1);
}
.success {
background-color: rgba(100, 255, 100, 1);
}
Now try typing in anything but the mysery word displayed, and click the CONFIRM button.

And then try it with the correct word.

Try the wrong word several times in a row. The hanged man should appear bit by bit, and finally, you get "GAME OVER" and a REPLAY button.

Final touches
We need to tighten this up a bit. What if you enter capital letters, spaces or a number?To handle this, we run the value through the RemoveIllegalCharacters() function, which we will create after this step.
src/components/Player/Player.js
<input
type="text"
maxLength="13"
value={ guessedWord }
onChange={ (e)=>{ setGuessedWord(RemoveIllegalCharacters(e.target.value)); }}
/>
type="text"
maxLength="13"
value={ guessedWord }
onChange={ (e)=>{ setGuessedWord(RemoveIllegalCharacters(e.target.value)); }}
/>
Remember the utils folder? This is where we will create this, because it could serve as a general-purpose function.
utils/RemoveIllegalCharacters.js
const RemoveIllegalCharacters = (word) => {
}
export default RemoveIllegalCharacters;
}
export default RemoveIllegalCharacters;
We use a regular expression to remove everything that isn't alphabetical. Then return the lowercase version of the result. It's overkill, but whatever, man.
utils/RemoveIllegalCharacters.js
const RemoveIllegalCharacters = (word) => {
let newWord = word.replace(/[^a-z]/gi, '');
return newWord.toLowerCase();
}
export default RemoveIllegalCharacters;
let newWord = word.replace(/[^a-z]/gi, '');
return newWord.toLowerCase();
}
export default RemoveIllegalCharacters;
After this, if you try to type in anything that isn't a lowercase letter, it just won't show up!