Thursday 25 June 2020

Making the contact tracing effort mandatory

Singapore is still in the middle of the COVID-19 battle; indeed, so is the rest of the world no matter what New Zealand claims. All due respect to NZ, but as long as an effective vaccine has not been created, the war is not over and all celebration is premature.

To that end, Singapore is intending to distribute the wearable TraceTogether token, which functions pretty much like the app of the same name. The app, along with the SafeEntry app (which is basically an online form called by scanning a QR code - rudimentary but effective) were rolled out the past few months as aids to help the contact tracing effort. However, they have not been altogether adequate.

The TraceTogether app

This app uses the Bluetooth feature on mobile phones, tracking all similarly enabled mobile phones within a radius. Therefore, in theory, one should be able to trace whomever an infected user was in close contact with.

Using TraceTogether.

Unfortunately, this does not work so well on iOS devices, and even on Android devices. It also has the annoying side-effect of hogging the Bluetooth signal. As long as this app is on, your mobile can't use Bluetooth for anything else.

Also, the older population may not be tech-savvy enough to actually know how to use a mobile phone, much less install an app.

The SafeEntry app

This solution is deployed at the entrances of all buildings, and every shop within a mall. Upon entry, the user is supposed to scan the QR code, go to the page and click the "Check-in" button after entering details such as NRIC and mobile number. Upon exit, the user should click the "check-out" button.

SafeEntry is useless in the open.

Not only is this troublesome AF, it's all too easy to forget to "check-out". And one can even more easily lose track of all the places checked in at. Just try going to any building from the underpass at Orchard MRT.

In addition, this method is deployed only at entrances of businesses. Meaning, it doesn't do jackshit to help trace people who might have contracted COVID-19 out in the open.

What the TraceTogether token solves

Basically, anything that involves considerable conscious effort on the part of the user, is suspect. People are human; they get lazy and slipshod. Wearing the token ensures that tracking will be done everywhere, without the need to install apps or click buttons.

Along with that, the Singapore Government might be about to make the wearing of this token mandatory; that is, if you are found not to have that token on your person, you will be fined and/or jailed. This has predictably raised a ruckus, with people signing some lame petition against it, just about guaranteeing that the law will be passed.

People are concerned, despite pretty much handing their data over to Facebook and Google every time they use their mobile phones (or even when they don't), that the Government will abuse this privilege to track their every movement. They're concerned for their freedom and privacy. They'd rather let the likes of Mark Zuckerberg and Sundar Pichai take their data for profit, but not their own Government who are trying to save their lives. Some have even suggested that the Government is using this outbreak as an excuse to implement a surveillance state.

Are you guys for real?!
Oh FFS, children. Grow up!

The token doesn't check your location. It checks who was in close contact with you. That's a whole different kettle of fish. I've found that most of the people raising a fuss aren't technically inclined... the techies I know aren't concerned in the least. Because we actually know shit, and we know this doesn't do what you think it does!

And even if it does track your every movement...

Maybe I haven't made myself perfectly clear the last few times I wrote about this, but fuck your precious privacy. Lives are at stake. In case you've been living under a rock and don't know what we're dealing with here, COVID-19 is a very infectious disease which can lead to death. The fact that only twenty-plus people have died out of a possible forty thousand infected in Singapore so far, is no reason to be complacent.

COVID-19, on its own, is not that deadly a disease. However, it is extremely contagious and Singaporeans behaving like utter retards at every opportunity makes this disease even more dangerous than it already is. We're stupid and ill-disciplined, and will willingly disregard self-preservation and the safety of others for instant gratification. That's what the past few months of observation have shown me.

If the TraceTogether token is not made mandatory, that means much faith has to be placed in the hands of Singaporeans to do the right thing for the greater good... and I'm not at all sure we're deserving of that amount of faith.

Oh, the COVIDity!
T___T

Saturday 20 June 2020

Web Tutorial: The Slide Carousel (Part 3/3)

Right! We're at the final part and probably the most important. The slide carousel, as it stands, works. But we want it to slide slowly, not instantly. And we want it to slide on its own without clicking on the buttons. We'll be taking care of it today.

Go to the slide() method. Declare the variable currentMarginLeft.
slide: function(dir)
{
    var nextSlide;
    var currentMarginLeft;
    var nextMarginLeft;


In the If blocks, set the value of currentMarginLeft as well. For sliding left, currentMarginLeft is 0 and nextMarginLeft is -100. It's reversed for sliding right.
var nextSlide;
var currentMarginLeft;
var nextMarginLeft;

if (dir == "left")
{
    if (this.currentSlideIndex == this.slides.length - 1)
    {
        nextSlide = 0;
    }
    else
    {
        nextSlide = this.currentSlideIndex + 1;
    }

    currentMarginLeft = 0;
    nextMarginLeft = -100;
}

if (dir == "right")
{
    if (this.currentSlideIndex == 0)
    {
        nextSlide = this.slides.length - 1;
    }
    else
    {
        nextSlide = this.currentSlideIndex - 1;
    }   

    currentMarginLeft = -100;
    nextMarginLeft = 0;
}


Call the setTransitionSpeed() method with an argument of 0 before the If blocks.
var nextSlide;
var currentMarginLeft;
var nextMarginLeft;

this.setTransitionSpeed(0);

if (dir == "left")
{
    if (this.currentSlideIndex == this.slides.length - 1)
    {
        nextSlide = 0;
    }
    else
    {
        nextSlide = this.currentSlideIndex + 1;
    }

    currentMarginLeft = 0;
    nextMarginLeft = -100;
}

if (dir == "right")
{
    if (this.currentSlideIndex == 0)
    {
        nextSlide = this.slides.length - 1;
    }
    else
    {
        nextSlide = this.currentSlideIndex - 1;
    }   

    currentMarginLeft = -100;
    nextMarginLeft = 0;
}


This method basically sets contentContainer's transition speed, in seconds, to the value specified by interval. We passed in 0 just now, so it's still instantaneous. But that's by design...
slide: function(dir)
{
    var nextSlide;
    var currentMarginLeft;
    var nextMarginLeft;

    this.setTransitionSpeed(0);

    if (dir == "left")
    {
        if (this.currentSlideIndex == this.slides.length - 1)
        {
            nextSlide = 0;
        }
        else
        {
            nextSlide = this.currentSlideIndex + 1;
        }

        currentMarginLeft = 0;
        nextMarginLeft = -100;
    }

    if (dir == "right")
    {
        if (this.currentSlideIndex == 0)
        {
            nextSlide = this.slides.length - 1;
        }
        else
        {
            nextSlide = this.currentSlideIndex - 1;
        }   

        currentMarginLeft = -100;
        nextMarginLeft = 0;
    }

    this.setContent(nextSlide, dir);

    this.setMargin(nextMarginLeft);
    this.currentSlideIndex = nextSlide;
},
setTransitionSpeed: function(interval)
{
    this.contentContainer.style.webKitTransition = interval + "s all";
    this.contentContainer.style.transition = interval + "s all";
},
setMargin: function(margin)
{
    this.contentContainer.style.marginLeft = margin + "%";
},


...because we want this part to be instant. We call the setMarginLeft() method and pass in the value of currentMarginLeft.
slide: function(dir)
{
    var nextSlide;
    var currentMarginLeft;
    var nextMarginLeft;

    this.setTransitionSpeed(0);

    if (dir == "left")
    {
        if (this.currentSlideIndex == this.slides.length - 1)
        {
            nextSlide = 0;
        }
        else
        {
            nextSlide = this.currentSlideIndex + 1;
        }

        currentMarginLeft = 0;
        nextMarginLeft = -100;
    }

    if (dir == "right")
    {
        if (this.currentSlideIndex == 0)
        {
            nextSlide = this.slides.length - 1;
        }
        else
        {
            nextSlide = this.currentSlideIndex - 1;
        }   

        currentMarginLeft = -100;
        nextMarginLeft = 0;
    }

    this.setMargin(currentMarginLeft);
    this.setContent(nextSlide, dir);

    this.setMargin(nextMarginLeft);
    this.currentSlideIndex = nextSlide;


Then we introduce the setTimeout() function to run the setTransitonSpeed() method with an interval of 1 second, after a delay of 250 milliseconds. Look up some information on setTimeout() here.
    this.setMargin(currentMarginLeft);
    this.setContent(nextSlide, dir);

    setTimeout
    (
        function()
        {
            carousel.setTransitionSpeed(1);
        },
        250
    );

    this.setMargin(currentMarginLeft);
    this.setContent(nextSlide, dir);


Then we enclose the next code block in another setTimeout() function call. This one will execute after 500 milliseconds.
setTimeout
(
    function()
    {
        carousel.setTransitionSpeed(1);
    },
    250
);

setTimeout
(
    function()
    {
        this.setMargin(currentMarginLeft);
        this.setContent(nextSlide, dir);
    },
    500
);


Use the object name instead of this. Because this can't be relied on to refer to what you think it refers to when called from inside a callback.
setTimeout
(
    function()
    {
        carousel.setMargin(currentMarginLeft);
        carousel.setContent(nextSlide, dir);
    },
    500
);


Now you see it sliding slowly from right to left, or left to right.

Automating this slider

This one's easy enough. We've already established that sliding left and right works, so all that's left to do is automate this.

In the carousel object, add a property, canMove, and set it to true by default.
currentSlideIndex: 0,
contentContainer: undefined,
c0: undefined,
c1: undefined,
canMove: true,
begin: function()
{
    this.contentContainer = document.getElementById("contentContainer");
    this.c0 = document.getElementById("content0");
    this.c1 = document.getElementById("content1");

    this.setContent(this.currentSlideIndex + 1, "left");               
},


In the begin() method, use the setInterval() function to run the animateSlider() method every 5 seconds. Here's some info on the setInterval() function.
currentSlideIndex: 0,
contentContainer: undefined,
c0: undefined,
c1: undefined,
canMove: true,
begin: function()
{
    this.contentContainer = document.getElementById("contentContainer");
    this.c0 = document.getElementById("content0");
    this.c1 = document.getElementById("content1");

    this.setContent(this.currentSlideIndex + 1, "left");

    setInterval
    (
        function()
        {
            carousel.animateSlider();
        },
        5000
    );                   
},   


Create the animateSlider() method.
begin: function()
{
    this.contentContainer = document.getElementById("contentContainer");
    this.c0 = document.getElementById("content0");
    this.c1 = document.getElementById("content1");

    this.setContent(this.currentSlideIndex + 1, "left");

    setInterval
    (
        function()
        {
            carousel.animateSlider();
        },
        5000
    );                   
},       
animateSlider: function()
{

},


Check to see if canMove is true, and call the slide() method with an argument of "left" if so.
animateSlider: function()
{
    if (this.canMove)
    {
        this.slide("left");   
    }
},


Set canMove to false whenever a button is clicked. This means that the slider will no longer move automatically. Because it would be annoying if you were scrolling to see something and the slider moved by itself, possibly sooner than you'd like or in the opposite direction.
sliderButtonClick: function(dir)
{
    this.canMove = false;
    this.slide(dir);
}


And then every time after the slide() method is run, set canMove to true after 5 seconds. This way, after roughly 5 seconds, if you stop clicking on the buttons, the carousel will resume moving!
slide: function(dir)
{
    var nextSlide;
    var currentMarginLeft;
    var nextMarginLeft;

    this.setTransitionSpeed(0);

    if (dir == "left")
    {
        if (this.currentSlideIndex == this.slides.length - 1)
        {
            nextSlide = 0;
        }
        else
        {
            nextSlide = this.currentSlideIndex + 1;
        }

        currentMarginLeft = 0;
        nextMarginLeft = -100;
    }

    if (dir == "right")
    {
        if (this.currentSlideIndex == 0)
        {
            nextSlide = this.slides.length - 1;
        }
        else
        {
            nextSlide = this.currentSlideIndex - 1;
        }   

        currentMarginLeft = -100;
        nextMarginLeft = 0;
    }

    this.setMargin(currentMarginLeft);
    this.setContent(nextSlide, dir);

    setTimeout
    (
        function()
        {
            carousel.setTransitionSpeed(1);
        },
        250
    );

    setTimeout
    (
        function()
        {
            carousel.setMargin(nextMarginLeft);
            carousel.currentSlideIndex = nextSlide;
        },
        500
    );

    setTimeout
    (
        function()
        {
            carousel.canMove = true;
        },
        5000
    );
},


Turn off the red outlines.
div {outline: 0px solid #FF0000;}


Now this is what it looks like. It should move every 5 seconds.

Some little niceties

Remember we left the content properties of the elements in the slides array were all empty strings? Let's set them to some random text and HTML.
slides:
[
    {
        bg: "00.jpg",
        content: "<div><h2>Phasellus ullamcorper</h2><p>Lorem ipsum dolor sit amet, consectetur adipiscing elit. Praesent fringilla molestie pellentesque. Aliquam auctor scelerisque mattis. Donec maximus ipsum non eros gravida suscipit. Sed vulputate massa orci, non placerat lectus suscipit mollis. Fusce faucibus lorem eu lectus mattis, et dictum urna semper. Maecenas massa magna, commodo at pulvinar ac, lacinia nec augue. Nullam pretium consectetur ultricies. In a mattis justo. Suspendisse potenti. Vivamus scelerisque, urna imperdiet faucibus facilisis, orci elit dictum ex, blandit rutrum metus diam eget mi. Phasellus ullamcorper eu purus eu venenatis. Nullam vestibulum dolor vel felis facilisis, ac rutrum tellus rutrum. Sed vehicula elementum erat, eget mattis tortor rhoncus a. Phasellus ut nisl volutpat, dictum lectus ut, dictum lectus.</p><h2>Quisque pharetra</h2><p>Lorem ipsum vel felis facilisis, ac rutrum tellus rutrum. Sed vehicula elementum erat, eget mattis tortor rhoncus a.</p><p>Vestibulum porta mattis quam a gravida. Aliquam quis quam nulla.</p></div>"
    },
    {
        bg: "01.jpg",
        content: "<div><h2>Phasellus mattis</h2><p>Lorem ipsum vel felis facilisis, ac rutrum tellus rutrum. Sed vehicula elementum erat, eget mattis tortor rhoncus a.</p></div>"
    },
    {
        bg: "02.jpg",
        content: "<div><h2>In diam nisi erat</h2><p>Vestibulum porta mattis quam a gravida. Aliquam quis quam nulla. Pellentesque nisi erat, elementum ut maximus sed, euismod vel dui. Curabitur vitae dui nec justo rhoncus imperdiet. In diam risus, egestas dictum viverra vel, pretium sed nisl.</p></div>"
    },
    {
        bg: "03.jpg",
        content: "<div><h2>Nullam ullamcorper</h2><p>Lorem ipsum scelerisque, urna imperdiet faucibus facilisis, orci elit dictum ex, blandit rutrum metus diam eget mi. Phasellus ullamcorper eu purus eu venenatis. Nullam vestibulum dolor vel felis facilisis, ac rutrum tellus rutrum. Sed vehicula elementum erat, eget mattis tortor rhoncus a. Phasellus ut nisl volutpat, dictum lectus ut, dictum lectus.</p><h2>Quisque pharetra</h2><p><img src='img/03.jpg' height='150' align='right' />Vestibulum porta mattis quam a gravida. Aliquam quis quam nulla. Pellentesque nisi erat, elementum ut maximus sed, euismod vel dui. Curabitur vitae dui nec justo rhoncus imperdiet. In diam risus, egestas dictum viverra vel, pretium sed nisl. Nam mi risus, imperdiet sed purus id, posuere feugiat nibh. Curabitur dignissim ipsum eget est pretium, ut luctus leo dapibus. Praesent in vehicula felis. Nullam quis faucibus justo. Praesent ac turpis tempor elit lobortis sodales laoreet pulvinar velit. Nam vel leo arcu. Cras magna nulla, lacinia in turpis vel, efficitur sagittis sem. Interdum et malesuada fames ac ante ipsum primis in faucibus. In congue consectetur lacus, ac venenatis elit gravida at.</p></div>"
    },
    {
        bg: "04.jpg",
        content: "<div><h2>Quisque pharetra</h2><p>Quisque eget aliquam urna. Integer tortor justo, fringilla ut diam in, ornare maximus sem. Nam dictum mauris nisl, id posuere sem sodales sit amet. Sed ac nulla ut nunc molestie vestibulum id a ipsum. Duis nec elementum libero. Etiam porttitor turpis eu venenatis porta. Quisque pharetra diam vel dui porta luctus. Duis sed odio viverra, molestie orci et, hendrerit erat. Duis ut tortor nec orci suscipit finibus nec non massa. </p></div>"
    }
],


Hmm, we'll need some styling here.


We'll style all divs inside content with padding, a translucent white background, round corners and all that jazz.
.content
{
    width: 50%;
    height: 100%;
    float: left;
    background-color: #000044;
    background-size: cover;
    background-position: 50% 50%;
    background-repeat: no-repeat;
    padding-top: 1em;               
}

.content div
{
    padding: 1em;
    background-color: rgba(255, 255, 255, 0.5);
    color: rgba(0, 0, 0, 1);
    font-weight: bold;
    width: 80%;
    border-radius: 5px;
    margin: 0 auto 0 auto;
}


See, HTML works here too!


Nice, we have a carousel!

This was done in vanilla JavaScript. Could probably have done it much easier in the numerous JavaScript frameworks in the tech stratosphere, but I believe in the importance of starting from the basics. And this is how you implement a simple slide carousel with basic tools.

Happy carousing,
T___T

Wednesday 17 June 2020

Web Tutorial: The Slide Carousel (Part 2/3)

Now that we have the HTML layout up, JavaScript is what makes this thing run. We'll run this entire thing from one object, carousel.

slides is an array of content for the slides, which we will populate later. currentSlideIndex is an integer that starts at 0 and is used to point to the current element of slides.
<script>
    var carousel =
    {
        slides:
        [

        ],
        currentSlideIndex: 0
    }
</script>


currentContainer, c0 and c1 are variables used to hold the DOM objects that will be frequently referred to.
<script>
    var carousel =
    {
        slides:
        [

        ],
        currentSlideIndex: 0,
        contentContainer: undefined,
        c0: undefined,
        c1: undefined
    }
</script>


Finally, the methods. begin() is the method that's run when the entire page is loaded. slide() accepts a parameter, dir, which defines whether the display should slide left or right. sliderButtonClick() simply calls slide(), passing in whatever value it received, as the argument.
<script>
    var carousel =
    {
        slides:
        [

        ],
        currentSlideIndex: 0,
        contentContainer: undefined,
        c0: undefined,
        c1: undefined,
        begin: function()
        {
       
        },               
        slide: function(dir)
        {

        },
        sliderButtonClick: function(dir)
        {
            this.slide(dir);
        }
    }
</script>


In the onload attribute of the bdy tag, make sure the begin() method is called. In the buttons, ensure that when clicked, they call the sliderButtonClick() method, passing in "left" and "right" as arguments. This won't do anything for now because begin() is empty. sliderButtonClick() is not empty, but the method it calls, slide(), certainly is.
<body onload = "carousel.begin();">
    <div id="carouselContainer">
        <div class="margin">
            <input type="button" onclick="carousel.sliderButtonClick('left')" value="&#9668;"/>
        </div>

        <div id="viewport">
            <div id="contentContainer">
                <div id="content0" class="content"></div>
                <div id="content1" class="content"></div>
            </div>
        </div>

        <div class="margin">
            <input type="button" onclick="carousel.sliderButtonClick('right')" value="&#9658;"/>
        </div>   
    </div>
</body>


Next, let's update the slides array. Each element is an object with the properties bg and content. content will be set to an empty string for now, but bg will hold the filenames of the images.
var carousel =
{
    slides:
    [
        {
            bg: "00.jpg",
            content: ""
        },
        {
            bg: "01.jpg",
            content: ""
        },
        {
            bg: "02.jpg",
            content: ""
        },
        {
            bg: "03.jpg",
            content: ""
        },
        {
            bg: "04.jpg",
            content: ""
        }
    ],
    currentSlideIndex: 0,
    contentContainer: undefined,
    c0: undefined,
    c1: undefined,
    begin: function()
    {
   
    },               
    slide: function(dir)
    {

    },
    sliderButtonClick: function(dir)
    {
        this.slide(dir);
    }
}


We'll set up the begin() method next, because it's the first thing to be run when the page loads. In here, we set the contentContainer, c0 and c1 properties to the objects in the DOM.
begin: function()
{
    this.contentContainer = document.getElementById("contentContainer");
    this.c0 = document.getElementById("content0");
    this.c1 = document.getElementById("content1");
},


Then we run the setContent() method. We will pass in the currentslideIndex property plus 1, and the string "left" as arguments.
begin: function()
{
    this.contentContainer = document.getElementById("contentContainer");
    this.c0 = document.getElementById("content0");
    this.c1 = document.getElementById("content1");

    this.setContent(this.currentSlideIndex + 1, "left");                   
},


Now create the method.
slide: function(dir)
{

},
setContent: function(next, dir)
{

},
sliderButtonClick: function(dir)
{
    this.slide(dir);
}


setContent() is a method that accepts two parameters - next and dir. next is the slide after the current slide. Remember we passed in the currentslideIndex property plus 1? That's why. And dir is the direction the slider will slide in. For now, we'll only handle the case for "left", but feel free to add an If block for "right" too.
setContent: function(next, dir)
{
    if (dir == "left")
    {

    }

    if (dir == "right")
    {

    }
},


First, we set c0's innerHTML property to the content property of the current element of slides pointed to by currentSlideIndex. Since all of the content properties are empty strings at the moment, this doesn't do much.
setContent: function(next, dir)
{
    if (dir == "left")
    {
        this.c0.innerHTML = this.slides[this.currentSlideIndex].content;
    }

    if (dir == "right")
    {

    }
},


Then  we set c0's background image to the bg property.
setContent: function(next, dir)
{
    if (dir == "left")
    {
        this.c0.innerHTML = this.slides[this.currentSlideIndex].content;
        this.c0.style.backgroundImage = "url(img/" + this.slides[this.currentSlideIndex].bg + ")";
    }

    if (dir == "right")
    {

    }
},


Do the same for c1, but the element pointed to in slides will be decided by next.
setContent: function(next, dir)
{
    if (dir == "left")
    {
        this.c0.innerHTML = this.slides[this.currentSlideIndex].content;
        this.c0.style.backgroundImage = "url(img/" + this.slides[this.currentSlideIndex].bg + ")";

        this.c1.innerHTML = this.slides[next].content;
        this.c1.style.backgroundImage = "url(img/" + this.slides[next].bg + ")";
    }

    if (dir == "right")
    {

    }
},


Ack, that's hideous. Let's clean this up a bit.


Style content to ensure that background covers the whole of the div and doesn't repeat.
.content
{
    width: 50%;
    height: 100%;
    float: left;
    background-color: #000044;
    background-size: cover;
    background-position: 50% 50%;
    background-repeat: no-repeat;   
}


Much, much better. Now you can clearly see that content0 has 00.jpg as its background, and content01 has 01.jpg.


Great! Now it's time we did the slide() method. Remember when you click the button, it calls the sliderButtonClick() method with "left" as an argument, which in turn calls slide() with "left" as an argument? We'll be handling that.

Declare variables nextSlide and nextMarginLeft. And add two If blocks - one for "left" and one for "right". Again, we will only handle the first case for now.
slide: function(dir)
{
    var nextSlide;
    var nextMarginLeft;

    if (dir == "left")
    {

    }

    if (dir == "right")
    {

    }
},


If we're sliding left, obviously nextSlide is the value of currentSlideIndex plus 1.
slide: function(dir)
{
    var nextSlide;
    var nextMarginLeft;

    if (dir == "left")
    {
        nextSlide = this.currentSlideIndex + 1;
    }

    if (dir == "right")
    {

    }
},


Now remember we have a finite amount of elements in slides. So if currentSlideIndex is already pointing to the last element of slides, nextSlide is 0.
slide: function(dir)
{
    var nextSlide;
    var nextMarginLeft;

    if (dir == "left")
    {
        if (this.currentSlideIndex == this.slides.length - 1)
        {
            nextSlide = 0;
        }
        else
        {
            nextSlide = this.currentSlideIndex + 1;
        }
    }

    if (dir == "right")
    {

    }
},


nextMarginLeft is -100. This is in percentages. So after this, we will set the left margin to -100%.
slide: function(dir)
{
    var nextSlide;
    var nextMarginLeft;

    if (dir == "left")
    {
        if (this.currentSlideIndex == this.slides.length - 1)
        {
            nextSlide = 0;
        }
        else
        {
            nextSlide = this.currentSlideIndex + 1
        }

        nextMarginLeft = -100;
    }

    if (dir == "right")
    {

    }
},


This is done by running the setMarginLeft() method and passing in currentMarginLeft as an argument. But before that, run the setContent() method, passing in nextSlide and dir as arguments.
slide: function(dir)
{
    var nextSlide;
    var nextMarginLeft;

    if (dir == "left")
    {
        if (this.currentSlideIndex == this.slides.length - 1)
        {
            nextSlide = 0;
        }
        else
        {
            nextSlide = this.currentSlideIndex + 1
        }

        nextMarginLeft = -100;
    }

    if (dir == "right")
    {

    }

    this.setContent(nextSlide, dir);

    this.setMargin(nextMarginLeft);
},


And after that,  set the currentSlideIndex property to nextSlide.
slide: function(dir)
{
    var nextSlide;
    var nextMarginLeft;

    if (dir == "left")
    {
        if (this.currentSlideIndex == this.slides.length - 1)
        {
            nextSlide = 0;
        }
        else
        {
            nextSlide = this.currentSlideIndex + 1
        }

        nextMarginLeft = -100;
    }

    if (dir == "right")
    {

    }

    this.setContent(nextSlide, dir);

    this.setMargin(nextMarginLeft);
    this.currentSlideIndex = nextSlide;
},


Time to create the setMargin() method. It has a parameter, margin. Basically, what it does is set contentContainer's left margin to margin %.
slide: function(dir)
{
    var nextSlide;
    var nextMarginLeft;

    if (dir == "left")
    {
        if (this.currentSlideIndex == this.slides.length - 1)
        {
            nextSlide = 0;
        }
        else
        {
            nextSlide = this.currentSlideIndex + 1;
        }

        nextMarginLeft = -100;
    }

    if (dir == "right")
    {

    }

    this.setContent(nextSlide, dir);

    this.setMargin(nextMarginLeft);
    this.currentSlideIndex = nextSlide;
},
setMargin: function(margin)
{
    this.contentContainer.style.marginLeft = margin + "%";
},
setContent: function(next, dir)
{
    if (dir == "left")
    {
        this.c0.innerHTML = this.slides[this.currentSlideIndex].content;
        this.c0.style.backgroundImage = "url(img/" + this.slides[this.currentSlideIndex].bg + ")";

        this.c1.innerHTML = this.slides[next].content;
        this.c1.style.backgroundImage = "url(img/" + this.slides[next].bg + ")";
    }

    if (dir == "right")
    {

    }
},


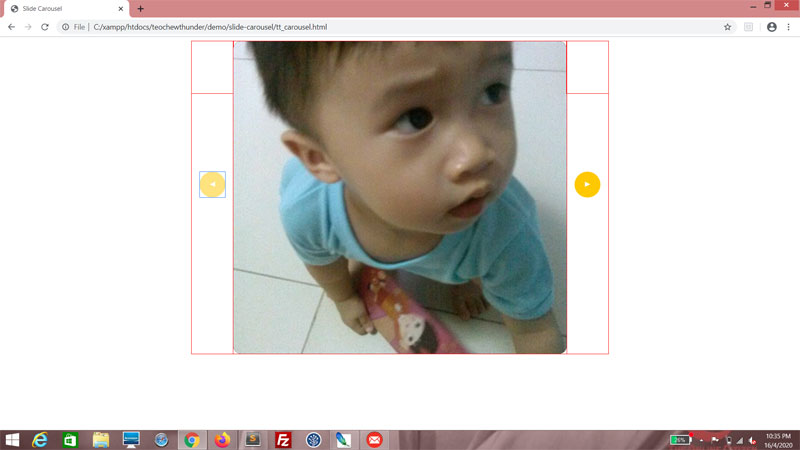
Click on the left button. You should see contentContainer shifts to the left!


Let's style viewport. Set the overflow property to hidden. While we're at it, give it round corners.
#viewport
{
    width: 80%;
    height: 100%;
    float: left;
    overflow: hidden;
    border-radius: 15px;
}


Now with only room for one content div at a time, you can click on the left button to your heart's content, and see all the pictures scroll!


Let's settle the "right" case now. Since it's sliding right, the next slide to come into view should be the previous slide.
slide: function(dir)
{
    var nextSlide;
    var nextMarginLeft;

    if (dir == "left")
    {
        if (this.currentSlideIndex == this.slides.length - 1)
        {
            nextSlide = 0;
        }
        else
        {
            nextSlide = this.currentSlideIndex + 1;
        }

        nextMarginLeft = -100;
    }

    if (dir == "right")
    {
        nextSlide = this.currentSlideIndex - 1;
    }

    this.setContent(nextSlide, dir);

    this.setMargin(nextMarginLeft);
    this.currentSlideIndex = nextSlide;
},


Unless, of course currentSlideIndex is already 0. In which case you set it to the index of the last element in slides.
slide: function(dir)
{
    var nextSlide;
    var nextMarginLeft;

    if (dir == "left")
    {
        if (this.currentSlideIndex == this.slides.length - 1)
        {
            nextSlide = 0;
        }
        else
        {
            nextSlide = this.currentSlideIndex + 1;
        }

        nextMarginLeft = -100;
    }

    if (dir == "right")
    {
        if (this.currentSlideIndex == 0)
        {
            nextSlide = this.slides.length - 1;
        }
        else
        {
            nextSlide = this.currentSlideIndex - 1;
        }   
    }

    this.setContent(nextSlide, dir);

    this.setMargin(nextMarginLeft);
    this.currentSlideIndex = nextSlide;
},


And then nextMarginLeft is set to 0.
slide: function(dir)
{
    var nextSlide;
    var nextMarginLeft;

    if (dir == "left")
    {
        if (this.currentSlideIndex == this.slides.length - 1)
        {
            nextSlide = 0;
        }
        else
        {
            nextSlide = this.currentSlideIndex + 1;
        }

        nextMarginLeft = -100;
    }

    if (dir == "right")
    {
        if (this.currentSlideIndex == 0)
        {
            nextSlide = this.slides.length - 1;
        }
        else
        {
            nextSlide = this.currentSlideIndex - 1;
        }   

        nextMarginLeft = 0;
    }

    this.setContent(nextSlide, dir);

    this.setMargin(nextMarginLeft);
    this.currentSlideIndex = nextSlide;
},


In the setContent() method, let's cater for "right". It's the same as for "left", but next and currentSlideIndex reverse positions.
setContent: function(next, dir)
{
    if (dir == "left")
    {
        this.c0.innerHTML = this.slides[this.currentSlideIndex].content;
        this.c0.style.backgroundImage = "url(img/" + this.slides[this.currentSlideIndex].bg + ")";

        this.c1.innerHTML = this.slides[next].content;
        this.c1.style.backgroundImage = "url(img/" + this.slides[next].bg + ")";
    }

    if (dir == "right")
    {
        this.c0.innerHTML = this.slides[next].content;
        this.c0.style.backgroundImage = "url(img/" + this.slides[next].bg + ")";

        this.c1.innerHTML = this.slides[this.currentSlideIndex].content;
        this.c1.style.backgroundImage = "url(img/" + this.slides[this.currentSlideIndex].bg + ")";
    }
},


Now if you click on the right button, you will see the sequence of images go from the slides with the highest to the lowest!

Next

You're probably wondering what the deal with having two content divs is, if we're only going to show one at a time anyway. Fret not, your questions will be answered right after this intermission.

Sunday 14 June 2020

Web Tutorial: The Slide Carousel (Part 1/3)

A few years ago in 2016, I walked you through the sheer awesomeness that was the mini-carousel.

I have good news for you. Things are about to get even more awesome. Not only do I have new variations on that theme, my style of coding has... evolved, since.

We're still going to make a carousel today, but this one will be a single slide one. You will be able to slide left and slide right, and if you do nothing, the carousel moves all on its own.

Ready? Let's do it.

Before we begin, I'm reusing the pictures of my nephew Paul. He's a lot bigger now, and an absolute nightmare to keep up with. Save these pictures in the img folder.

00.jpg

01.jpg

02.jpg

03.jpg

04.jpg


Here's the starting HTML. Note that in the CSS, I've set a few defaults, such as font size. All divs have a red outline.
<!DOCTYPE html>
<html>
    <head>
        <title>Slide Carousel</title>

        <style>
            div {outline: 1px solid #FF0000;}
           
            body
            {
                font-size: 12px;
                font-family: verdana;
            }
        </style>

        <script>

        </script>
    </head>

    <body>

    </body>
</html>


Add a div, and give it the id of carouselContainer.
<body>
    <div id="carouselContainer">

    </div>
</body>


Here, we are going to style carouselContainer, define its size and set its margin. The size should not be all that important for the purposes of getting the carousel to work, but I think a 800 by 600 display makes the pictures look good.
div {outline: 1px solid #FF0000;}

body
{
    font-size: 12px;
    font-family: verdana;
}

#carouselContainer
{
    width: 800px;
    height: 600px;
    margin: 0 auto 0 auto;
}


A good start!


It's time to make your viewport. Add this div into the carouselContainer div. The id shall be viewport.
<div id="carouselContainer">
    <div id="viewport">

    </div>
</div>


Style this div. It will take up 80% of its parent's width and all of its parent's height, and be floated left.
#carouselContainer
{
    width: 800px;
    height: 600px;
    margin: 0 auto 0 auto;
}

#viewport
{
    width: 80%;
    height: 100%;
    float: left;
}


See that smaller rectangle that now appears on inside the carouselContainer div? That's the viewport div.


Now let's add the margins. Add a div before the viewport div, and after. They will be styled using the margin CSS class.
<div id="carouselContainer">
    <div class="margin">

    </div>

    <div id="viewport">

    </div>

    <div class="margin">

    </div>
</div>


Here, let's write the margin CSS class. It will take up 10% of its parent's width, all of its height and float left. Added some font specification in there too.
#carouselContainer
{
    width: 800px;
    height: 600px;
    margin: 0 auto 0 auto;
}

.margin
{
    width: 10%;
    height: 100px;
    float: left;
    text-align: center;
    font-size: 5em;
}

#viewport
{
    width: 80%;
    height: 100%;
    float: left;
}


The margins each take up 10% width, and the viewport div takes up 80%. Altogether, they fill up the carouselContainer div nicely.


I'm going to deal with buttons next!

This one's pretty straightforward. I'm adding input buttons in each div that is styled using margin. One points left and one points right.
<div id="carouselContainer">
    <div class="margin">
        <input type="button" value="&#9668;"/>
    </div>

    <div id="viewport">

    </div>

    <div class="margin">
        <input type="button" value="&#9658;"/>
    </div>
</div>


Pretty basic.


Styling these buttons is really up to personal taste. So set whatever colors you want, and feel free to get fancy using the hover pseudoselector. This is pretty much a matter of aesthetics. Though I'd strongly recommended setting a top margin. In this case, I've given it 250 pixels.
.margin
{
    width: 10%;
    height: 100px;
    float: left;
    text-align: center;
    font-size: 5em;
}

.margin input[type="button"]
{
    color: rgba(0, 0, 0, 1);
    cursor: pointer;
    margin-top: 250px;
    width: 50px;
    height: 50px;
    border-radius: 50%;
    border: 0px solid red;
    background-color: rgba(255, 200, 0, 1);
    color: rgba(255, 255, 255, 1);
}

.margin input[type="button"]:hover
{
    background-color: rgba(255, 200, 0, 0.5);
}

#viewport
{
    width: 80%;
    height: 100%;
    float: left;
}


There you go. You'll notice that once you set the top margin, the heights of the containing divs collapse. Maybe one day we'll examine this phenomenon, but for now it really doesn't matter. We wanted the margin CSS class to take up horizontal space, and it's done so.


Now for the viewport...

Append a div within the viewport div, and give it an id of contentContainer.
<div id="carouselContainer">
    <div class="margin">
        <input type="button" value="&#9668;"/>
    </div>

    <div id="viewport">
        <div id="contentContainer">

        </div>
    </div>

    <div class="margin">
        <input type="button" value="&#9658;"/>
    </div>
</div>


Style it. It should take up twice its parent's width, and all of its height. Also, give it a soothing green background so we see what we're dealing with here.
#viewport
{
    width: 80%;
    height: 100%;
    float: left;
}

#contentContainer
{
    width: 200%;
    height: 100%;
    background-color: #004400;
}


You'll see that the div overflows its bounds. This is deliberate, because it's part of the setup.


Now, within the contentContainer div, create two divs with ids content0 and content1 respectively. The first one will be styled using the CSS class content.
<div id="viewport">
    <div id="contentContainer">
        <div id="content0" class="content"></div>
        <div id="content1"></div>
    </div>
</div>


Now style content. It will take up half of its parent's width (which will be 100% of viewport's width because contentContainer takes up twice as much width as viewport), all of its height and has a deep blue background for visualization. Make sure it floats left, too.
#contentContainer
{
    width: 200%;
    height: 100%;
    background-color: #004400;
}

.content
{
    width: 50%;
    height: 100%;
    float: left;
    background-color: #000044;
}


There, now you see half of contentContainer appears to be deep blue!


Now style content1 as well.
<div id="viewport">
    <div id="contentContainer">
        <div id="content0" class="content"></div>
        <div id="content1" class="content"></div>
    </div>
</div>


Now that both divs are styled, the whole of contentContainer appears deep blue.


Next

Preparing for some image switching.

Sunday 7 June 2020

App Review: Missing

A game for a cause, with screenshots that promised so much. What could go wrong? Well, dear readers, you're about to find out.


Missing is a mobile role-playing game by Missing Link Trust where the player assumes the role of one of the many girls who go missing in India every year. And, as ideas go, it's certainly not a bad one.


I first picked up Missing because it advertised itself as a game with a social conscience and the graphics seemed really good - both big pluses in my book. Would have been an even bigger plus if they had featured zombie slavers... nah, I'm kidding. Even zombies couldn't save this game.

The Premise

You play Ruby, a girl in India who has been abducted and forced to work in the sex trade. The story chronicles her day-to-day survival and eventual escape from her predicament.


It's a puzzle-based game with the puzzles built into the story, with a predominantly point-and-drag interface.

The Aesthetics

The game is full of nicely rendered spaces to walk in, depicting the squalor pretty well. The character portraits are actor photographs and they're quite apt most of the time - from the sleazy pimp Masi to the brutal enforcer Shonty. The amount of detail put into each environment is great.


The Experience

This is a nice story with good atmospheric effects. Even though I kind of knew that there was a happy ending in there (it would be way too depressing otherwise) I still wanted to see this game through to the end.

The Interface

Use your finger to drag around the screen, and Ruby will run where you direct her to.


The book in the bottom left is a journal for you to track your progress with, and the items in your inventory will be used at some point in the game.


During conversations with NPCs, you choose conversation options to advance the story and get information.

What I liked

The Logo. Look at that artful use of negative space for the second "I" in "MISSING".


Puzzles. The ones which advanced the story were pretty good. They weren't hard enough to be annoying, but not so easy that they insulted your intelligence. For the most part, it was just a matter of hiding from roaming enforcers.

In terms of aesthetics, the graphics are brilliantly painted and as far as prettiness goes, Missing is probably up there with the best.


The creators of the game did a great job with the story here. It is kind of short, but compelling simply because it's based on real situations. The sexual violence isn't too in-your-face and does just enough to bring its point across.

What I didn't

The font used in narration and conversations. Narrow and all-caps. Considering all the effort they took to make this game look so pretty, why did they choose such a hideous one?

Animation. The great pity about the gorgeous graphics is the silted animation, and sometimes very obvious visual glitches.


The Mini-game where Ruby has to earn money from men. It begins with a time limit, bargaining with a chosen target and closing the deal with a tasteful fade-to-black. Firstly, this mini-game is silly and repetitive. The goal is to earn enough money so that Masi will let Ruby off for the day and give her a chance to advance the storyline. Problem is, every time Ruby meets her quota for the day, Masi will up the quota. Maybe all this is meant to convey the hopelessness that Ruby finds herself in, but we're playing a game here. Being depressing is one thing, but this is pure drudgery.


No replay value. This happens with a lot of RPGs with linear storylines, but in this case, even the various dialog options don't offer anything that interesting on replay.


The final stage. Oh, the horror! It's an absolute pain in the arse to play and again. Maybe this is deliberate in order to convey the danger and frustration... but enough is enough. Look at the screenshots above, then imagine playing them in the dark. Literally, because that stage happens during a blackout.

Conclusion

This game's a mixed bag. The idea is good, but the execution is so dismal that I'm tempted to warn you off it. Still, it's not all bad. There are parts which are good... which unfortunately makes the bad parts stand out even more. This game is the perfect example of how good graphics aren't everything.

My Rating

5.5 / 10

You might want to consider missing this game...
T___T