Friday, 22 September 2023

Web Tutorial: Oracle APEX Mailing Registration Form (Part 2/4)

Let's get into it! In this part of the web tutorial, we will make a Registration Form which, upon completion, redirects to a Thank You page.

We earlier created a page called Registration, so open that. It's blank. We need to add a form to it. To do that, look at the three tabs at the bottom of your screen. You'll see Regions, Items and Buttons. When you click on Regions, you'll see a lot of options. The one we are interested in is Form. Click and drag it into the screen above and this is what you should see.


On the right panel, click on Source. You should select "Local Database". For Table Name, select "MAILING_LIST". Once you do that, fields will magically appear in your form, notably, all the columns in the MAILING_LIST table. They will be automatically named by concatenating "P" and the page number, followed by an underscore and the field name. You can change this, but it works fine for what I have in mind.


Let's add one more field. There is already a password field in the form, but we want to confirm it properly. Therefore, we will add another password field. Click on the Items tab at the bottom of the screen. There'll be a whole bunch of options, mostly form elements. Select the one labelled "password" and drag it onto your form. Name it "P2_CONFIRMPASSWORD".


We need to make sure that this item is required. On the right panel, you'll see Value Required under the Validation section. Make sure it's turned on.


We need to create a more specific back-end validation for this field. Right click on the field at the left panel. You should see an array of options come up. Select Create Validation.


Now over here your new validation should appear under the field P2_CONFIRMPASSWORD. On the right panel, give it a name. In the Validation section, the Type is "Expression" and you should select "SQL" as the Language. Make sure Always Execute is on. Also, set the Error Message.


In the box, type in the expression below. The server will evaluate this expression and only continue if it is true. Otherwise the error message will be displayed.
:P2_CONFIRMPASSWORD = :P2_PASSWORD


Now we'll work on the rest of the fields!

Start with P2_EMAIL. Do what we did before - create a validation.


As with the last time, give it a name, the Type is "Expression" and you should select "SQL" as the Language. Make sure Always Execute is on. Set the Error Message.


This is the expression. Since EMAIL is the Primary Key for the table MAILING_LIST, we want to ensure that the user does not try to enter an already existing email address.
upper(:P2_EMAIL) not in (SELECT upper(EMAIL) FROM MAILING_LIST)


Next we move on to P2_FIRST_NAME. It's a string and that value is required. Other than that, we probably don't need to do anything else. The field after that, P2_LAST_NAME is optional and we don't need to do anything there.


The next field is P2_DOB. It's a date. Under the Settings section on the right panel, you can see some options. Since we don't need the time of birth, disable Show Time. For Minimum Date, leave it as "None". However, we want to ensure that anyone using this form is at least 15 years of age, so for Maximum Date, set the value as "Static". The Maximum Static setting will come up, so just type in the value "-15y". For the rest of the settings, feel free to play around.


P2_GENDER is a string, so by default the system will give you a text field. We'll change this to a radio button by going to the right panel. Some of the very first options you will see are the Name, and the Type. Change that to "Radio Select".


You'll now see List of Values come up on the right panel. Click on it to add "M" and "F" to the values in the popup box. The interface should be fairly intuitive here.


P2_DAYS is a number. We want the user to select this from a drop-down list, so change the Type to "Select List".


As before, add the values in List of Values. Unlike P2_GENDER, you will want to create nice textual options instead of just giving the user a number and letting them figure out it represents the number of days between emails.


Now, for P2_PASSWORD. The Type on the right panel should already have been set to "Password", but no harm checking.


And after that, it's time to create the button. On the bottom, select the Buttons tag. Any one of the options should do, but the last one gives you the option to add a nice icon with the text. Drag it into your Form.


Name the button and define the label. If you want, select an icon. The action for the button should be "Submit Form".


Go to the third tab on the left panel. You should see the back-end validations we defined earlier. Right-click in the Processes section and select Create Process.


This is where we enter the SQL to save the record.


This is the SQL code. Note that for the PASSWORD field, we first encrypt it using a hash. It's not perfect but it's professionally it's the least one can do.

UPDATE MAILING_LIST SET FIRST_NAME = :P3_FIRST_NAME, LAST_NAME = :P3_LAST_NAME, DOB = :P3_DOB, GENDER = :P3_GENDER, DAYS = :P3_DAYS WHERE upper(EMAIL) = upper(:EMAIL)


Now right-click on Post-processing and Create a Branch.


This redirects to Page 10, which is the Thank You page. The settings are on the right panel.


Before we begin testing, make sure the Security section's Authentication setting for the Registration page is "Page is Public".


Let's test this! Click on the Run button, and a new browser tab should pop up. You should see this.


Click the REGISTER button, and all these notifications should pop up for all the fields that you have marked as Required.


If you try again with "xxx" in the email address, they'll have a different validation message.


If you try to enter a date which is too recent, a different error message comes up as well.


You can try adding valid values for these fields and the error messages will disappear. Now try entering a different password for PASSWORD and CONFIRM PASSWORD...


Now back to the app. We want to work on Page 10, which is the Thank You page. Click on the bottom tabs and select Regions. We want the Static Content item. Drag it into the page.


Name the section. Add the HTML in the Source section.


This is the HTML. Yes, we want the user to begin receiving email the very next day. That will be covered some other day.
<h1>Your registration is complete</h1>
Thank you for registering. You should receive your first self-affirmation the next day!


Add a button. It's the LOGIN button.


This button will redirect to Page 1, which is the Login page. After the user has successfully registered, they should be able to do so.
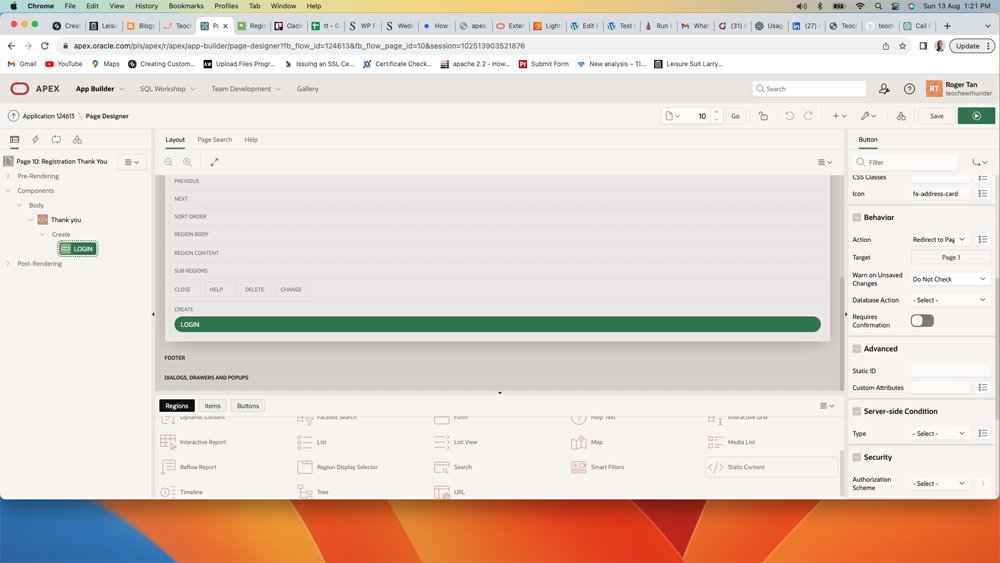

Save the page. Now let's try registering again, this time with valid values.


This is what you should see.


When you view the table, you should see the data has gone in! Note that PASSWORD has been hashed, and LAST_SENT is set to the default of "01-01-1970".


If you try registration with the same email address, this error message should come up.


Next

We're done with the Registration portion. Now that we have data, we will look into updating.

Tuesday, 19 September 2023

Web Tutorial: Oracle APEX Mailing Registration Form (Part 1/4)

Normally, when I begin a web tutorial, I say something like "let's write some code!". Well, today, let's not write some code.

Oracle APEX is a low-code app development platform. My aim today is to create a basic Registration app for a mailing list using this platform. Why? For shits and giggles, I guess. I have no really good reason. In fact, why do I need any reason at all?

With that in mind, you will need to register for an Oracle APEX workspace and log in. Please note that while all these screenshots were taken on Chrome, it was done on my Macbook. It shouldn't make a difference if you use Windows.

Well then, let's jump right in! The features we will use today are mostly found in the first two menu items at the top - App Builder and SQL Workshop.


Click on App Builder. It will bring you to this window where you will click on Create An Application. Pretty intuitive so far, yeah? Don't worry about the rest. We won't be needing it.

Here, enter a name for your application. Ignore everything else and just click on Create Application.

And here, you just created your first app! Click on it...

...and it'll take you to a place where all these pages have been pregenerated for you. Delete as many of them as you can. The only one you might not be able to delete is Page 9999, which is User Login. Oracle APEX is dead set on you having that page whether you use it or not, for reasons I won't go into.

Let's make some pages! Hit the Create Page button and this window will pop-up. There are tons of interesting options, but we are going to go with the basic one, which is the very first one.

Toggle Use Navigation and Use Breadcrumb to Off. We won't be needing those. We'll make our own Login page, which is page id 1. Click on Create Page.

Repeat the process until you have all these pages. Here's a list of pages I created, which we will be working on.
Login (id 1) - A login page for users to enter the app.
Registration (id 2) - A form for users to add themselves to your database.
Update (id 3) - A form for users to update their particulars.
Interests (id 4) - For users to view their Interests and delete them.
Descriptions (id 5) - For users to view their Descriptions and delete them.
Interest (id 6) - For users to add a new Interest.
Description (id 7) - For users to add a new Description.
Update Password  (id 8) - A form for users to update their password.
Logout (id 9) - A page that logs the users out.
Registration Thank You (id 10) - A page that shows a thank you message after registration.


It's time to work on the database. Oracle APEX comes with this nice database management feature. Click on SQL Workshop, the second item in the top menu. You will see these two tables, MAILING_LIST and MAILING_LIST_TERMS, after the next few steps.

From the previous screen, click on Object Browser. This will lead you to this page where the amount of functionality in the left menu is staggering. We will only use the Table function, which is the default page and first option.

On the right panel, click on Table. this will bring up a dialogue where you enter the name of your table. Set Semantics as "Default", and enter whatever you like for Comments.

Here, you can start creating columns for your table. There's a whole bunch of options here, and if you're not new to databases, this should be fairly intuitive.

Now you can go through this process, or you can try another route. Click Cancel, and go back to the main screen. Here, select SQL Commands.

In this screen, you can simply enter in a command to create your tables, and click Run Command. At the end of it, you should have the tables MAILING_LIST and MAILING_LIST_TERMS.

Here's the command for creating MAILING_LIST. The fields are as follows:
EMAIL - This is a string which is the Primary Key for the table. It is used to contact the user.
FIRST_NAME - This string is descriptive, used to address the user.
LAST_NAME - This string is descriptive and optional,
DOB - This is a date field, used to determine the user's age and other information such as Zodiac sign.
GENDER - This is a single character, either "M" or "F".
DAYS - An integer which specifies the number of days between emails.
LAST_SENT - This is a date field whose value tracks when the user was last contacted. Default value is "01-01-1970".
CREATE TABLE "MAILING_LIST" ( "EMAIL" VARCHAR2(100) NOT NULL ENABLE, "FIRST_NAME" VARCHAR2(50) NOT NULL ENABLE, "LAST_NAME" VARCHAR2(50), "DOB" DATE, "GENDER" CHAR(1) NOT NULL ENABLE, "DAYS" NUMBER NOT NULL ENABLE, "PASSWORD" VARCHAR2(100) NOT NULL ENABLE, "LAST_SENT" DATE DEFAULT '01-01-1970' NOT NULL ENABLE, CONSTRAINT "MAILING_LIST_PK" PRIMARY KEY ("EMAIL") USING INDEX ENABLE ) ;


Here's the command for creating MAILING_LIST_TERMS. The fields are as follows:
EMAIL - This string is a Foreign Key to the MAILING_LIST table.
TYPE - This is a string with two possible values - "INTERESTS" or "DESCRIPTIONS".
TERM - This is a non-empty string.
The combination of EMAIL, TYPE and TERM must be unique.

CREATE TABLE "MAILING_LIST_TERMS" ( "EMAIL" VARCHAR2(100 CHAR) NOT NULL ENABLE, "TYPE" VARCHAR2(100 CHAR) NOT NULL ENABLE, "TERM" VARCHAR2(100 CHAR) NOT NULL ENABLE, CONSTRAINT "MAILING_LIST_INTERESTS_PK" PRIMARY KEY ("EMAIL", "TYPE", "TERM") USING INDEX ENABLE ) ;

ALTER TABLE "MAILING_LIST_TERMS" ADD FOREIGN KEY ("EMAIL") REFERENCES "MAILING_LIST" ("EMAIL") ENABLE;


This is just setup so far. We've not done anything terribly exciting yet, but never fear, we're getting to it!

Next

The Registration Process

Thursday, 14 September 2023

Ten Awesome Tech Tattoos

Tattoos are a common sight in society these days. I recently saw a nice tattoo on some random middle-aged housewives, and then it hit me: it's not that housewives are suddenly finding it hip to ink their bodies. It's more like these were the rebellious teenagers from a couple decades back, now all grown up and shit. Heck, I'm no spring chicken. But that's neither here nor there.

Tech tattoos, on the other hand, should really occupy their own niche. The ones I managed to find in cyberspace are clever, quirky and just awesome.

1. Stay Hungry, Stay Foolish

We begin with a nice nod to the late great Steve Jobs. This is one of his more well-known quotes.

From IJustWanaShine.

Now I'm not a big fan and this isn't anything I would ever do. But come on, this is classy. And inspirational, to boot.

2. HTML Code

For all web devs out there, this is not just HTML code, it's a clever pun!

From Lambatest


It would actually take someone in the know to appreciate that joke; however, it's relatively easy to implement. Again, not one of those things I would totally do, but I appreciate the intent.

3. Linux Command

For those familiar with Linux, this line basically means "recursively delete all files and directories without asking for confirmation". In other words, remove everything without regret.

From louiseann93

The sentiment behind simplifying your life is one I can get behind. The fact that this dude has it inked into his forearm gave me pause. Is he saying he can remove your life with one punch?

4. Binary

This guy has his name "MIKE" tattooed in binary.


From TattooViewer

Not a bad idea, but if you had a seriously long ass name, that might present a problem.

5. 404

Nothing to see here, move along. That's the message I got.

From Pinterest

The woman in question has it on her bosom. It could be her way of saying "my eyes are up here", but it might just send a cheekier message. Like, "titsheart not found".

6. More Binary!

Ooh! Now this one is nice. Not only is it binary, it's taking the shape of one of my favorite childhood memories!

From Tattoodo

Plus, it's in monochrome. I love tats like that.

7. Paper Clip

This is another memory, albeit not quite so fond.

From
JavaScript in Plain English

If anyone ever had the misfortune of using Microsoft Word when it was featuring this annoying little mascot, they'd know what I'm talking about. It's a nice idea, but I can't see myself wanting this fella be a permanent part of me.

8. Docker

Now this is dedication. Is it a DevOps thing to ink the whale icon of Docker in their skin? That's amusing.

From Twitter

Then again, I have Liverpool FC's motto inked into my knuckles, so who am I to talk?

9. WiFi

I appreciate anyone who has the WiFi icon tattooed on them. Not that they can actually provide WiFi, but they can at least relate to its importance.

From Tattoodo

This fella has it on his middle finger. I can just imagine someone asking him for WiFi, and his response...


10. IBM

Again, dedication. This time, to a tech company. Honestly, I'm not totally behind this one. Unless you own the company in question, this just seems superfluous to me. Companies are where you work and get paid, and after you're gone from there, you're gone.

From Flickr

In addition, if I had to pick an IBM tattoo, I would not have gone for this one. I would have gone for the far cleverer rebus option. An eye, a bee and an M.

Conclusion

There you go, folks! Ten cool (and some not that cool but nevertheless thought-provoking) tech tattoos. Any strike your fancy?

I ink, therefore I am,
T___T